
No Reviews
You must be logged in to post a review.
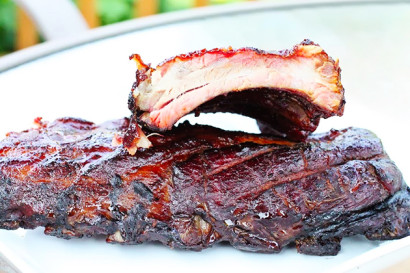
Smoked barbecue ribs that are so simple, my kids made them. I’ll admit these were some of the best I’ve had as well.
Start by preparing your ribs (wash, trim, remove silver skin). Once prepared, add all of your spices to a mixing bowl, and mix until everything is well incorporated.
Generously season both sides of the ribs, then place in a plastic, sealable bag and place in the refrigerator to marinate overnight.
When you are ready to get the smoker started, heat your charcoal. I use a drum smoker, and it has worked just fine for me over the years. I heat a chimney full of regular charcoal, cooking until they are nice and white hot. Dump these into the bottom of the smoker, and spread around. I add a bit more charcoal on the top. Add the drum portion of the smoker, then add the ribs to the grates. Cover.
Take one handful of the cherry wood chips, about 1 cup, and add them to the coals. Make sure all doors and covers are closed, then walk away. The smoke will begin to build, and slowly begin smoking the ribs.
After about 2 hours, flip the ribs over, and add the remaining soaked wood chips to the charcoal. Cover, and walk away.
After about 2 more hours, remove them from the smoker and onto a large casserole dish. Cover tightly with aluminum foil.
Note: I let these sit out on the stove, covered, until the were cool enough to place in the refrigerator. Yes, we waited until the next day to make them as we had prior engagements with family. Feel free to place these in a 275ºF oven for another 2 hours, before saucing.
The following afternoon, we placed them in a 275ºF oven for about 2 hours. Then we removed the aluminum foil, and the boys each picked their favorite sauce. I told them they could use as much sauce or as little when painting their ribs. You could tell that they were thinking it through. Let me just say the ribs looked and smelled amazing. We were all excited. After saucing, we raised the heat to 325ºF, and placed back in the oven for 10 minutes, uncovered.
We flipped the ribs over, sauced one more time, then back in the oven for another 10 minutes.
Each kid got their own serving plate, and as soon as we sliced through the ribs, let me just say, wow. I was a proud dad, I really was. Not just because these looked and smelled great, but the boys were really excited as well. You could tell that they were proud of themselves. After we feasted, I had my son ride a few ribs up to the neighbor, who actually talked about how great they were today. That’s always a good sign. I hope you enjoy.
Prep: Cook:
Serves: 1 Level: Easy
Prep: Cook:
Serves: 10 Level: Easy
Prep: Cook:
Serves: 8 Level: Easy
Prep: Cook:
Serves: 8 Level: Easy
Prep: Cook:
Serves: 6 Level: Easy


One Comment
Leave a Comment
You must be logged in to post a comment.
patiodaddio on 7.30.2013
Those look great, Dax!