


No Reviews
You must be logged in to post a review.
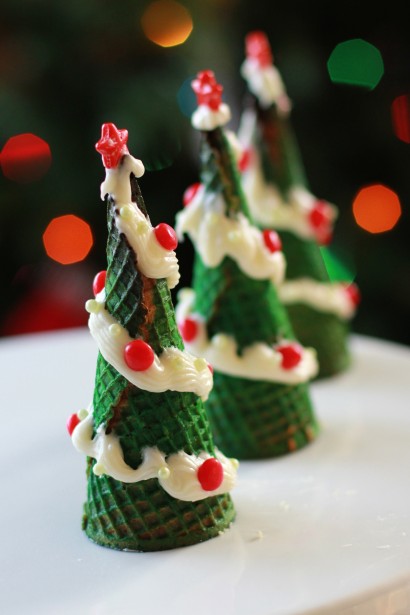
Fun and easy recipe to make with the kids! These Christmas Tree Cones are sure to bring the cheer to your holiday festivities.
1. Begin by spraying the cones with green edible spray dye to totally cover them. Before you do this, make sure that you fully cover your work surface with wax paper. Let cones dry on the wax paper.
2. Next make your favorite cupcake batter (you can use a box mix or your favorite recipe that makes approximately 24 cupcakes). Drop a nut down into the cone to stop the batter from dripping out of the tip. Then fill your cones about 3/4 of the way full with the cupcake batter. Now you’ll have to make this little contraption in order to ensure that your cones stay upright while they bake them. You’ll need to buy some disposable cupcake pans. Snip holes in the bottom of each cupcake slot. Make the hole large enough so that the cones sit about half way down into the pan making sure they are secure and won’t flop over. * Check out the related link to my blog to see step by step photos of this process.
3. You’ll bake the cupcake cones at the temperature and time that your cupcake recipe recommends. You can check to see if they are done by inserting a toothpick into the middle and making sure the pick comes out clean. Remove from oven and let cool. Once cool, trim down the part of the cupcake that bubbled past the top of the cone. That way, the cone will sit flat on the serving plate.
4. Now it’s time to decorate!! You can make your own frosting or you can use store bought. Put it in a piping bag and pipe some garland on your tree (see photo). Add a candy star for the top and add red hots and sugar pearls for ornaments. You can use any type of candy for decoration, you can be as creative as you want! After you admire your work, you can eat them which is the best part!!
Prep: Cook:
Serves: 10 Level: Easy
Prep: Cook:
Serves: 8 Level: Easy
Prep: Cook:
Serves: 6 Level: Easy
Prep: Cook:
Serves: 10 Level: Easy

Prep: Cook:
Serves: 10 Level: Intermediate


One Comment
Leave a Comment
You must be logged in to post a comment.
Nanci (TK) on 12.15.2011
Too cute! We need a bit of help. Would you go into the ingredients list and for all of the packaged items (cans of dye, bags of candies, tub of frosting, size of cupcake mix) please add in the specific size (in ounces) of the package? We’ve got a lot of members overseas, in places where packaging varies, so we always ask that you include package sizes on all recipe submittals. We appreciate your help.
For the cupcake recipe, if you’d specify what size ‘batch’ of batter folks need (or if an 18 ounce box mix – plus additional required ingredients specified in the box will work, just add that into that line of the ingredients list). And for the frosting, what size ‘batch’ do you recommend – or will a 16 ounce tub of store bought work? If you’d add this additional info into the ingredients list, that will help folks out!
When done, click ‘make recipe visible’ and ‘save’ and we’ll get this posted.
Thanks,
TKNanci