


No Reviews
You must be logged in to post a review.
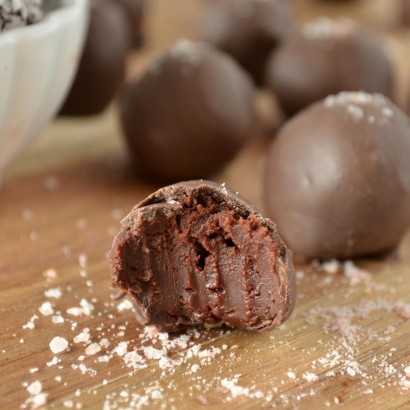
If you’ve ever been frustrated by hard, grainy homemade truffles, don’t give up yet! These truffles come out rich and silky every time.
Spray an 8-inch square baking dish with cooking spray. Line it with 2 sheets of parchment paper, running perpendicular to each other to form a cross. Make sure the ends of the paper hang over the ends of the pan. Spray the parchment paper with cooking spray.
Put the chocolate in a heat-proof dish. Microwave it until melted and no chunks remain, stopping to stir every 30 seconds. Set aside.
Microwave cream (separately) until warm to the touch, 30-45 seconds. Stir corn syrup, vanilla, and salt into the hot cream. Pour mixture over the chocolate. Cover with plastic wrap and allow to sit for 3 minutes, then stir (with a spoon, not a whisk!) until thoroughly combined. Stir in butter, one piece at a time, until thoroughly incorporated.
Spread the chocolate mixture into the prepared baking dish. Allow it to sit (uncovered) at room temperature for 2 hours. Then cover and transfer to the fridge to cool for at least another 2 hours, or up to overnight. (I did overnight.)
After truffles have cooled for the allotted amount of time, remove from the refrigerator. Using the parchment paper as a handle, pull the layer of chocolate out of the baking dish. Run a sharp knife under hot water, and cut the square of chocolate into 64 squares (8 rows by 8 rows). Coat your palms lightly in cocoa powder and roll each square into a ball. You may find that about halfway through, the chocolate is too warm to roll into balls. In this case, refrigerate the remaining squares for 5-10 minutes, then continue.
Now you are ready to coat the truffles. If coating in sprinkles, nuts, cocoa powder, etc. instead of melted chocolate, simply roll each truffle in your hands for a few seconds to warm it and make the outside stickier, then roll in the desired coating.
If coating in chocolate bark, put the chocolate into a heat-safe bowl. Microwave chocolate bark in 30-second increments, stirring in between, until melted. Roll each truffle around in the chocolate bark, using a fork, until thoroughly coated. Set on a plate or baking sheet and sprinkle with a pinch of sea salt.
Drag a toothpick around the bottom of the truffle to cut off the chocolate “foot” that might develop as some of the chocolate coating slides down the truffle. This will make that easy to break off, leaving you with round truffles, rather than round truffles sitting in pools of hardened chocolate. Chocolate bark should harden within several minutes, at which point you should definitely sample one, and then return the rest to the refrigerator for another 2 hours.
These truffles are best stored in an airtight container in the refrigerator. Allow to sit at room temperature for 5 minutes or so before serving.
Enjoy! Makes 64 small truffles.
Adapted from Cook’s Illustrated.
See related blog link for step-by-step photos.

Prep: Cook:
Serves: 12 Level: Easy
Prep: Cook:
Serves: 32 Level: Easy

Prep: Cook:
Serves: 10 Level: Intermediate
Prep: Cook:
Serves: 12 Level: Easy
Prep: Cook:
Serves: 24 Level: Easy


No Comments
Leave a Comment!
You must be logged in to post a comment.