No Reviews
You must be logged in to post a review.

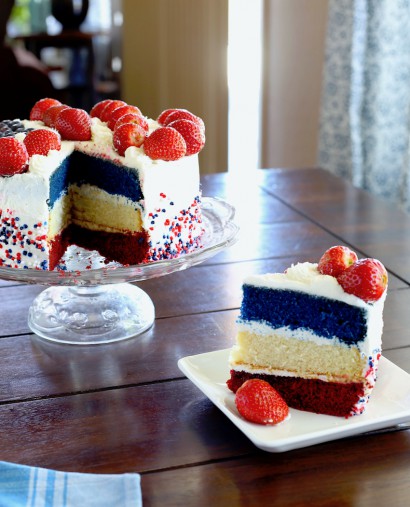
What better way to say Happy Birthday America than with a flag themed cake?
For the red velvet cake (adapted From Live Well Bake Often):
Preheat oven to 350°F. Lightly grease and flour two 9-inch round cake pans.
In a large bowl, sift cake flour, cocoa powder and baking soda.
In the bowl of a stand mixer, cream butter, sugar, eggs, oil, red food color, vanilla extract, and vinegar. With the mixer running on low, slowly add dry ingredients in three additions, alternating with the buttermilk, starting and ending with the dry ingredients. Make sure to mix each addition until just combined.
Distribute batter between prepared cake pans. Bake at 350°F for 28–30 minutes or until a toothpick inserted into the center of the cakes comes out clean. Place cakes while in their pans, on wire racks to cool for 10 minutes.
Remove the cakes from the cake pans and invert onto the racks directly to cool.
For the vanilla cake (adapted From Joy Of Baking):
Preheat oven to 350°F. Lightly grease and flour two 9-inch round cake pans.
In a large bowl, sift flour, baking powder, salt.
In mixer, cream sugar, eggs, lemon zest, and vanilla extract until smooth.
Stir together milk and oil. With mixer running on low, add the dry ingredients to the batter in three additions alternating with the milk mixture, starting and ending with the dry. Mix until just combined.
Distribute batter between pans. Bake for 25–30 minutes until toothpick inserted comes out clean.
Place cakes while in their pans, on wire racks to cool for 10 minutes. Remove the cakes from the cake pans and invert onto the racks directly to cool.
For the blue velvet cake (adapted From Food Network):
Preheat oven to 350ºF. Lightly grease and flour two 9-inch round cake pans.
In a large bowl, sift flour, cocoa, baking soda and salt.
In the bowl of a stand mixer (or handheld mixer), cream oil, sugar, coconut sugar, food coloring, vanilla, vinegar and eggs. With the mixer running on low, add dry ingredients to the batter in three additions alternating with the buttermilk, starting and ending with the dry. Mix until just combined.
Distribute batter between prepared cake pans. Bake 28–30 minutes or until cakes have pulled away from sides and toothpick inserted in center of cakes is clean.
Place cakes while in their pans, on wire racks to cool for 10 minutes. Remove the cakes from the cake pans and invert onto the racks directly to cool.
For the cream cheese frosting:
Beat cream cheese and butter until smooth. Add sugar and vanilla until frosting is light and fluffy. Beat in heavy cream until well combined.
For the whipped cream frosting:
Beat heavy cream until until it starts to become thick. Slowly add powdered sugar and continue beating until stiff peaks form.
To assemble, stack cakes with red cake at the bottom, white in the middle, blue on top. Fill and frost between the cakes between with cream cheese frosting. Ice the entire cake with sweetened whipped cream.
Decorate with berries or fruit of choice.
Notes:
• Eggs, butter, milk and buttermilk should be at room temperature.
• No buttermilk? No worrie. Combine 4-5 tablespoons of regular milk in enough plain yoghurt to equal the amount required in the ingredients.
• It is beneficial to line the bottom of your cake pan with parchment. Just trace out a parchment circle using the cake tin as your guide and place it in after the pan is greased and floured. Be sure to remove it before you frost.
• Tap the pans on the counter 2-3 times before batter goes into the oven to remove any air bubbles.
• If you are baking all the cakes in succession, then one preheat is fine and the oven will remain on throughout your baking. That being said, you can space out baking the all the ayers. Cakes can be made several days in advance, sealed with wrap and stored in the freezer.
• When whipping heavy cream, chill bowl and blade (s) in freezer for 5–10 minutes prior to beating.
• Each recipe yields 2 cakes, which in my household is not a problem. Desserts are dietary requirements here, so I freeze the extras, including any shaved off remnants, in lots of plastic wrap for later use.
No Comments
Leave a Comment!
You must be logged in to post a comment.