

No Reviews
You must be logged in to post a review.
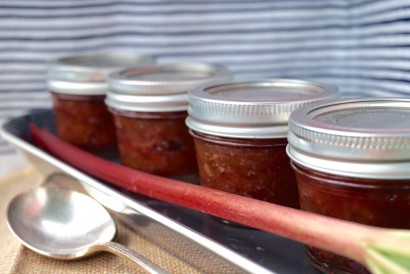
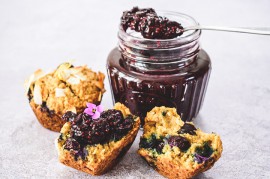
A perfect jam to spread on your morning scone!
You will also need six 4-ounce size canning jars with lids and rings.
Place rhubarb in a bowl. Add sugar, lemon juice, lemon zest, grated ginger and chopped crystallized ginger. Stir mixture. Cover and let it sit at room temp for about 2 hours until the sugar starts to dissolve and the rhubarb has released its juices. Stir occasionally to help the process. If you have time, you could let this mixture sit in the fridge for a few days which helps break down the fruit, but this works just as well.
While you’re waiting for the rhubarb mixture, do 2 things. Place a few small spoons in the freezer to use as a jam tester later on in the process. And sterilize your jars according to safe canning practices (see related blog link for details).
Once your rhubarb is ready, scoop the sugar, juice and fruit into a large pot with high sides (or a jam pan if you have one). Bring to a boil over medium-high heat. Once it starts to bubble and get a little foamy you’ve entered into Phase 1 of the jam cooking process. Stir the mixture to make sure nothing is sticking. Skim off any foam that forms during the process.
As you enter the second phase of cooking the liquid will start to really reduce. Stir occasionally to prevent sticking. If you notice it’s starting to stick, turn down the heat very slightly.
As the third phase starts you’ll notice the bubbles are more concentrated in wells and come out from the side of the pan. It will still have some liquid when it’s close to being done and will firm up once cooled. The whole cooking process should take about 15-20 minutes.
To test for doneness, turn off the heat and dip one of your freezer spoons into the jam. Put it back in the freezer and wait a few minutes. Take the spoon out and if the consistency is like syrup, you need to cook it a few minutes more. Test it again after a few minutes. The jam should move very slowly down the spoon when done and should have a jammy consistency.
To store your jam you have a couple options. The least complex option is what I favor.
Take your clean jars and remove the lids. Put the glass sections on a jelly roll pan and bake them for about 10 minutes at 350 F. This sterilizes them and prevents them from breaking when you pour hot jam in them!
When filling the jars, leave at least 1″ of space between the top of the jam and the lid. That air will create the suction to seal the jars as the jam cools and allow for expansion if you’re freezing it. After filling the jars, make sure the rims are clean. Screw on the tops. As the jelly cools to room temp the jars will seal themselves.
I like to keep my jars in the back of the refrigerator where it’s the coldest. The jam should last for about a month.
The other option is to freeze it which will make it good for about a year.
The Ball company has instruction on preserving all types of foods on their website. It’s quite helpful.
Prep: Cook:
Serves: 10 Level: Easy
Prep: Cook:
Serves: 4 Level: Easy
Prep: Cook:
Serves: 16 Level: Easy
Prep: Cook:
Serves: 12 Level: Easy
Prep: Cook:
Serves: 16 Level: Easy


No Comments
Leave a Comment!
You must be logged in to post a comment.