
No Reviews
You must be logged in to post a review.
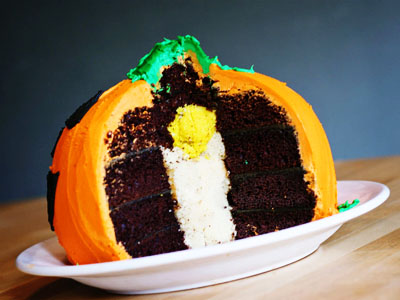
This cake is not for the faint of heart, but it’s SO much fun to share! You have GOT to click the link to see the rest of the cake!
For White Cake:
Mix white cake cake mix, vanilla pudding, 4 eggs, sour cream, milk, and oil for two minutes on medium speed. Pour into a cupcake pan and bake at 350 degrees for 25 to 35 minutes. Be sure to check at 15 minutes.
For Devils Food Cake:
Mix devil’s food cake mix, chocolate pudding, 8 eggs, sour cream, milk, and oil for two minutes on medium speed. Pour into 4 prepared 8- or 9-inch cake rounds. Bake at 350 degrees for 30 to 35 minutes. Be sure to check at 25 minutes.
For Frosting:
Cream together butter and cream cheese. Add vanilla and incorporate. Slowly add in powdered sugar until fully combined.
After cake and cupcakes have cooled, put them into the freezer for AT LEAST one hour.
To assemble the cake:
Level each layer of the cake so it is flat.
You are going to be cutting out the center of the chocolate cakes. If you have a round cookie cutter, that works well. If not, get a glass with a width smaller than the base of your cupcake. (Keep one of the cutouts for your ‘stem.’)
Cut through THREE layers of the chocolate cake. You can place them on top of each other to make sure they line up and then cut. Or you can cut each layer individually then place them on top of each other and trim.
For the fourth chocolate cake, I cut a much smaller circle, as I wanted to ‘squish’ in the yellow cake. I shaved the yellow cupcake into a rough diamond shape, to resemble a flame.
Cut three white cupcakes so that they are symmetrical. You can just shave off the sides with a sharp knife. If your cupcakes have been in the freezer, this works MUCH better. You want them to be round, like the wick of a candle.
Place one chocolate layer down, add some chocolate frosting as glue, and continue with two of the remaining layers until you have three layers stacked. Reserve the layer with the smaller hole.
Now, get your white cupcakes and push them down into the center hole. You will most likely have a little white cupcake sticking above the top layer of chocolate cake; just take your knife and trim it off.
Now take the fourth chocolate layer, with the much smaller whole cut out, and place it in on top of the assembled cake. (Make sure there is a layer of frosting in there.) ‘Stuff’ in the yellow cupcake. You want the chocolate to ‘fill in’ around the cupcake so you can see the diamond shape of the ‘flame’.
Now throw that bad boy in the freezer and let him chill out for at LEAST on hour.
Get your cake out of the freezer, and start trimming away. You want to make a round shape, like a pumpkin, so cut away the bottom edge, the part that is touching the plate. You also want to go around the top and trim away that sharp corner. Very soon, you will start to see a pumpkin shape forming.
Go ahead and put down a dollop of frosting where you want your stem to be. You can make it as high as you would like, just be sure to use frosting in between each layer.
Once you are happy with your shape, you can begin frosting it!
Put about 3/4 of the frosting into a bowl and add orange food coloring. This can be as little as two drops or as much a 12, depending on how orange you want it.
Once combined, take a knife and start spreading the frosting over the cake.
I do a crumb coat, which means I do one layer of frosting to seal in all the crumbs, then put the cake into the freezer for an hour.
After the crumb coat, I finish putting on all of the frosting and try to smooth it out a bit. With this cake specifically, you can smooth it out running the flat side of your knife up and down, since that is kind of how pumpkins are.
Now you can add the brown or green to the stem, using a small amount of frosting colored appropriately. You can either try and smooth it out or you can put frosting in a Ziploc bag, cut off the corner, and just pipe around the stem to cover it. Either way looks good!
To the remaining frosting, add some black food coloring, and outline the jack-o-lantern face.
Fill it in if you want. Sometimes the outline looks good, too!
I apologize for these somewhat wordy instructions. If you see anything or think of anything that needs correction, please, just let me know so I can fix it!
And of course, if you have questions along the way, please feel free to email me anytime!
Prep: Cook:
Serves: 12 Level: Intermediate
Prep: Cook:
Serves: 12 Level: Easy
Prep: Cook:
Serves: 16 Level: Easy
Prep: Cook:
Serves: 32 Level: Easy
Prep: Cook:
Serves: 16 Level: Easy


8 Comments
Leave a Comment
You must be logged in to post a comment.
Marjorie Dougherty on 10.20.2015
This cake is awesome can’t wait to make. You have great idea. Thanks for sharing.
txtorrie on 11.1.2009
Good idea. Instructions are a bit to complex to follow along but it looks pretty!
nickjuly on 10.31.2009
Thats so cute!
Renee on 10.31.2009
Amanda – you are an amazing baker!! Super cute!
mandaKay on 10.26.2009
This is awesome Amanda! Great pumpkin cake – thanks for sharing!