The Pioneer Woman Tasty Kitchen
Profile Photo

Artisan Bread Awesomeness

4.97 Mitt(s) 29 Rating(s)29 votes, average: 4.97 out of 529 votes, average: 4.97 out of 529 votes, average: 4.97 out of 529 votes, average: 4.97 out of 529 votes, average: 4.97 out of 5

Prep:

Cook:

Level: Easy

System:

2
x

Print Options

Page size Letter 3x5 4x6
Text Size Small Medium Large
Content Include description
Include prep time, etc.
Show image

Description

I spent last winter teaching myself to bake (good) bread. You know the drill, proofing yeast, raising, kneading, raising — yada yada yada. Then my neighbor stopped by with the PERFECT baguette. . . one that called just four ingredients, could be left to its own devices for 12-18 hours and required no kneading. Game over.

Ingredients

  • 3 cups All-purpose Or Bread Flour, With A Little Extra For Dusting
  • ¼ teaspoons Instant Yeast
  • 1-½ teaspoon Salt (Note: I Started Out Using Plain Ole Table Salt But Find You Get A Much More Robust Flavor With Kosher Or Sea Salt)
  • 1-¾ cup Water, Room Temperature

Preparation

In a large bowl, mix flour, yeast and salt together. Add water and stir till more or less blended. The dough will be thick and shaggy. Think Creature from the Black Lagoon.

Cover bowl tightly with plastic wrap. Let dough rest at room temperature for at least 12 hours, but to 18 or 20 hours. Seriously.

The dough is ready when it is swollen and bubbly all over the top. Think lunar surface.

Spread 1/4 to 1/3 cup of additional flour on a smooth work surface. Dump the dough onto the floured surface. Have a scraper handy because it’s pretty gooey and will stick to the bowl.

Sprinkle the top of the dough with a little more flour. Using a bench scraper or spatula, lift up one side of the dough, give it a good stretch skyward and fold it over the rest of dough. Repeat this process 2-3 times trying not to deflate the dough too much.

Flour up you hands and get ready to shape the dough in loaves or rolls on the floury surface. For rolls, divide the dough in half, halve again, and divide each quarter into thirds. For loaves, divide dough in half and create rounded or oblong free-form shapes. Work as gently as possible so as not to deflate dough very much.

Place these little gems on a cookie sheet lined with parchment paper. Dust loaves/rolls with flour and cover with plastic wrap.

Let rise for 30 minutes while you pre-heat your oven to 475 degrees (F). The oven does need to be good and hot.

A few minutes before it’s time to put the bread in the oven, put a pie pan filled with 1/2 – 1 inches of water on the bottom rack. This creates steam — a “turbo boost” for the bread and creates a great crust.

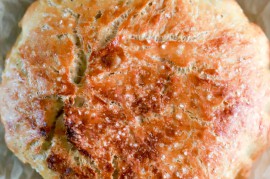
Bake bread on middle rack till it’s a fine, nutty brown — about 15 minutes for rolls and about 20 minutes for loaves. Bottoms of your bread should be browned as well.

Cool on a rack, and as tempting as it may be to tear into your bread while warm, it’s actually way better once it cools. You have been warned.

18 Comments

You must be logged in to post a comment.

Profile photo of QueenOfHerKitchen

QueenOfHerKitchen on 12.8.2013

Just popping in to say I have made this bread about a million times (Okay not a million, but almost…) and consider it one of my go to simple recipes for something yummy and easy to make. It’s hard to wait the 12-18 hours to bake it, but so worth it. Thanks for sharing your recipe!

Profile photo of joynh

joynh on 9.16.2012

Warning it must be instant yeast! If you Use regular it is very watery…but I’m still going to bake it!

Profile photo of culinarygoddess

culinarygoddess on 5.9.2011

I can’t wait to try this! I hope it is as good as it looks.

Profile photo of grannib

grannib on 4.25.2011

This sounds like a winner, this will be the recipe I use, love recipes with few ingredients.

Profile photo of trayszee

trayszee on 4.21.2011

Just MAGNIFICENT!! Yes, it looks gloopy and just doesn’t seem right BUT IT IS! I will say…..I made this in my dutch oven and before putting in the ingredients, I warmed my pan up so that it sat on the stove and my dutch oven kept it a nice warm temp for hours. Also, I didn’t turn it out onto the counter right before baking….I tipped it a little, sprinkled flour under it and then I just kept rolling it UNDER (like petting a dog’s head)….around and under…..several times..right there in the pan….it really looked beautiful and I didn’t have a smidge of flour on my counter :) Guess what?? I’ve got another one on the stove for tomorrow morning :) Thank you!!

29 Reviews

You must be logged in to post a review.

Profile photo of Cathy Bray

Cathy Bray on 10.26.2018

This recipe really surprised me! Right before I put it in the oven I thought that it looked too flat and that there was no way it was going to work, but with the high heat and the steam it puffed up so BIG! It was beautiful! Right before I put it in the oven I dusted with flour and scored a picture of a wheat stem with a razor and it looked so pretty! This is going in my keeper file. Thank you for the recipe!!

Profile photo of gkmama

gkmama on 8.19.2013

I have been using this recipe weekly for the past 3 years and it never gets old and always turns out great! This is the one that brings me back to this site time and time again! Thanks so much for posting this amazingly easy and delicious recipe!!!

Profile photo of cherylovesfood

cherylovesfood on 4.30.2012

Thank you so much! This recipe (& all the comments) got me started on my adventures in bread making, some of which have gone much better than others. This is my no fail recipe which has earned me numerous compliments (one from a cousin who is a chef). Thank you again!

Profile photo of sarablaire

sarablaire on 2.29.2012

So happy that you posted this recipe. Its so simple, and so yummy! We’ll definitely be making this often.

Profile photo of Bridget

Bridget on 8.31.2011

Holy cow! I’ve never made bread before so I was nervous, but it was sooo easy!!! Some of the best bread I’ve ever had! Next time I’m going to try adding some rosemary or some good cheese.
Related Recipes

Easiest No-Knead Bread in a Dutch Oven
Profile Photo by Lindsay @ My Therapist Cooks in Breads
Mark Bittman’s no-knead bread is the easiest, most foolproof path to...
5.00 Mitt(s) 1 Rating(s)1 vote, average: 5.00 out of 51 vote, average: 5.00 out of 51 vote, average: 5.00 out of 51 vote, average: 5.00 out of 51 vote, average: 5.00 out of 5

Prep: Cook:

Serves: 6 Level: Easy


No Yeast Naan
Profile Photo by Liz Voltz in Breads
Quick and easy Naan flat bread made without yeast. Comes together...
0.00 Mitt(s) 0 Rating(s)0 votes, average: 0.00 out of 50 votes, average: 0.00 out of 50 votes, average: 0.00 out of 50 votes, average: 0.00 out of 50 votes, average: 0.00 out of 5

Prep: Cook:

Serves: 6 Level: Easy


Sourdough Banana Muffins
Profile Photo by PW Food & Friends in Breads
Use up your excess sourdough discard/starter in these yummy banana muffins! From...
0.00 Mitt(s) 0 Rating(s)0 votes, average: 0.00 out of 50 votes, average: 0.00 out of 50 votes, average: 0.00 out of 50 votes, average: 0.00 out of 50 votes, average: 0.00 out of 5

Prep: Cook:

Serves: 12 Level: Easy


Coconut Blueberry Wholemeal Muffins
Profile Photo by Cheryl Whyte in Breads
Sometimes you just need something a little sweet, right!? Well, I’ve...
5.00 Mitt(s) 1 Rating(s)1 vote, average: 5.00 out of 51 vote, average: 5.00 out of 51 vote, average: 5.00 out of 51 vote, average: 5.00 out of 51 vote, average: 5.00 out of 5

Prep: Cook:

Serves: 12 Level: Easy


Sourdough Naan
Profile Photo by PW Food & Friends in Breads
Naturally leavened Indian flatbread cooked in a cast iron skillet! From Erica...
0.00 Mitt(s) 0 Rating(s)0 votes, average: 0.00 out of 50 votes, average: 0.00 out of 50 votes, average: 0.00 out of 50 votes, average: 0.00 out of 50 votes, average: 0.00 out of 5

Prep: Cook:

Serves: 12 Level: Intermediate