Using kitchen scissors, cut each marshmallow in half through the middle. (I cut all the marshmallows from one bag in half, then about 12 from the second bag. You can always cut more if you find you need them.) Dipping the scissors in hot water, then drying them off after a few cuts will make it a lot easier to cut the marshmallows.
Place the marshmallows, cut side up, on a cookie sheet or tray.
I usually put the candy thermometer in the pan before adding the ingredients. That way, I can adjust the height of the thermometer and make sure the bulb at the bottom doesn’t touch the bottom of the pan.
Combine cream, sugar, corn syrup and salt in a DEEP medium saucepan. Make sure it’s a deep one and if it’s heavy, all the better. I recommend nonstick, but it doesn’t have to be. It just makes clean up easier. I use a heat diffuser under my pan since it isn’t that heavy. This is by no means necessary, but I’ve found it helpful to keep the mixture from scorching. Once I get the ingredients stirred and combined well, I clip the thermometer in place.
Bring mixture to a boil over low heat, stirring constantly. The mixture will start out milky white, then it will go through several color stages as it cooks. It seems to take forever to get to 220 degrees, and once it does, it seems to stay there forever! It takes a while (at least on my stove) to get to 225 degrees. Once it hits 225 degrees, the bubbles will start to rise up towards the top of the pan. As long as you stir it down, it shouldn’t boil over (that’s why I suggest the DEEP saucepan). The mixture will also start to change color – you’ll see it starting to get a light golden color. Keep stirring and checking that candy thermometer! At 230 degrees, the color will deepen a little more.
You’re almost there! 235 degrees is the magic number. This temperature doesn’t seem to take as long to reach as the others. You’ll also notice that the mixture feels slightly thicker as you’re stirring. Keep your eye on the thermometer and remove the pan from the heat when the thermometer reaches 235 degrees (soft ball stage).
I use a small heating pad under my pan because it’s not thick and doesn’t hold the heat that well. You want the butterscotch to stay nice and warm to make it easy to dip the marshmallows. My husband came up with the idea of wrapping a towel around the pan and clothespin it to help keep some of the heat in. He does come up with good ideas sometimes!
Let the pan sit for 3-5 minutes to take some of that boiling heat away. I usually stir the butterscotch for a few minutes to sort of cool it down a little; if you dip the marshmallows immediately after removing it from the heat, they’ll hit that hot butterscotch and start to melt right away. I stir until I feel the mixture gets a tad bit thicker and see it start to drip slower off of the wooden spoon.
Start dipping your marshmallows; drop a marshmallow in the mixture, one at a time; coat one side, then quickly flip the marshmallow over, using a meat fork and a cake tester or wooden skewer.
Lift the marshmallow out with the fork (don’t stab it; use the cake tester to place it onto the fork); let some of the excess butterscotch drip back into the pan. Ease the marshmallow off of the fork with the help of the cake tester and onto parchment paper-lined baking sheets. Don’t worry if there’s puddling around the marshmallows; that’s perfectly normal. You’ll also notice that the first 10-20 marshmallows don’t look as coated as the ones you do later; that’s normal too. As the butterscotch cools, it thickens so the more marshmallows you dip, the thicker the coating.
As you get towards the bottom of the pan, the butterscotch may thicken to the point that the marshmallows don’t want to coat. If that happens, take the pan back to the stove and heat it over low heat just to rewarm the butterscotch. You don’t want to boil it, all you want to do is loosen it up enough to make the butterscotch the same thickness it was when you began dipping. Continue dipping until all the butterscotch is used.
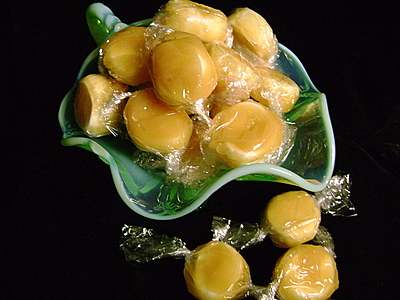
You’ll have over 100 pieces, depending on the size of the marshmallows. Don’t worry about all of that excess butterscotch around the marshmallows – that will all get scraped up and wrapped with the candy.
Let the pans of coated marshmallows sit overnight to dry out. They won’t be bone dry; you should be able to touch them with your finger and not have them stick like super glue. The salt is what helps dry them out. How do I know that? I forgot to put it in once and the coating stayed really, really sticky!
Now comes the tedious part: the wrapping. My suggestion is to get a roll of plastic wrap specifically for these. Get the cheapest one you can find and cut the brand new roll in half through the middle. My husband Bob does this for me by putting a razor blade in a vise and holding both ends of the roll, rotates the roll of plastic wrap around the razor. This makes it SO much easier than cutting that clingy wrap in half piece by piece.
Tear pieces large enough to wrap the candies. (Yes, I throw them in a pile and yes they cling together, but oh well. They don’t call it cling wrap for nothing, right?) Lay individual squares of plastic wrap down and place a marshmallow on the center of each piece.
Using a butter knife, run the knife under a marshmallow, lift it off of the parchment paper and place it in the center of the plastic wrap. Fold one side of plastic wrap over marshmallow; repeat with other side. Twist each end of the plastic wrap. Repeat to wrap all of the marshmallows.
Store in an airtight container. They’ll keep at room temperature for a good 2 weeks.
When it comes time to eat them, unwrap the marshmallow and eat it right off the plastic wrap. You can pick it off the wrap with your fingers, but that might be a tad messy. Then again, what a good excuse to lick your fingers!
If you find the marshmallows are really sticky when you try and peel the wrapping off, you can refrigerate them for a few minutes. But I feel they lose a little of their butterscotch flavor when they’re chilled.
By the way, this isn’t something to make in the hot weather. I don’t think they’d set up well in heat and humidity. Save making these for a cool dry day.


2 Comments
Leave a Comment
You must be logged in to post a comment.
Olivia Johnson on 3.27.2023
Hi Carol, what elevation are you at? That will help me determine whether to match your temperature or not. I’m at 3600 ft.
Jessica on 12.23.2019
I’m so in love with this recipe! Found it earlier this year and made it often. Actually doing it when I was searching for a copycat recipe of See’s scotch kisses and I think this recipe is so much better! Thank you for all of the details, makes it very easy to follow!