To Make the Dough:
1. Make sure milk is nice and warm, but not overly hot.
2. Add sugar to milk. Stir to dissolve.
3. Add yeast into a small bowl.
4. Pour milk/sugar mixture over yeast. Stir gently, then let sit for 10 minutes.
5. Melt butter in separate bowl until butter is almost melted. Stir to finish melting so butter won’t be overly hot.
6. Add beaten eggs to melted butter, stirring constantly to make sure the butter’s not too hot for the eggs.
7. Add the egg/butter mixture to the bowl of an electric mixer fitted with the dough hook.
8. With the mixer on 3 or medium-low speed, pour in the yeast mixture.
9. Allow the dough hook to stir this mixture for a couple of minutes, making sure it’s thoroughly combined.
10. With the mixer still going, add helpings of the flour mixture in 1/4 to 1/2 cup increments until all the flour is gone.
11. Stop the mixer, scrape the bowl, then turn the mixer on the same speed for five whole minutes.
12. After five minutes, stop the mixer and scrape the bottom of the bowl.
13. Turn on the mixer for 30 seconds.
14. Turn off the mixer and allow the dough to sit in the bowl undisturbed for 10 minutes.
15. After 10 minutes, transfer dough to a lightly oiled bowl. Toss the dough to coat, then cover the bowl with plastic wrap and place straight in the fridge.
16. Refrigerate dough for at least 8 hours, or overnight.
To Make the Doughnuts:
1. Remove bowl from fridge and turn out dough onto a lightly floured surface.
2. Roll out to 1/4 to 1/3-inch thickness.
3. Using a 3-inch cutter, cut as many rounds as you can, then roll out remaining dough and cut as much as you can, etc.
4. Cut holes out of each round using a 1 1/2-inch cutter.
5. Place both doughnuts and holes on a floured baking sheet.
6. Cover with large tea towel and place in a warm place in your kitchen; my kitchen is very drafty, so I have to briefly warm the griddle, then turn it off and set the sheets on top to keep warm.
7. Allow doughnuts to rise undisturbed for at least 1 hour; 1 hour 15 minutes if necessary. Doughuts should be visibly puffier and appear to be airy.
To Fry the Dougnuts
1. Heat plenty of vegetable shortening in a large pot until the temperature reaches 375 to 380 degrees—do not let it get hotter than 380 degrees! 375 is ideal; keep the thermometer in the pan to continually monitor.
2. One to two at a time, gently grab doughnuts and ease them into the hot oil. Allow them to cook 1 minute on each side; they will brown very quickly.
3. Remove doughnuts from the oil with a slotted spoon, allowing all oil to drip off.
4. Place doughnut immediately on several layers of paper towels. Count to five, then flip it over onto a clean part of the paper towels. Count to five, then flip it over again; the purpose, obviously, is to drain as much grease as possible before it soaks into the doughnut.
5. Repeat with remaining doughnuts and holes. The holes will cook more quickly than the doughnuts; about 30 seconds per side.
6. Allow doughnuts to slightly cool.
To Glaze
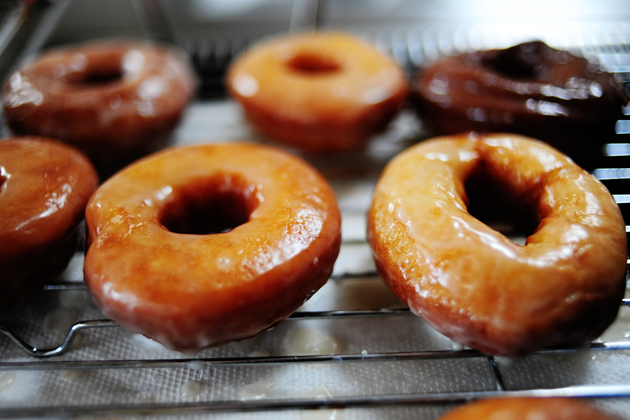
1. Mix all glaze ingredients in a bowl until completely smooth.
2. One by one, dip doughnuts into the glaze until halfway submerged. (Note: completely submerge doughnut holes, then remove with slotted spoon.)
4. Remove from glaze, then turn right side up on a cooling rack over a cookie sheet (to catch dripping glaze.)
5. Serve warm if possible, or room temperature.








14 Comments
Leave a Comment
You must be logged in to post a comment.
Theresa DePaepe aka Mama on 5.3.2010
These are really way beyond good – better than store bought. Start the dough on Saturday if you want them for Sunday.
rozanie on 4.30.2010
The best homemade donuts EVER!
jjpeaches on 4.26.2010
Made these Friday afternoon on into Saturday morning (read the recipe and you’ll see what I mean). DELICIOUS! Really beyond belief. There were a few left on Sunday (after Saturday’s donut fiesta) and my son took them to work. We couldn’t get enough.
poohder2005 on 4.19.2010
I don’t have a Kitchenaid Mixer. Can someone translate this recipe for us poor folk? LOL!
anmohn on 4.9.2010
These were amazing! And anyone can do it! This was my first attempt and cooking with yeast and they actually came out!! The problem is I want to make them again but I don’t think my waist line can handle it!