No Reviews
You must be logged in to post a review.

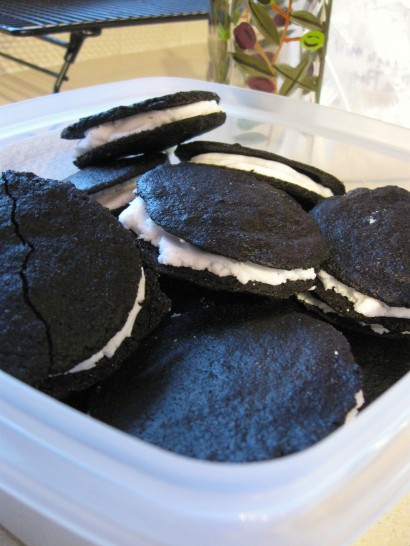
All the delicious goodness of your favorite sandwich cookie – now gluten free. Slather them with peanut butter and dunk them in milk – they’re every bit as good as you remember!
1.) Preheat your oven to 325F. Lightly grease your cookie sheets – it took 3 1/2 sheets to bake the full batch.
2.) Beat together the butter, sugar, salt and espresso powder. Feel free to sample this concoction – it’s yummy.
3.) Beat in the egg,water, and vanilla. Then add the cocoa powders, wheat free flour and xanthan gum. The dough will be stiff. (There’s no leavening in these cookies. You can stop worrying about forgetting it now.)
4.) Use a teaspoon-sized cookie scoop (or make 2 teaspoon sized balls) to scoop out the dough and place them 1.5 – 2 inches apart on the greased cookie sheets. Use a flat bottomed glass slicked with a light coating of canola oil to flatten the cookies to 1/8 inch thickness.
They’ll be flat. Really flat. But it will work. I promise. Just think of how thin and crispy Oreos are and squish away. The more evenly sized, the better. Look past the plate of baked cookies to see that corner of unbaked ones – see they’re super flat, but delicious!
5.) Bake for 17-20 minutes. I recommend baking 1/2 sheet to begin with. You want them to be just so; set but not overly done. They will come out set, but a little flexible and that’s ok. You’ve overdone them if they break instead of coming off the cookie sheet.
6.) Get the cookies off the sheet almost immediately after you remove them from the oven. They’re crisp and delicate. Cool them on a clean counter or cooling rack. A really thin spatula helps get these babies off the sheet.
7.) Assemble the filling while the rest of the batch bakes. That way you can frost the cool cookies while the rest bake.
To assemble the frosting, beat the shortening and powdered sugar on low until it starts to stick together. (It will take quite a bit of beating, and you’ll be tempted to think I’m lying to you about it coming together, but I’m not.) Add the water and beat until smooth.
8.) “Frost” the bottom side of a cookie with 2.5 -3 teaspoons of filling. Squish another cookie on top until it sticks, being careful not to break it. I use “frost” loosely, because I made 3 small balls of filling and used my fingers to squish them into an even layer between the cookies. My 6 year olds loved helping with this and squishing the cookies with the glass. Apparently, squishing food with impunity is very satisfying to young kids.
9.) Eat these babies and enjoy. They’re rich, buttery and amazing. Plus, since they’re wheat free that means they’ll be just as crisp tomorrow and the day after.
Ingredient Notes:
* Espresso powder is made from dehydrated espresso and is available from King Arthur Flour. 1/2 teaspoon of finely ground espresso coffee would work, too.
** Flour – I use a mix of 2 parts superfine brown rice flour + 2/3 part potato starch + 1/3 part tapioca flour/starch. You can get superfine rice flour from Authentic Foods or by processing regular brown rice flour in a VitaMix for 60 seconds. You need a high-powered blender to get the flour fine enough – my KitchenAid blender doesn’t cut it.
***Black cocoa powder is different from high cocoa content, Dutch process powder. It’s quite black and imparts an extremely chocolaty flavor. It also gives these cookies their characteristic black color. I got mine from King Arthur flour, but it is carried by many bakery supply stores.
No Comments
Leave a Comment!
You must be logged in to post a comment.