

No Reviews
You must be logged in to post a review.
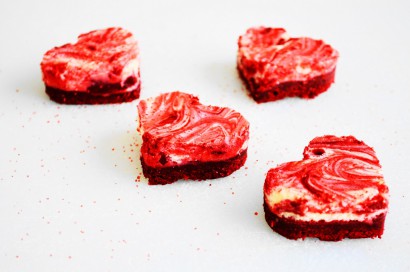
These red velvet cheesecake hearts are so decadent, amazing and romantic! They’re the perfect sweet treat for Valentine’s Day.
Note: This needs to chill for at least 3 hours before cutting and serving
Preheat oven to 350ºF and grease a 9-inch round springform pan liberally with butter or shortening.
Prepare the red velvet brownie batter first. Fill a small pot halfway with water and bring it to a gentle boil on the stove. Combine the flour, baking powder and salt in a bowl and whisk it together. Set it aside. Then combine the butter and chocolate in a heat proof bowl and set it over the simmering water. Let it melt together as you gently stir it with a heat proof rubber spatula. Once it is smooth and shiny, take the bowl off of the heat. Let it cool for a minute, then whisk in the sugar, followed by the eggs and food coloring. Lastly, whisk in the dry ingredients just until they disappear and the batter is smooth. Set the batter aside.
Next, prepare the cheesecake batter. Set up a stand mixer with the paddle attachment. Combine the cream cheese and yogurt in its bowl and beat them together until smooth and fluffy. Add in the sugar and vanilla and let them get mixed in well. Then pour in each egg one at a time and let them get mixed in well too. Finish with the flour and let it all get well combined and smooth. Set the batter aside.
Take the brownie batter and reserve a 1/4 cup. Pour the rest into the greased cake pan and smooth it out into a thin, even later. Pour the cheesecake batter over it into another layer. Take the reserved 1/4 cup of brownie batter and drizzle it all over the cheesecake layer. Use a butter knife to gently swirl it into the cheesecake batter. Bake the cheesecake brownies for about 30 minutes, until set and baked through. The cheesecake will just start to get golden around the edges. Take it out and let it cool for 30 minutes before releasing it from the springform pan. Sprinkle the top liberally with crystallized red sugar for some extra sparkle. Transfer it to a cake plate with a dome to seal it and let it refrigerate for at least 3 hours or up to overnight.
Once it has chilled, it’s time to take it out and cut out the heart shaped brownies! Grab a heart shaped cookie cutter that’s about 2-3 inches wide at the widest part. Run it under the hottest water you can, then dry it with a paper towel. This helps to cut through the cheesecake cleanly. Cut out heart shaped brownies as close together as possible to yield as many brownies as you can. I got 20 out of mine, but this might vary depending on the size of your heart shaped cutter. The scraps are great to sample as you work! Serve them immediately for a sweet, romantic treat! They will also keep for a couple of days sealed in the refrigerator. Make sure they are in a single layer so that the red velvet brownies don’t flake off on the pretty swirling.
Prep: Cook:
Serves: 6 Level: Easy
Prep: Cook:
Serves: 12 Level: Intermediate
Prep: Cook:
Serves: 16 Level: Easy
Prep: Cook:
Serves: 24 Level: Intermediate

Prep: Cook:
Serves: 12 Level: Easy


No Comments
Leave a Comment!
You must be logged in to post a comment.