


No Reviews
You must be logged in to post a review.
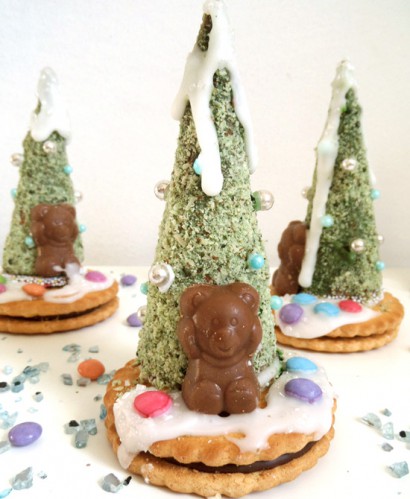
Christmas chocolate trees that you can make with your children.
Start by making the paper cones.
I used grease-proof paper: 30 cm/12 inch x 24 cm/9.5 cm. From one piece of paper I got 2 trees about 10 cm/4 inch tall.
Cut the paper in two pieces. Take one piece and fold it in half. Form a cone from each piece of folded paper and stick it with sellotape. Repeat the procedure until you have all the cones you need. Take some empty egg cardboard boxes and place the cones into the holes, so that they stand up.
Chop the chocolate into small pieces and place into a waterproof bowl. Find a taller pot where the bowl fits comfortably and fill it about halfway with water. Make sure that the water doesn’t touch the bottom of the bowl containing the chocolate. Heat the water gently and melt the chocolate while stirring very often. Make sure that the water doesn’t start to boil, that would ruin the chocolate. If it gets too hot, turn off the heat and continue stirring the chocolate until shiny and completely melted.
Carefully pour a little bit of the chocolate into each prepared cone. Place some M&M’s or some Smarties into each cone and fill them with the rest of the chocolate. Shake each cone gently to make sure that the chocolate on top is leveled. Put the cones back in their egg boxes and leave until the chocolate is completely set again. I left them to harden overnight.
The next day carefully remove the paper and place the cones on plates or wooden boards. If the chocolate at the base of the trees is not completely level, cut a thin slice of the chocolate using a very sharp knife. Make sure the trees are able to stand straight and properly.
Place the ground almonds on a large plate and mix them with some drops of the green color and mix with your hands until the almonds turn green. Add more color as necessary. Make sure to use gloves if you don’t want your hands to turn green as well.
In a small bowl mix some of the powdered sugar with 1 or 2 tablespoon of the lemon juice. Add food coloring to make it green as well. The consistency of this mixture should be rather runny. Try it with a first chocolate cone to make sure that the icing stays on it without being too thick either. Add more sugar or lemon juice as necessary.
Brush the cones with the sugar icing one by one and immediately turn them into the ground almonds. Turn them around until completely coated in almonds. Place them back on their boards.
While they set prepare the white sugar icing. Place some more powdered sugar into another small bowl and mix with some lemon juice to obtain a thicker paste this time. Fill a small amount of the paste into a small piping bag with a very small nozzle. Pipe a tiny amount of this paste on each Christmas bauble and press the bauble onto the tree. The mixture should be thick enough to stay on the bauble so adjust the consistency if necessary. You will need some patience for this step, the baubles are very small and you have to be careful not too press too hard on the trees as not to break them. Clean your hands from time to time if the sugar gets on your fingers, otherwise you will find the baubles sticking to your fingers instead to the tree. If you don’t want to use a piping bag, you could use a wooden skewer instead. I just dipped that in the sugar icing and put a small drop of it on the bauble.
Place the round chocolate biscuits on a board. Stick the other chocolate rounds on the biscuits (not in the middle) using some sugar icing. Smear a bit more icing on the base of the trees and stick them on top of this chocolate round. Stick the chocolate bear to the tree using the icing as well.
Using a teaspoon or another, larger nozzle pour some of the remaining sugar paste on top of the trees to imitate snow. Immediately sprinkle some white, ice-like sprinkles on top (you can omit this step if you cannot find such sprinkles). Pour the rest of the sugar icing on the biscuits, on front of the trees to imitate snow as well. Stick smarties or other small sweets on top of the snow. Leave to set.
Prep: Cook:
Serves: 6 Level: Easy
Prep: Cook:
Serves: 12 Level: Intermediate
Prep: Cook:
Serves: 16 Level: Easy
Prep: Cook:
Serves: 24 Level: Intermediate

Prep: Cook:
Serves: 12 Level: Easy


One Comment
Leave a Comment
You must be logged in to post a comment.
Elena on 12.22.2015
So cute!