
No Reviews
You must be logged in to post a review.
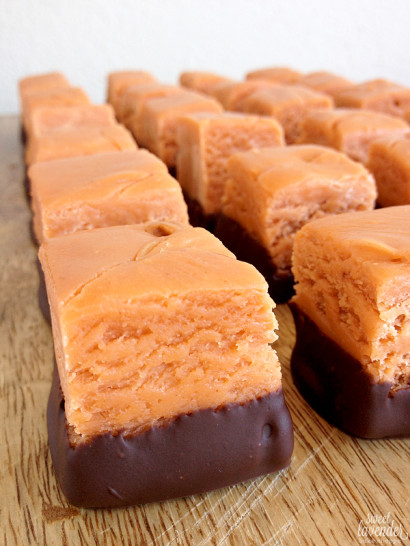
Slightly chewy, sweet, peanut buttery and very fudge-like … and dipped in semi-sweet chocolate. So yummy! Oh and it’s super easy to make! It does take a few hours to make from start to finish, but this includes chilling time so you can cut it into squares much easier. No candy thermometer is needed and it tastes amazing.
Note: Active prep time is roughly 20 minutes but you will want to plan ahead because this does require refrigeration to allow the fudge to completely cool.
1. Lightly spray an 8×8″ baking pan or dish with cooking spray and then line with parchment paper. You will want your parchment to hang over the sides of the dish by a few inches, for easy lifting once fudge is cooled. Set aside.
2. Into a medium to large saucepan, add your candy corn and peanut butter. Turn heat to low and cook, stirring frequently with a wooden spoon, until candy corn is almost all the way melted. This should take about 3-4 minutes. Make sure to break up any large chunks with your spoon. Please be very careful not to burn the bottom, as it will want to. Constantly stir and don’t leave it unattended!
3. Next, add your entire can of sweetened condensed milk and stir to combine. Cook for another 3 minutes, stirring frequently. At this time, your candy corn should mostly be melted. Do not let the mixture come to a boil. Rather it should gently heat over low until everything is melted and combined.
4. Add your white chocolate chips and give it a good stir. Turn heat off and continue stirring until chips are melted and combined completely. Because white chocolate melts at a much lower temperature, the residual heat from the mixture should melt it just fine. If you find it isn’t melting completely, go ahead and put it back over a low flame and heat until just melted.
5. Quickly pour the mixture into your prepared baking dish and smooth it using a spatula so that there is a nice flat top. Tap the dish on the counter to settle everything and then allow it to cool at room temperature for 15-20 minutes. Next, place fudge into the refrigerator to cool completely.
6. Once completely cooled and hardened, lift the fudge out of pan with the parchment handles, put it onto a cutting board and cut into 1×1″ squares. To do this I simply cut straight down with a long large knife. You can wipe the blade after each cut if you’d like. Line a sheet pan with wax or parchment and place the squares of fudge onto the parchment, spaced about 1/2″ apart. Place the pan into the fridge to set up once more while you melt your chocolate!
7. Over a double boiler, gently heat and melt your semi-sweet chocolate chips. Once completely melted, remove fudge from the fridge and dip the bottom of each square into your melted chocolate. Shake off excess and then place the square back onto your parchment lined sheet pan. Repeat. When all of the pieces have been dipped, place fudge back into the fridge until chocolate has hardened.
8. Once hardened, fudge can be gifted and given to your friends and family! Store at room temperature, in an airtight container for up to 5 days.
Once completely set, I wrapped a couple of pieces in cellophane bags, tied the bags closed with fancy ribbon, and gave as gifts to friends! They are perfectly fine at room temperature without any fear of melting or sticking!
Makes about 40 even-sized squares.
Recipe slightly adapted from Crazy for Crust who adapted it from The Domestic Rebel.
Prep: Cook:
Serves: 6 Level: Easy
Prep: Cook:
Serves: 12 Level: Intermediate
Prep: Cook:
Serves: 16 Level: Easy
Prep: Cook:
Serves: 24 Level: Intermediate

Prep: Cook:
Serves: 12 Level: Easy


No Comments
Leave a Comment!
You must be logged in to post a comment.