The Pioneer Woman Tasty Kitchen
Profile Photo

Plain Bagels

4.83 Mitt(s) 12 Rating(s)12 votes, average: 4.83 out of 512 votes, average: 4.83 out of 512 votes, average: 4.83 out of 512 votes, average: 4.83 out of 512 votes, average: 4.83 out of 5

Prep:

Cook:

Level: Intermediate

System:

6
x

Print Options

Page size Letter 3x5 4x6
Text Size Small Medium Large
Content Include description
Include prep time, etc.
Show image

Description

Perfectly chewy yet soft plain bagels, from an East Coaster who knows her bagels.

Ingredients

  • ⅔ cups Warm Water
  • ½ Tablespoons Sugar
  • 1-½ teaspoon Yeast
  • 2 cups All-purpose Flour
  • ½ Tablespoons Vegetable Oil
  • ¾ teaspoons Salt

Preparation

In the bottom of your mixer bowl, combine the water, sugar, and yeast and let the yeast develop for about 5 minutes. Add in flour, vegetable oil, and salt and mix with a dough hook (or by hand) until the dough is elastic and tough. You may need to add in a bit of extra water, but do it little by little. Let the dough sit and rise in a warm place for 20-30 minutes.

Turn dough out onto a floured surface and knead. Cut into 6 equal pieces. Roll each individual piece into a “snake” long enough to wrap around your palm. Dip each end of the dough in water and press together in your palm, forming a circle. Place the formed bagels on a floured board and allow to rise another 20-30 minutes.

Bring 6 cups of water to a boil in a heavy-bottomed pot. When the water is gently boiling, place 2-3 bagels into the water for 1 minute and then flip to boil on the other side for another minute. Remove the bagels, place them on paper towels to take off excess moisture, then place on a baking sheet. Repeat with the remaining bagels. Bake in the oven on 425ºF for 18 minutes, turning them over after 10 minutes. Enjoy!

Note: Substitute 1/2 cup wheat flour and 1 1/2 cup all-purpose flour for a wheat variation.

7 Comments

You must be logged in to post a comment.

Profile photo of the city girl cooks

the city girl cooks on 7.21.2011

Thanks for that recipe!! Really simple and delicious! :)
I froze them after boiling to have some nice fresh bagels on every sunday morning breakfast with my boyfriend! :)

Profile photo of necessaryforce

necessaryforce on 7.1.2011

If I were to let these rise overnight, how would I do so?

Profile photo of

on 6.20.2011

I doubled the recipe and found that these freeze nicely. Freeze after boiling and wrap tightly. Thaw for 30 minutes and proceed with baking for fresh bagels anytime. The baked bagels don’t keep long; best to bake the day you plan to consume.

Profile photo of cookinginwa

cookinginwa on 4.18.2011

I made these over the weekend and they were AMAZING! The only downfall is that the recipe only makes 4-6 bagels! ;-) After making these, I don’ t think I’ll ever go back to store-bought bagels again!

Profile photo of ecourtney

ecourtney on 4.8.2011

Could I let the dough rise overnight? Would it rise too much?…if that can even happen. And do you still put in a warm place or just leave on the counter top?

Just curious? Thanks!

12 Reviews

You must be logged in to post a review.

Profile photo of Jackie

Jackie on 2.28.2013

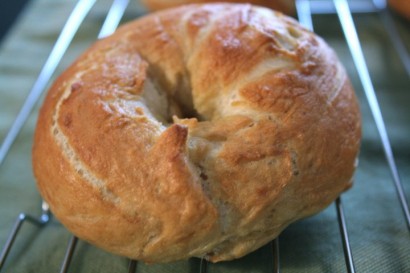
Great base recipe! This was my first time making bagels, but I got a little adventurous anyway. I doubled the recipe and split the dough into three pieces: one I kept plain, one got chocolate chips and cinnamon, and one got Parmesan, onion powder, and garlic. Everything went pretty much exactly the way it was supposed to — my first rise took an hour, but it’s cold outside and I only had *almost* enough yeast left in my jar, so that might have contributed. Besides that, they turned out great and are delicious (I just sampled one of the chocolate-chip ones). Will definitely be making these again!

Profile photo of jackiestaylor

jackiestaylor on 2.2.2012

these are great :)

Profile photo of Teresa

Teresa on 10.4.2011

These were good but I couldn’t make them pretty!

Profile photo of amycookie

amycookie on 4.24.2011

Easy and very good :)

Profile photo of Katey

Katey on 4.19.2011

These were super good! They were also much easier than I was expecting. We will definitely make these again.

Related Recipes

Easiest No-Knead Bread in a Dutch Oven
Profile Photo by Lindsay @ My Therapist Cooks in Breads
Mark Bittman’s no-knead bread is the easiest, most foolproof path to...
5.00 Mitt(s) 1 Rating(s)1 vote, average: 5.00 out of 51 vote, average: 5.00 out of 51 vote, average: 5.00 out of 51 vote, average: 5.00 out of 51 vote, average: 5.00 out of 5

Prep: Cook:

Serves: 6 Level: Easy


No Yeast Naan
Profile Photo by Liz Voltz in Breads
Quick and easy Naan flat bread made without yeast. Comes together...
0.00 Mitt(s) 0 Rating(s)0 votes, average: 0.00 out of 50 votes, average: 0.00 out of 50 votes, average: 0.00 out of 50 votes, average: 0.00 out of 50 votes, average: 0.00 out of 5

Prep: Cook:

Serves: 6 Level: Easy


Sourdough Banana Muffins
Profile Photo by PW Food & Friends in Breads
Use up your excess sourdough discard/starter in these yummy banana muffins! From...
0.00 Mitt(s) 0 Rating(s)0 votes, average: 0.00 out of 50 votes, average: 0.00 out of 50 votes, average: 0.00 out of 50 votes, average: 0.00 out of 50 votes, average: 0.00 out of 5

Prep: Cook:

Serves: 12 Level: Easy


Coconut Blueberry Wholemeal Muffins
Profile Photo by Cheryl Whyte in Breads
Sometimes you just need something a little sweet, right!? Well, I’ve...
0.00 Mitt(s) 0 Rating(s)0 votes, average: 0.00 out of 50 votes, average: 0.00 out of 50 votes, average: 0.00 out of 50 votes, average: 0.00 out of 50 votes, average: 0.00 out of 5

Prep: Cook:

Serves: 12 Level: Easy


Sourdough Naan
Profile Photo by PW Food & Friends in Breads
Naturally leavened Indian flatbread cooked in a cast iron skillet! From Erica...
0.00 Mitt(s) 0 Rating(s)0 votes, average: 0.00 out of 50 votes, average: 0.00 out of 50 votes, average: 0.00 out of 50 votes, average: 0.00 out of 50 votes, average: 0.00 out of 5

Prep: Cook:

Serves: 12 Level: Intermediate