For the dough, heat the milk, vegetable oil, and sugar in a medium saucepan over medium heat to just below a boil. Set aside and cool to warm. Sprinkle the yeast on top and let it sit on the milk for 1 minute.
Add 8 cups of the flour. Stir until just combined, then cover with a clean kitchen towel, and set aside in a relatively warm place for 1 hour. After 1 hour, remove the towel and add the baking powder, baking soda, salt, and the remaining 1 cup flour. Stir thoroughly to combine. Use the dough right away, or place in a mixing bowl and refrigerate for up to 3 days, punching down the dough if it rises to the top of the bowl. (Note: dough is easier to work with if it’s been chilled for at least an hour or so beforehand.)
Preheat the oven to 375°F.
To assemble the rolls, remove half the dough from the pan/bowl. On a floured baking surface, roll the dough into a large rectangle, about 30 x 10 inches. The dough should be rolled very thin.
To make the filling, pour 3/4 cup to 1 cup of the melted butter over the surface of the dough. Use your fingers to spread the butter evenly. Generously sprinkle half of the ground cinnamon and 1 cup of the sugar over the butter. Don’t be afraid to drizzle on more butter or more sugar! Gooey is the goal.
Now, beginning at the end farthest from you, roll the rectangle tightly towards you. Use both hands and work slowly, being careful to keep the roll tight. Don’t worry if the filling oozes as you work; that just means the rolls are going to be divine. When you reach the end, pinch the seam together and flip the roll so that the seam is face down. When you’re finished, you’ll wind up with one long buttery, cinnamony, sugary, gooey log.
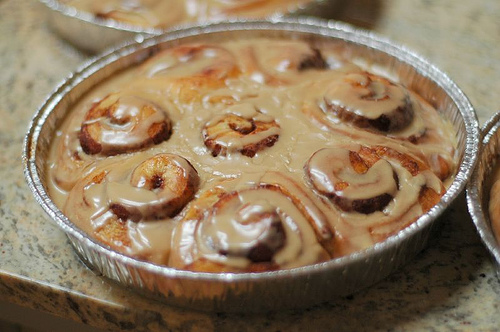
Slip a cutting board underneath the roll and with a sharp knife, make 1/2-inch slices. One “log “will produce 20 to 25 rolls. Pour a couple of teaspoons of melted butter into disposable foil cake pans and swirl to coat. Place the sliced rolls in the pans, being careful not to overcrowd. (Each pan will hold 7 to 9 rolls.)
Repeat the rolling/sugar/butter process with the other half of the dough and more pans. Preheat the oven to 375°F. Cover all the pans with a kitchen towel and set aside to rise on the countertop for at least 20 minutes before baking. Remove the towel and bake for 15 to 18 minutes, until golden brown. Don’t allow the rolls to become overly brown.
While the rolls are baking, make the maple icing: In a large bowl, whisk together the powdered sugar, milk, butter, coffee, and salt. Splash in the maple flavoring. Whisk until very smooth. Taste and add in more maple, sugar, butter, or other ingredients as needed until the icing reaches the desired consistency. The icing should be somewhat thick but still very pourable.
Remove pans from the oven. Immediately drizzle icing over the top. Be sure to get it all around the edges and over the top. As they sit, the rolls will absorb some of the icing’s moisture and flavor. They only get better with time… not that they last for more than a few seconds. Make them for a friend today! It’ll seal the relationship for life. I promise.








52 Comments
Leave a Comment
You must be logged in to post a comment.
snowclouds on 12.14.2012
These are amazing. I make them every Christmas and everyone wants some. For those of you who said something about the melted butter being really messy when rolling them, try not melting the butter. Just beat the soft butter with sugar (brown is way better) and spread in on the dough. I did this last year and it was so much easier to roll and cut them.
ziggerbean on 10.10.2012
Please fix the “Servings:8″ error!! I needed about 30 rolls so I quadrupled the ingredient list and thank God I just read through the whole recipe before starting because I would have ended up with 124 rolls!! I don’t have the pans, space or time for that endeavor even if it does sound like heaven!
tinkerbellmandi on 4.24.2012
I’m having friends over for a weekend and wanted to make these ahead on either Wed or Friday before they arrive and then bake them Sunday. What is the best way to do that? I’ve never made anything with yeast before so I wasn’t sure if I let it rise in the pan and then could pop it in the fridge/freezer or if I should bake it and then reheat it (I’m afraid that’ll make it dry)
bluejena on 11.24.2011
I have to make a half batch for it to fit properly in my 5 quart KitchenAid… otherwise it climbs up the beater and gets into the spring – ew! However, a half batch is more than enough for a 9×13 casserole dish of these, so that’s fine with me.
lookintosave on 3.9.2011
Can someone help me? I want to make sure I do this right. The recipe calls for 2 packages of yeast. Is that 2 envelopes or 6 envelopes (3 envelopes in a strip or package). TIA!