


No Reviews
You must be logged in to post a review.
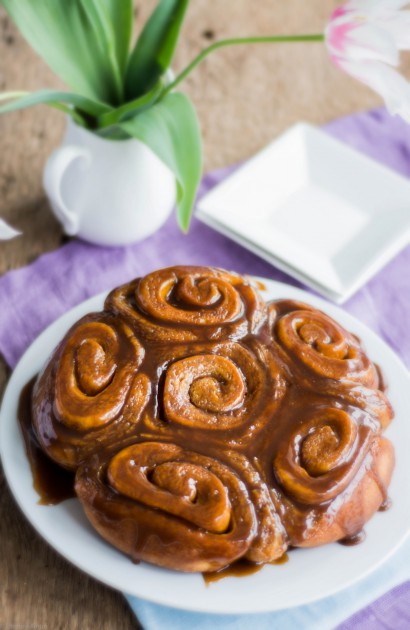
Delicious and indulgent cinnamon buns that can be frozen before baking, making these a perfect make-ahead treat for a special morning.
For the dough:
Measure flour into a small bowl and set it aside. This will help make sure you don’t add too much which would give you a stiff dough.
Mix the warm water, the first amount of sugar and yeast together in a small bowl and let it sit for five minutes to bloom the yeast.
In the bowl of a stand mixer fitted with the dough hook (see notes for how to make this without a mixer), add the buttermilk, eggs, second amount of sugar and salt. Mix in 1½ cups of the flour and the yeast mixture. As the dough hook brings the flour and liquids together, add the melted butter. You may have to scrape the sides down so that the flour blends in.
When you have a sticky, uniform looking mixture, start added the rest of the flour ¼ cup at at time. This will take a few minutes. When you have about ¼ cup of flour left in the bowl, slow the mixer down to minimum and just sprinkle the flour in until you get a ball that can be turned out on a floured counter or board without it being a sticky mess.
With the dough on the floured surface, sprinkle more flour on the dough and knead the dough for two or three minutes. You will use almost all the flour but you may need a bit more or less, depending on the size of your eggs, or humidity in your home. The dough is ready to be placed in a greased bowl when it springs back and isn’t sticky when kneaded.
Cover the bowl with a clean tea towel and place in a warm, place for 1½ hours to rise.
When the dough has doubled in size and when you poke your figure in the centre of the dough and the hole stays, it is ready to be punched down and rolled out.
Just before you roll it out, prepare the filling by melting the butter in a small bowl in the microwave and mixing together the brown sugar and cinnamon in another bowl. Set that aside.
For the topping: Melt the butter in a small pot on the stove over low heat. Whisk in the brown sugar, maple syrup and whipping cream with the butter as it melts. Heat the ingredients until butter is just melted and the mixture is uniform with no oily parts of unincorporated melted butter. Try not to let it bubble as this will contribute to the topping hardening later. Pour the mixture into a 9″ x 12″ cake pan or two 9-inch round cake pans. Set the pan or pans aside.
On a lightly floured board, roll the dough into a 14″ x 18″ rectangle using a rolling pin. Now it’s time to add the fillings. Evenly brush the melted butter onto the rectangle leaving a ½” perimeter around the edge without butter. Sprinkle the dry brown sugar and cinnamon mixture evenly on the melted butter.
Starting with the long side closest to you, begin rolling the dough away from you. Use your fingers to make sure the dough stays tight and even as you roll it. With the seam on the board, cut the log into 3 even pieces using a serrated knife. Then cut each third into 4 even pieces.
Holding the seam of each piece, carefully and evenly place the slices into the pan prepared with the sticky topping. Place the end pieces cut side down.
Cover the pan (or pans) lightly with plastic wrap and let the buns rise for 45 minutes. Towards the end of the rise time, preheat oven to 350 F.
When the oven is preheated to 350 F, remove the plastic from the pans and put them in the oven. Bake the buns for approximately 30 minutes or until the outer buns are deep golden brown and the centre buns sound hollow when tapped lightly. Do not over-bake or the sticky topping will harden when the cinnamon buns cool.
Instructions for freezing:
If freezing the dough, cover the pans of rolls tightly with two layers of plastic wrap that wrap totally around the pan (otherwise it won’t stay on) and freeze until needed.
To thaw: let the buns thaw in the fridge overnight or set the pan on the counter to thaw more quickly.
When the buns have been warmed to room temperature for a half hour, preheat the oven and bake the same as above.
Note:
If not using a stand mixer, you can mix the dough to a shaggy stage with a strong wooden spoon. Mix all the wet ingredients together the same as the instructions and then mix the 1½ cups flour in with the wooden spoon. Pour in the melted butter and mix vigorously until you get a thick sticky dough. Slowly add more flour and stir with the wooden spoon. When it becomes very difficult to use the spoon, start using your hands to mix the flour in while the dough is still in the bowl. When it becomes less sticky, turn the dough out onto a well floured surfaced and knead the remaining flour into the dough as directed in the main instructions.
Prep: Cook:
Serves: 6 Level: Easy
Prep: Cook:
Serves: 6 Level: Easy

Prep: Cook:
Serves: 12 Level: Easy
Prep: Cook:
Serves: 12 Level: Easy
Prep: Cook:
Serves: 12 Level: Intermediate


No Comments
Leave a Comment!
You must be logged in to post a comment.