The Pioneer Woman Tasty Kitchen
Profile photo of Natalie | Perry's Plate

Oat-Almond Pie Crust

Posted by in Baking, Step-by-Step Recipes

Tasty Kitchen Blog: Oat-Almond Pie Crust. Guest post by Natalie Perry of Perry's Plate, recipe submitted by TK member Katy (girlgonecountry) of The Suburban Girl Gone Country.

 
If I asked you what you disliked about making pie crust, I bet I could guess the top two answers: cutting the butter into the flour and rolling out the dough.

I’m right, huh? That’s how I feel, too, which is why I love this recipe so much. The cutting part is much easier (you’ll see why), and you don’t have to roll it out!

This pie crust also works with sweet or savory fillings, and if you use gluten-free oats, the crust is completely gluten-free!

This ingenious recipe comes from TK member Katy (girlgonecountry) who blogs at The Suburban Girl Gone Country.


Tasty Kitchen Blog: Oat-Almond Pie Crust. Guest post by Natalie Perry of Perry's Plate, recipe submitted by TK member Katy (girlgonecountry) of The Suburban Girl Gone Country.

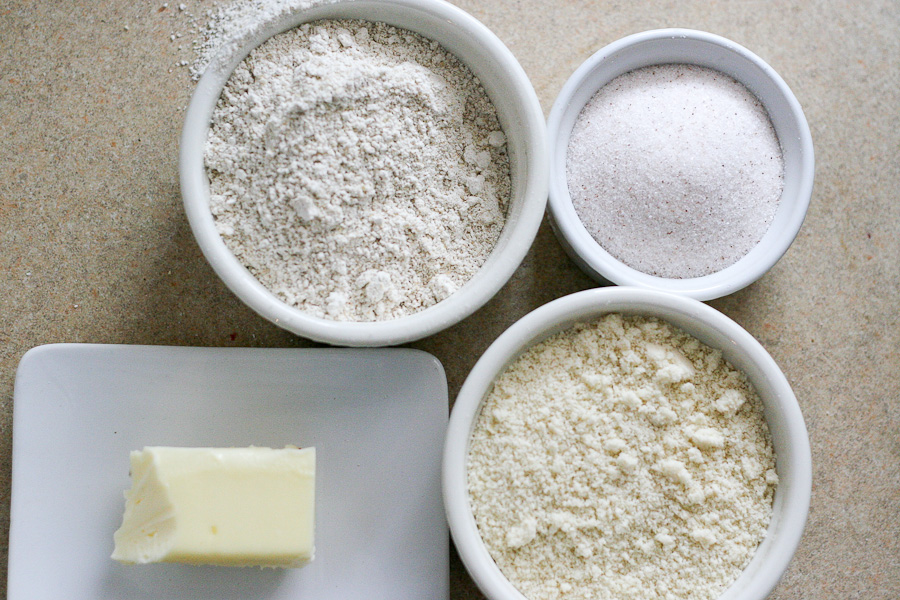
Just a handful of ingredients are needed: almond meal/flour, butter, salt, and oat flour. Katy also used a bit of maple syrup, but I left it out because I was using the crust for a quiche and didn’t want the extra sweetness.

Where do you get oat flour? Well, if you have rolled oats and either a powerful blender, food processor, or a spice/coffee grinder, it’s easy. I’ll show you real quick.
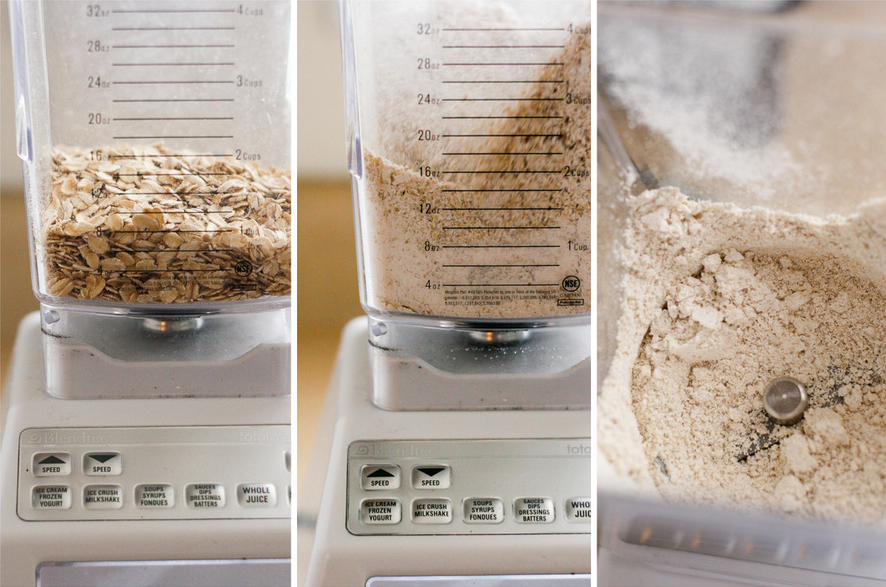


Tasty Kitchen Blog: Oat-Almond Pie Crust. Guest post by Natalie Perry of Perry's Plate, recipe submitted by TK member Katy (girlgonecountry) of The Suburban Girl Gone Country.

Dump. Blend. 

I feel like there should be a third step because I like things in groups of three, but that’s it. Really.


Tasty Kitchen Blog: Oat-Almond Pie Crust. Guest post by Natalie Perry of Perry's Plate, recipe submitted by TK member Katy (girlgonecountry) of The Suburban Girl Gone Country.

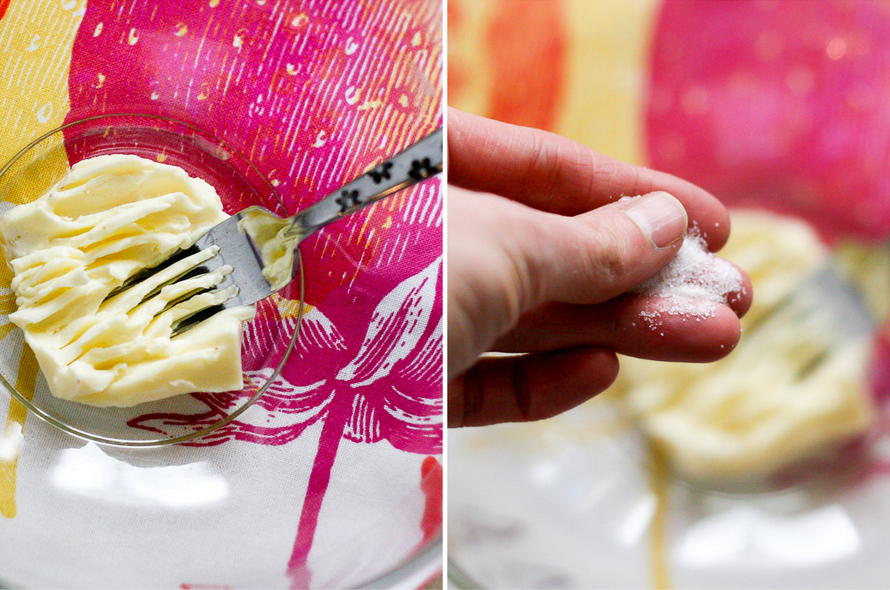
Back to the crust. Put the softened butter in a bowl. 

Yes, softened. I realize that using soft butter is breaking a cardinal rule of pie crust making, (always use cold butter!!) but it works. Trust me.

Add the salt and smash it around with a fork.

Mashing soft butter is a lot easier than cold butter, don’tcha think?


Tasty Kitchen Blog: Oat-Almond Pie Crust. Guest post by Natalie Perry of Perry's Plate, recipe submitted by TK member Katy (girlgonecountry) of The Suburban Girl Gone Country.

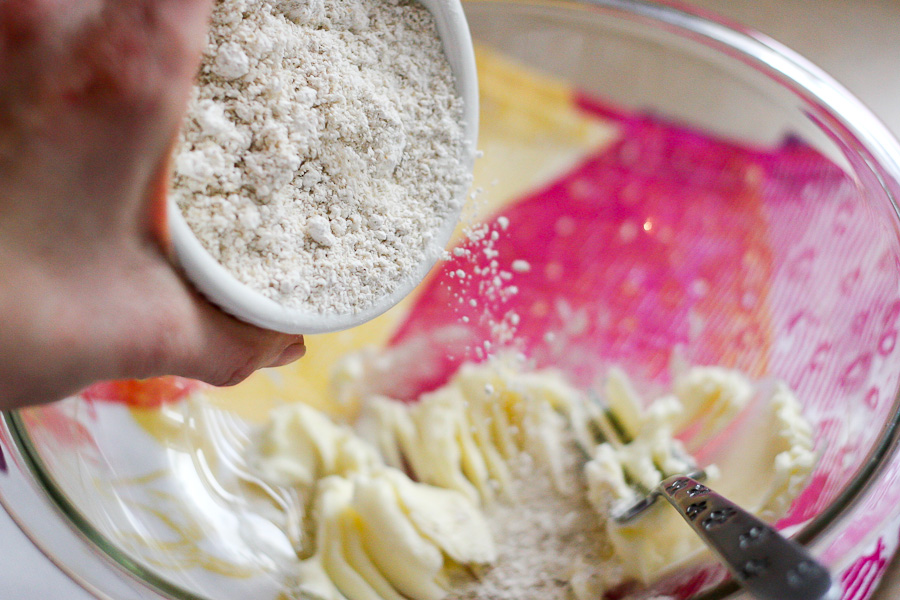
Add some of the oat flour and mix.


Tasty Kitchen Blog: Oat-Almond Pie Crust. Guest post by Natalie Perry of Perry's Plate, recipe submitted by TK member Katy (girlgonecountry) of The Suburban Girl Gone Country.

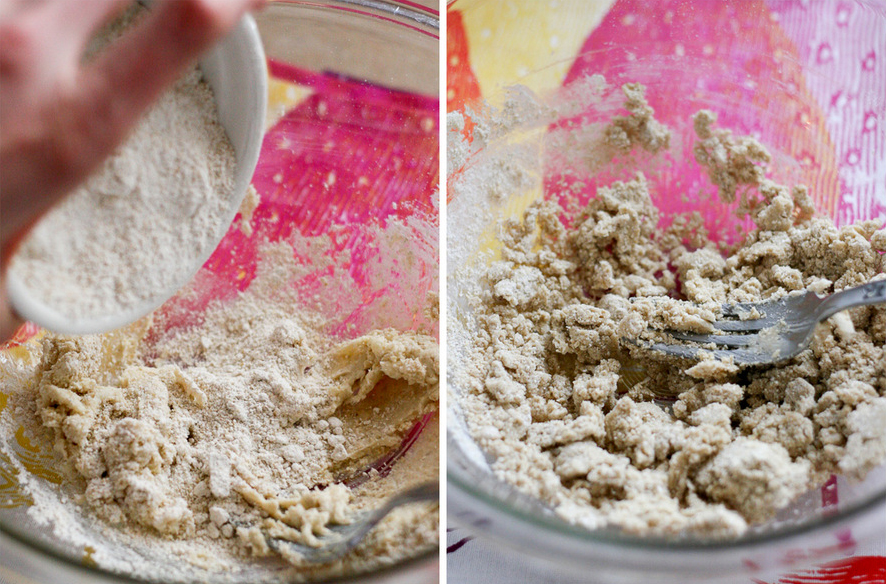
Continue adding the oat flour (in 2-3 portions) until it’s incorporated into the butter.


Tasty Kitchen Blog: Oat-Almond Pie Crust. Guest post by Natalie Perry of Perry's Plate, recipe submitted by TK member Katy (girlgonecountry) of The Suburban Girl Gone Country.

Now add the almond flour and mix as much as you can with the fork. Using your hands at this point makes it much easier.


Tasty Kitchen Blog: Oat-Almond Pie Crust. Guest post by Natalie Perry of Perry's Plate, recipe submitted by TK member Katy (girlgonecountry) of The Suburban Girl Gone Country.

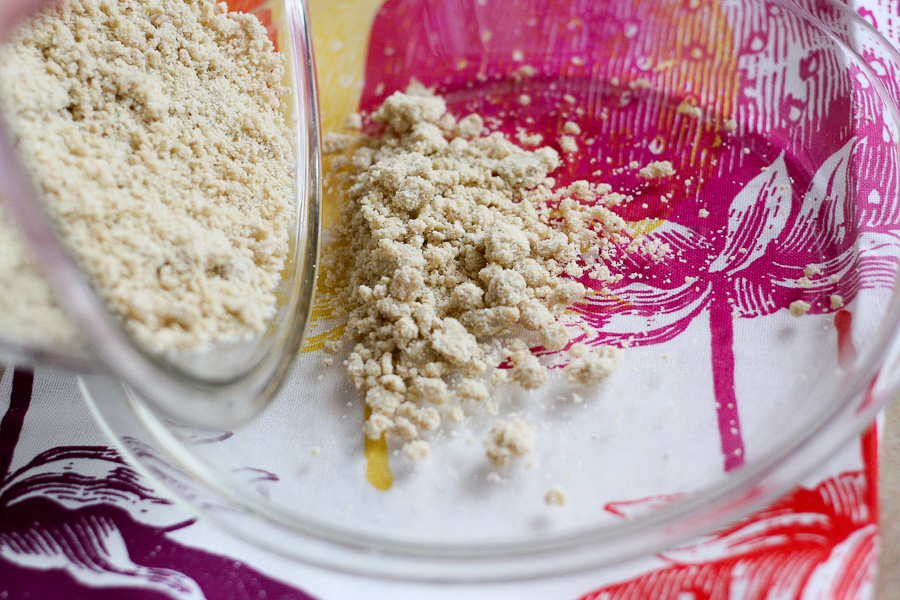
The mixture will be quite crumbly. To be honest, I was worried that it would be too dry (because I left out the syrup), but it worked out alright in the end. You could add a tablespoon of water if you’re really concerned about it. But don’t add too much or it’ll be mushy.

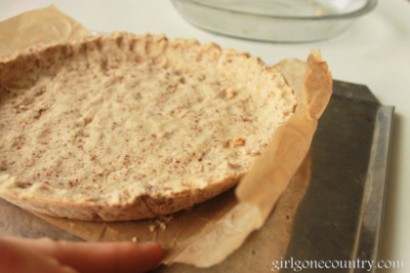
Dump the mixture into a pie plate.


Tasty Kitchen Blog: Oat-Almond Pie Crust. Guest post by Natalie Perry of Perry's Plate, recipe submitted by TK member Katy (girlgonecountry) of The Suburban Girl Gone Country.

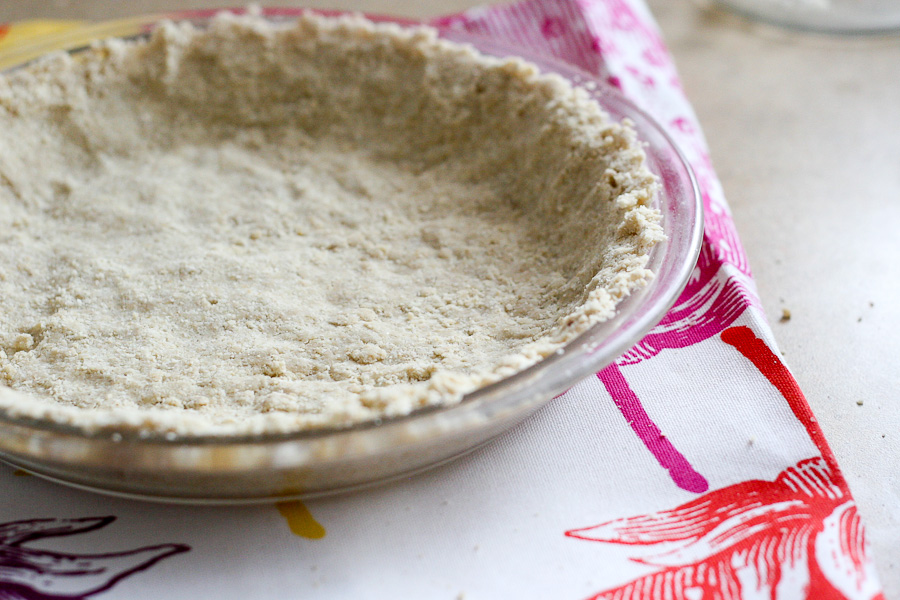
Press the dough out evenly. Bake the crust at 350 degrees F for 10-12 minutes if you’re planning on baking the filling inside the crust later. If you’re going to add a cold filling, bake the crust for 20 minutes at the same temperature.


Tasty Kitchen Blog: Oat-Almond Pie Crust. Guest post by Natalie Perry of Perry's Plate, recipe submitted by TK member Katy (girlgonecountry) of The Suburban Girl Gone Country.

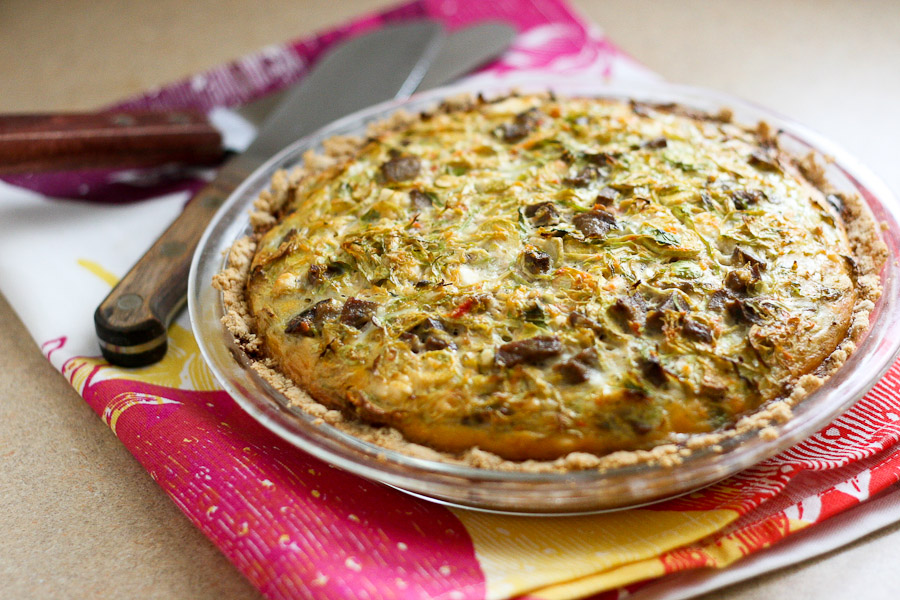
I used the crust for a quiche, which is one of my favorite clean-out-the-fridge meals. (This one happened to be filled with leftover bits of steak from Valentine’s Day, shredded Brussels sprouts, feta, and salsa for some kick. Great combo!)

The crust held up well being baked for almost an hour, and it wasn’t too brown!


Tasty Kitchen Blog: Oat-Almond Pie Crust. Guest post by Natalie Perry of Perry's Plate, recipe submitted by TK member Katy (girlgonecountry) of The Suburban Girl Gone Country.

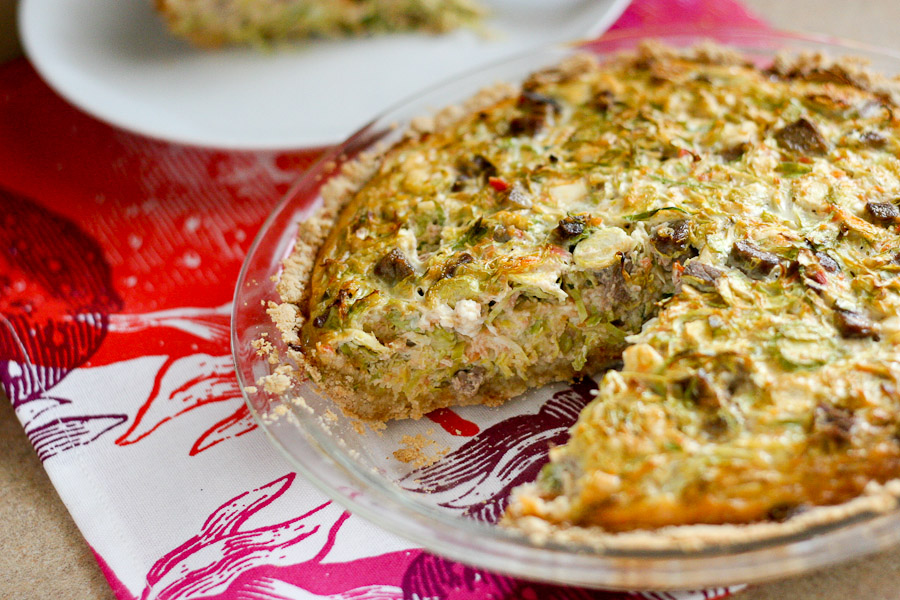
The real test, though, was slicing it. I seriously had doubts that it would stay in one piece. 

But it did!


Tasty Kitchen Blog: Oat-Almond Pie Crust. Guest post by Natalie Perry of Perry's Plate, recipe submitted by TK member Katy (girlgonecountry) of The Suburban Girl Gone Country.

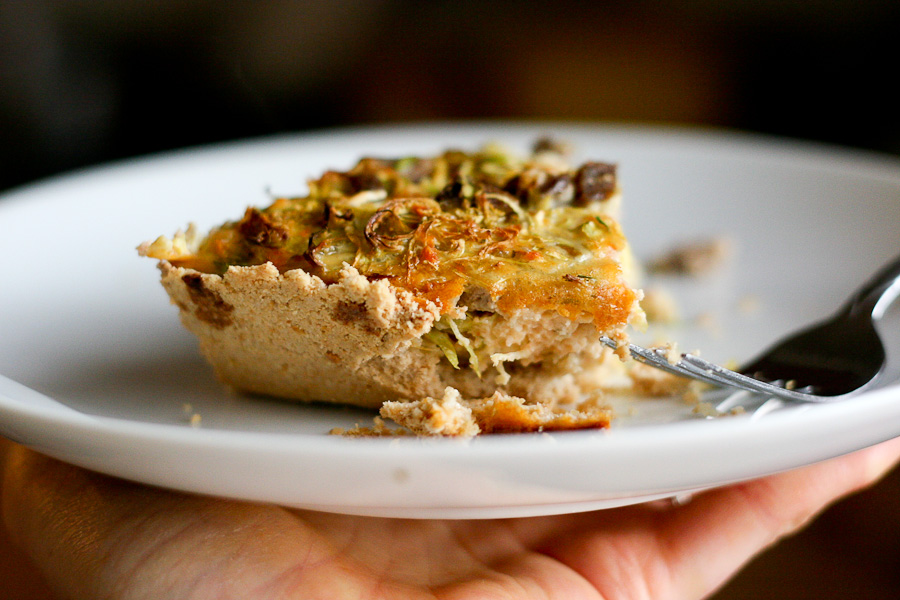
I also picked at the back of the crust to see if it was flaky. Yep. No soggy crust back there. 

I believe we have a winner, folks. I really liked the crust’s nutty flavor, too. The taste and texture reminded me of a graham cracker crust, but not as sweet. I can only imagine what a sweet version would taste like!

Be sure to check out Katy’s TK recipe box and lovely blog, The Suburban Girl Gone Country for more delicious-looking recipes, many of which are also gluten-free!

As always you’ll find the full recipe and printable below.


Printable Recipe

Oat/Almond Meal Pie Crust

See post on girlgonecountry.com’s site!
5.00 Mitt(s) 2 Rating(s)2 votes, average: 5.00 out of 52 votes, average: 5.00 out of 52 votes, average: 5.00 out of 52 votes, average: 5.00 out of 52 votes, average: 5.00 out of 5

Prep Time:

Cook Time:

Difficulty: Easy

Servings: 8

8
x

Print Options

Page size Letter 3x5 4x6
Text Size Small Medium Large
Content Include description
Include prep time, etc.
Show image

Description

This 50/50 combination of oat and almond flour makes an amazing pie crust.

Ingredients

  • 4 Tablespoons Butter, Left Out At Room Temperature For At Least 1 Hour
  • 2 Tablespoons Pure Maple Syrup
  • ¼ teaspoons Sea Salt
  • 1 cup Oat Flour (ground In A Clean Coffee Grinder)
  • 1 cup Almond Meal (Trader Joe's Brand Works Well)

Preparation Instructions

Preheat the oven to 350ºF. Line a pie dish with parchment paper with opposing sides exposed (your handles so you can take the pie out of the dish)—I just put a straight sheet of parchment paper in there.

Mix the butter, maple syrup and sea salt in a large bowl with a fork. If your butter is still cold, just work the fork into it more. Add 1/4 of the oat flour and stir and mash. Add the rest slowly while stirring and mashing (this will help the butter even out easily).

Next, add the almond meal and stir and mash. Use your hand to ensure that butter is worked into the dough evenly.

Press the dough in to the prepared pie dish. Bake at 350ºF for 10 minutes if you are going to bake a pie, or 15 minutes if you are going to fill the crust with a no-bake filling.

Let cool completely before filling the pie.


_______________________________________

Be sure to check out Natalie’s own beautiful food blog, Perrys’ Plate, where you can see her growing collection of lovely recipes. There’s always something new to see there. Go visit now!


Profile photo of HowSweetEats

Spicy Buffalo Chicken Cannoli

Posted by in Step-by-Step Recipes

Tasty Kitchen Blog: Buffalo Chicken Cannoli. Guest post by Jessica Merchant of How Sweet It Is, recipe submitted by TK member Sandy of Everyday Southwest.

 
As a lover of all things Buffalo chicken, I am constantly trying to find new ways to use the flavor combination. You could say that I’m a bit of a Buffalo chicken … freak? But that’s okay. The first step is admitting you have a problem, right?

Well. I might have a big problem now. Buffalo chicken cannoli? One of my favorite things, stuffed inside a fried shell, topped with blue cheese? I cannot take it.

This recipe from TK member Sandy is completely decadent and wonderful and fun. I’m going to tell you all about it, too.


Tasty Kitchen Blog: Buffalo Chicken Cannoli. Guest post by Jessica Merchant of How Sweet It Is, recipe submitted by TK member Sandy of Everyday Southwest.

These babies take just a few ingredients: flour tortillas, oil for frying, Buffalo wing sauce, mayo, cooked and cubed chicken, diced celery and blue cheese. Oh, and a little salt and pepper if needed.


Tasty Kitchen Blog: Buffalo Chicken Cannoli. Guest post by Jessica Merchant of How Sweet It Is, recipe submitted by TK member Sandy of Everyday Southwest.

Since I didn’t have a thing-a-ma-jig to wrap cannoli, I secured the tortillas with a toothpick. This worked perfectly. After doing that, I began to heat the oil in a large pot.


Tasty Kitchen Blog: Buffalo Chicken Cannoli. Guest post by Jessica Merchant of How Sweet It Is, recipe submitted by TK member Sandy of Everyday Southwest.

While the oil is coming to temperature, mix together some mayo and Buffalo wing sauce. You want it to have a little kick!


Tasty Kitchen Blog: Buffalo Chicken Cannoli. Guest post by Jessica Merchant of How Sweet It Is, recipe submitted by TK member Sandy of Everyday Southwest.

Once the oil is hot enough, fry the tortillas (just a few at a time) until golden. I found that keeping the toothpick in was fine, just as long as I had enough of it to grab and remove it before filling.


Tasty Kitchen Blog: Buffalo Chicken Cannoli. Guest post by Jessica Merchant of How Sweet It Is, recipe submitted by TK member Sandy of Everyday Southwest.

Once each cannoli is done, place on a paper towel to drain and become cool enough to touch.


Tasty Kitchen Blog: Buffalo Chicken Cannoli. Guest post by Jessica Merchant of How Sweet It Is, recipe submitted by TK member Sandy of Everyday Southwest.

While the tortillas are cooling, add the chicken and celery to a bowl. Add in the buffalo wing/mayo sauce and mix, mix, mix.


Tasty Kitchen Blog: Buffalo Chicken Cannoli. Guest post by Jessica Merchant of How Sweet It Is, recipe submitted by TK member Sandy of Everyday Southwest.

Toss in some crumbled blue cheese. I actually used smoky blue cheese. It is to die for.


Tasty Kitchen Blog: Buffalo Chicken Cannoli. Guest post by Jessica Merchant of How Sweet It Is, recipe submitted by TK member Sandy of Everyday Southwest.

Once the tortillas have cooled, use a small spoon and fill each with some of the chicken mixture. A few of the insides may puff up, so simply press down on the bubble gently to make room for the chicken.


Tasty Kitchen Blog: Buffalo Chicken Cannoli. Guest post by Jessica Merchant of How Sweet It Is, recipe submitted by TK member Sandy of Everyday Southwest.

Once they are all filled, serve with additional Buffalo wing sauce, blue cheese crumbles and celery.


Tasty Kitchen Blog: Buffalo Chicken Cannoli. Guest post by Jessica Merchant of How Sweet It Is, recipe submitted by TK member Sandy of Everyday Southwest.

And to take things over the top, cover each cannoli with a big drizzle of sauce!


Tasty Kitchen Blog: Buffalo Chicken Cannoli. Guest post by Jessica Merchant of How Sweet It Is, recipe submitted by TK member Sandy of Everyday Southwest.

Oh, and more blue cheese. Yes. It’s necessary.

These are totally insane in the best way ever. I’ll say it again: I adore all things Buffalo chicken, so it’s safe to say these will make a frequent appearance in my kitchen. They are such a fun twist on two traditional foods and I get giddy just thinking about them. Thanks so much for the recipe Sandy! Be sure to check out her fab blog, Everyday Southwest.


Printable Recipe

Spicy Buffalo Chicken Cannoli

See post on Sandy | Everyday Southwest’s site!
0.00 Mitt(s) 0 Rating(s)0 votes, average: 0.00 out of 50 votes, average: 0.00 out of 50 votes, average: 0.00 out of 50 votes, average: 0.00 out of 50 votes, average: 0.00 out of 5

Prep Time:

Cook Time:

Difficulty: Easy

Servings: 6

6
x

Print Options

Page size Letter 3x5 4x6
Text Size Small Medium Large
Content Include description
Include prep time, etc.
Show image

Description

Crunchy flour tortilla cannoli shells stuffed with spicy Buffalo chicken salad.

Ingredients

  • 20 whole Flour Tortillas
  • 24 ounces, fluid Vegetable Oil For Frying, Or Enough To Fill A Frying Pan 1 Inch Deep
  • 2-½ cups Cooked Chicken, Diced
  • 1 whole Large Celery Stalk, Finely Diced Or Minced
  • ¼ cups Mayonnaise
  • ¼ cups Prepared Hot Wing Sauce, More If Desired
  • ¼ cups Blue Cheese Crumbles
  • ½ teaspoons Salt, If Necessary
  • ½ teaspoons Black Pepper, If Necessary.

Preparation Instructions

Cut the flour tortillas into 5-inch circles. Loosely wrap the tortilla around a cannoli shell and secure with a toothpick. Or, if you prefer, fold the tortilla around two of your fingers and secure with toothpick. Overlap the tortilla only as much as you need to secure it with a toothpick leaving a nice wide center to fill with chicken mixture.

Use a frying pan or pot that is large enough to fill with 1 to 1 1/2 inches of oil to fry the tortillas. The pan should still have plenty of room so that the oil will not boil over. Heat the oil to 360ºF or until bubbles form when a scrap of tortilla is place in the oil. Place the tortillas in the hot oil with tongs one at a time. Leave the cannoli mold in the tortilla or use the tongs to keep the shape of a cannoli until the tortilla is cooked enough to hold its own shape then continue with the next tortilla. Only fry up to 4 to 5 at a time.

Fry the tortillas until golden brown and crispy; they will continue to brown a little when removed from the oil. Drain on paper towels. While the tortilla is hot, push down any of the bubbles that my have formed on the inside of the cannoli shell so that the center is open for the filling.

In a mixing bowl, toss together the diced chicken and diced celery.

in a small bowl, combine the mayonnaise and hot wing sauce in a small bowl. Add more hot wing sauce slowly and taste as you go for the desired flavor. The sauce mixture should be hotter than you expect because you will be adding it to the chicken and filling the tortilla with it, which will dilute the flavor of the sauce.

Fold the hot wing sauce mixture into the chicken a little at a time to achieve the desired consistency. Stir in the desired amount of blue cheese crumbles and save the remaining for garnish. Salt and pepper to taste. If you add the blue cheese to the mixture, you may not need salt so be sure to taste.

Fill the cannoli shells with chicken from both ends with a small spoon. Use the end of the spoon to push the filling into the middle of the cannoli.

Serve with hot wing sauce and blue cheese crumbles.


_______________________________________

Jessica Merchant is a personal trainer turned food writer and blogger. Her blog, How Sweet Eats, is where she proclaims her love for all things sweet, all things bacon, and everything else in between. She works her magic in her Pittsburgh kitchen, which she shares with her husband of 2 years.