

No Reviews
You must be logged in to post a review.
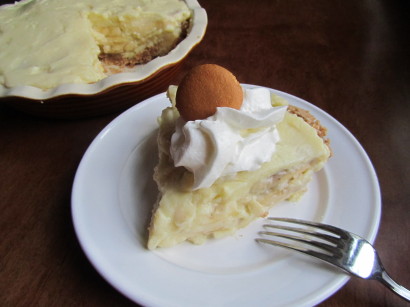
This pie is for the serious banana lover. It’s chock full of bananas and it’s reduced in fat, so let’s just call this health food!
For the pie:
1. In a 3-quart saucepan whisk together the coconut milk, regular milk, and ½ cup of the sugar. Split the vanilla bean in half and scrape out the seeds using the back of a paring knife, and add the seeds and the vanilla bean (if using vanilla extract do not add it yet) into the milk as well. Scald the mixture (i.e. get it very hot) over medium heat, do not boil.
2. Meanwhile in a medium heat safe bowl, add the egg yolks, whole eggs, the remaining ¾ cup of sugar and the cornstarch. Whisk for several minutes, until the mixture is a really pale yellow (you may wish to use a hand held mixer). (If using vanilla extract add that now).
3. Whisk about 1 cup of the scalded milk into the egg mixture (this tempers the eggs). Now whisk the egg mixture back into the pan of scalded milk. Cook while whisking continually. Once it starts to thicken, switch to a wooden spoon and stir continually, until the mixture thickens to the constancy of custard (or pudding). This will take about 5 minutes.
4. Place a strainer over a large bowl and pour the custard through the strainer. Use the back of a spoon or a rubber spatula to press the custard through the strainer. Once it’s strained, place a sheet of plastic wrap directly onto the custard, and refrigerate for 4 hours. Make your pie shell in the meantime because it will need to be cooled before you fill it.
5. Once the custard is chilled you are ready to assemble the pie. Spread about ¾ cup of the custard in the bottom of the prepared, cooled pie shell. Arrange about 1/3 of the bananas in a tile pattern, with the bananas touching, over the custard. Spread another ¾ cup of custard over the bananas, and add a second layer of bananas. Spread another ¾ cup of custard, and the third layer of bananas. Finally spread the remaining custard over the entire pie. Be sure that the bananas are completely covered with custard, this keeps the bananas from turning brown.
6. Cover the pie by laying a sheet of plastic wrap directly on the custard. Refrigerate for at least 4 hours before cutting with a sharp knife. This pie must be served cold.
7. Garnish with a little whip cream and a Nilla Wafer.
Note: This pie is best served fresh, but will keep for about 3 days in the refrigerator.
For the pie shell:
1. Preheat oven to 350 F.
2. In the bowl of a food processor add the Nilla Wafers. Pulse until you have fine crumbs.
3. Add the cinnamon, salt, melted butter and egg white to the food processor and pulse just until everything is mixed.
4. Dump the crumb mixture into a 9 inch pie dish (I used a deep pie dish for this pie). Use the pads of your fingers to press and pack the crumb mixture into the bottom of the pie dish and up the sides as well.
5. Bake for 10 minutes. Then remove from the oven and set on a rack.
6. Allow to cool completely before filling the pie shell.
Prep: Cook:
Serves: 6 Level: Easy
Prep: Cook:
Serves: 12 Level: Intermediate
Prep: Cook:
Serves: 16 Level: Easy
Prep: Cook:
Serves: 24 Level: Intermediate

Prep: Cook:
Serves: 12 Level: Easy


No Comments
Leave a Comment!
You must be logged in to post a comment.