One Review
You must be logged in to post a review.

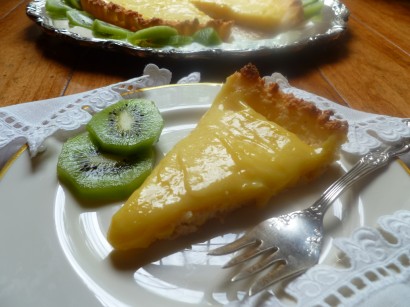
Lemon curd and the coconut crust are a great combination. But the human element behind the steps on the printed page is always important. How things look and feel and taste are all judgement calls. Here is an easy and interesting opportunity for developing “cooking senses”.
You will also need:
1. A double boiler or a homemade one using a pot and a heatproof bowl that will fit comfortably inside the rim of the pot without moving around or touching the bottom. Add water to the pot so that it almost reaches the bottom of the bowl.
2. A whisk.
3. One or two jars with lids for storing the curd in the refrigerator
4. A tart pan with a removable bottom: the photographed tart was baked in a pan measuring 11-inches across the top and 1-inch deep.
5. A blender or food processor.
6. A measuring cup or bowl with a flat bottom to provide a stable base for the tart as you slip the ring of the pan down off of the baked crust.
7. An icing spatula or knife with a long blade to loosen the crust from the base of the tart pan.
8. A cooling rack.
9. A piece of parchment paper, placed on the cooling rack (to prevent the crust from sticking to the rack).
For the lemon curd (makes about 1 and 1/2 cups):
Prepare ahead because the curd must be well-chilled before putting it into the crust.
1. Crack the eggs into a bowl, beat them well, and set them aside.
2. Put the lemon juice, zest, sugar and butter in the top of the double boiler. Bring the water in the bottom of the double boiler to a simmer and heat the mixture, whisking it now and again, until the sugar dissolves and the butter melts.
3. Whisking continuously, pour in the eggs, and cook the mixture over the simmering water without letting it boil. Make sure to whisk continuously.
4. Continue stirring and cooking the curd. Steam will begin rising from the curd, and little bubbles will form on the surface. At first the curd will leave only a film on a spoon. It will taste and look thin. Gradually, you will see a change in its consistency as you continue to stir and cook it. When the curd thickens and forms an opaque coating on the spoon and its color deepens, it is done.
5. Remove the curd from the heat and put it in one or a couple of jars. Wait until it cools to cap it, then refrigerate the curd. If you erred on the side of caution and cooked the curd a little less than the optimum, it will thicken more after being refrigerated. It should be well chilled before putting it into the tart shell. The curd will keep for several weeks at least, stored in the refrigerator. It is very good on bread or scones as well as in a tart.
For the coconut crust (for an 11-inch Tart) and assembly:
1. Preheat the oven to 325 F. Grease the tart pan very well with the softened butter. With your fingers, run butter vertically up into the ridges of the sides of the pan.
2. Put the coconut and the sugar in the blender or processor and mix until the coconut is finely chopped.
3. Blend in the egg whites and vanilla.
4. Test the consistency of the crust mixture. Put a handful of it on a large spoon or on a saucer. The crust mixture should hold its shape. It should look and feel like it holds together loosely. If it doesn’t, add some more coconut, process the mixture again briefly, and check the consistency again.
5. Press the crust into the tart pan. (The crust is thick.)
6. Put the tart shell in the preheated 325 F oven. After 20 minutes, remove the crust from the oven and press on the sides and bottom of it with a spoon to define the crust better … Then, return it to the oven for another 20 minutes, or until it has turned a golden brown.
7. When the tart shell is done, remove it from the oven and place it on a stable base (such as a large, flat-bottomed measuring cup or bowl turned upside down) and slide the metal ring of the tart pan down from the sides of the crust. Run the icing spatula or knife under the crust to loosen it from the bottom of the pan and …
8. Slide the crust onto the parchment paper that you have on top of the cooling rack. Cool the tart shell and fill it with the cold lemon curd when ready to serve.
9. Circle the tart with rounds of sliced kiwi if you use them
Note: If you find that your lemon curd it still on the thin side after it has been refrigerated, there is a remedy. Do not fill the tart shell. Instead, cut the coconut crust into wedges, place one on each plate, and spoon the curd onto each piece of crust. Decorate the desserts with kiwi slices … and all turns out well.
The recipe for Lemon Curd is adapted from Jane Grigson, author of the very readable and useful book about English food: English Food.
No Comments
Leave a Comment!
You must be logged in to post a comment.