


No Reviews
You must be logged in to post a review.
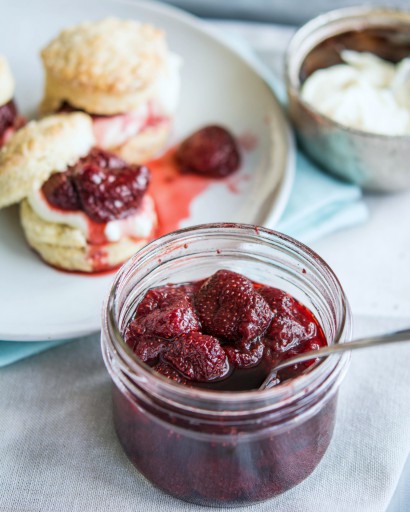
Whole strawberry preserves: versatile preserve that is delicious on yogurt or homemade scones.
In a large bowl, gently mix the sugar with the strawberries using a large, flat spoon. Try not to crush the berries.
Split the vanilla bean lengthwise and scrape out the seeds. Add the bean and the seeds to the bowl of strawberries and sugar. Gently stir it into the mixture. Don’t worry about spreading the clump of vanilla seeds in now since you would just end up squishing the berries in the process.
Let the bowl of berries sit on the counter at room temperature for 2 hours so that the juice starts to come out of the berries. Give it another stir and put the bowl in the fridge for 24 hours.
On day 2, get your canning pot filled with hot water with a rack on the bottom and a splash of white vinegar to help prevent hard water marks on the jars. Wash the 250 ml (1/2 pint) jars. Bring the canning pot to the boil and sterilize the jars for 10 minutes and leave them in the water to stay hot. You can add the empty jars to the canning pot about 10 minutes before the preserves are ready to go in them. You also need to wash the rings and lids. Place the lids in a small pot with hot water and bring it to the boil. Turn the heat off and let the lids sit in the hot water until you are ready to use them.
Pour the strawberries into a large wide-bottomed pot. Be sure to scrape in any undissolved sugar from the bowl into the pot. Bring the strawberries and sugar to a rolling boil over high heat. If the berries are straight from the fridge, this will take approximately 10 minutes depending on your stove and the pot you are using.
Add the lemon juice and boil the preserves for another 20 minutes, stirring often to prevent scorching. After it has boiled for 10 minutes, start skimming the foam off.
About 20 minutes of hard boiling will give you preserves that still have a nice amount of syrup that is slightly thicker than maple syrup and the strawberries are holding their shape. If you want it thicker then you can keep boiling it for another 2-5 minutes. It will thicken slightly in the jars but it will not set like jam. These times are dependent on how hot your stove runs.
Remove the jars from the canning pot and set them on a tea towel or paper towel on a board. Fish out the vanilla bean pod with a spoon and ladle the preserves into the jars leaving a ¼” head space in the top of each jar. Wipe the rim of the jars clean and place the lids and rings to the jars.
Process the jars in a water bath canner and make sure to boil for 10 minutes. Begin timing after the pot returns to a full boil.
After processing, let the jars rest on the counter for 24 hours. Check to make sure that all the jars have sealed. If there are any that haven’t, place them in the fridge and enjoy within 1-2 weeks.
Yield: Between 4 and 5 half pint jars. This depends on how juicy the berries are and how long you let it boil. If you use the full amount of sugar you will most likely get 5 jars.

Prep: Cook:
Serves: 9 Level: Intermediate
Prep: Cook:
Serves: 36 Level: Easy
Prep: Cook:
Serves: 6 Level: Easy
Prep: Cook:
Serves: 4 Level: Easy
Prep: Cook:
Serves: 8 Level: Easy


No Comments
Leave a Comment!
You must be logged in to post a comment.