


No Reviews
You must be logged in to post a review.
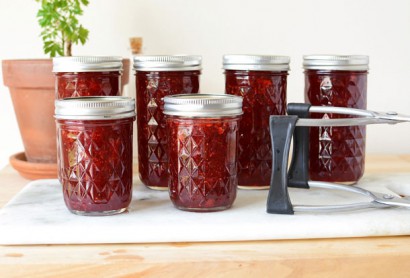
Think all strawberry jam canning recipes are the same? In this post I share my secrets on how to take your strawberry jam from ordinary to extraordinary!
You will also need a large canning pot, canning tongs, a canning funnel and six 12-ounce Ball canning/jelly jars with lids and rings.
1. Wash your hands! Fill a large pot with water and begin to heat up to a boil (this will be used for processing your jam). Place your canning jars into the dishwasher on the high heat setting to sterilize (don’t use soap). If you don’t have a dishwasher, sterilize them by boiling them according to standard safe canning practice. Place your lids and rings in a small, empty pot and set aside.
2. Rinse the strawberries and remove the stems and any rotten spots. Place them into a large saucepan and smash them until they have released their juices and only small pieces remain. A potato masher works well for this.
3. Add the Sure-Jell Pectin and the lemon juice to the saucepan and stir to evenly combine. Bring to a boil over high heat, while stirring frequently, and scraping the bottom of the pot to prevent burning. A wooden spoon works well for this.
4. Once you have achieved a rolling boil, add the sugar to the pot and stir to combine. Return the pot to a rolling boil, while continuing to stir and scrape the bottom of the pot. Boil for 1 minute and then remove the jam from the heat.
5. Allow the jam to sit for a couple of minutes, until it has stopped bubbling. Scrape any foam off of the top with a large spoon and discard.
6. Remove your sterilized jars from the dishwasher, taking care not to touch the inside of the jars. Add water to your small pot with the rings and lids and clean them by heating them on the stove top until the water begins to bubble. Make sure you don’t allow it to come to a full boil, as over-heating can damage the seals on the lids. I don’t boil the lids and the rings ahead of time as they tend to rust if they sit in water too long.
7. Using a canning funnel, ladle the jam into your clean jars, leaving approximately 1/4 inch of space between the jam and the top of the jar.
8. Before placing lids on the jars, wipe the rims clean with a damp paper towel to ensure a good seal. Then place the lid and the ring on the jar. Tighten the ring until you feel resistance and then loosen slightly (about 1 millimeter).
9. Place your jars into your pot of boiling water using canning tongs, taking care not to burn yourself. If there is any empty space in the pot, fill it in with empty jars, so your jam doesn’t roll around. Process your jam by boiling for 10 minutes.
10. After 10 minutes have passed remove the jam jars from the pot using your tongs. Place them on a counter top that doesn’t receive direct sun, where they can sit undisturbed for 24 hours. Soon after the jars are removed from the pot, you should start hearing popping sounds as the jars seal. If after 24 hours the bubble on the top of the lid hasn’t been sucked in and “pops” when you press on it, then that jar did not seal, and needs to be refrigerated and used within a month. Sealed jars are shelf stable for one year. Store in a cool, dark place with the rings removed.

Prep: Cook:
Serves: 9 Level: Intermediate
Prep: Cook:
Serves: 36 Level: Easy
Prep: Cook:
Serves: 6 Level: Easy
Prep: Cook:
Serves: 4 Level: Easy
Prep: Cook:
Serves: 8 Level: Easy


No Comments
Leave a Comment!
You must be logged in to post a comment.