(Makes 3 loaves)
1. First, measure all your dry ingredients into a large mixing bowl. Mix them around so they’re well blended. Then add the water (which really does need to be ice cold). Stir it with a spoon until it’s fairly uniform. The dough will be very sticky, so I tend to add a little less than the maximum 3 cup amount of water, and if it’s too dry, add a little more. Use your KitchenAid paddle mixer to combine it, or your hands—though you will get messy!
2. Once mixed, put a generous quantity of bread flour on the countertop and plop the squishy dough onto it. Then, begin to knead. You’ll probably find yourself using quite a bit more flour so that 90% of it doesn’t end up on your hands, but try to keep the excess flour to a minimum. Once the dough is smooth and elastic, and still quite sticky (or after 6-8 minutes of hand-kneading), lightly grease another clean mixing bowl and put the dough into it. Cover your bowl with plastic wrap and pop it all into the fridge. Leave it there overnight, but no longer than two days.
3. When you take it out of the fridge, you’ll notice that big, beautiful bubbles have formed in the dough. Yum!! Don’t do anything to it yet, just set it in a warm place (like a warm oven) and let it rise. Since the dough is cold, it will take quite a bit longer than your average rising time since it first has to warm up. Mine usually rises for a good 3 hours.
4. Once your dough has doubled in size and is smelling all yeasty and glorious, resist your instincts and don’t punch it down! Instead, fill a cast iron or sturdy metal baking pan with water, and put it in your oven. We’ll put the bread on the lower rack, so it’s ok to put the rack with the water on it fairly high in the oven. We want the steam from the evaporating water, as this will make the crust crunchy and beautiful. Preheat to about 475 Fahrenheit, and while the oven preheats, we’ll prep the loaves.
5. Personally, I like generously sized wider loaves rather than baguettes with this bread. You can do whatever you like, though. If doing baguettes, you can get about 5 shorter loaves from this recipe; otherwise, divide the dough into three lumps. It will be quite squishy and floppy, and won’t hold its shape too well. What we REALLY DON’T want is to squeeze or squash the dough too much. We want to keep those big air bubbles that have formed overnight, so be gentle with it. If you have a holey pizza pan, this is the time to use it. Otherwise a cookie sheet with some cornmeal sprinkled on it will do just fine. I bet a pizza stone would be great too, so use yours if you have one- just put the pizza stone in the oven with a light dusting of cornmeal when you put the water in, and slip the loaves onto it when the oven is ready. Otherwise, gently place the loaves onto your cornmeal sprinkled pan and pop it in the oven.
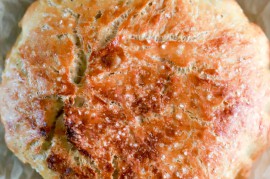
6. A word about the baking: These loaves will rise a lot, and expand slightly sideways too. I always have to bake them in several rounds- they don’t usually fit on a single pan. As the loaves bake (judge the doneness by color), usually 20-30 minutes depending on the size of the loaf, you’ll need to use a water spritzer to spray the loaves 4-5 times throughout the baking time. You can find one in the laundry aisle of most stores, near the ironing stuff. The steam from the pan is great, but we need a little extra. Plus, it’s fun. Don’t be afraid to aim directly at the bread. A word of caution: it is very hot, so be careful as the steam might cloud up on you when you spray. The loaves will become a lovely deep golden or light brown color when they are done. At this point, let them cool slightly if you can- a true test of your self-control- and then….devour!







9 Comments
Leave a Comment
You must be logged in to post a comment.
kitchenlovenest on 3.15.2011
@katejudy: I’m so sorry I didn’t see your question until today! Yikes–a couple months late . . . The wheat gluten is pretty important to this recipe. I would get some before making it. It helps create those big bubbles that are so desirable in rustic breads.
@danmar7: I would say it’s sticky if it sticks to your hands and fingers as you work it. I don’t have a lot of experience baking in different climates (at altitudes, or in humidity)–I wish I had a better answer for you!
danmar7 on 3.14.2011
Bread experts: what’s acceptable sticky? I live in southeast Texas, so we battle humidity, and tend to over flour to make up. What’s sticky to us, may be different to – well – almost anyone.
lvenable on 12.16.2010
i was about to ask the same question about the wheat gluten. i called my grocery store and they don’t carry. i had already started mixing things before i realized i even needed it. the dough is currently in the fridge, so i have no idea yet how it will turn out. what is the purpose of the wheat gluten?
katejudy311 on 11.4.2010
How essentil is the wheat gluten? I don’t have any, but I really want to make this bread today. (And I don’t want to go to the store.)
Midnite Baker on 10.29.2010
Yum! A bread recipe that uses lots of water. I have lots of potato water saved just for using in this type of recipe. Thanks for sharing. Will be making this very soon.