No Reviews
You must be logged in to post a review.

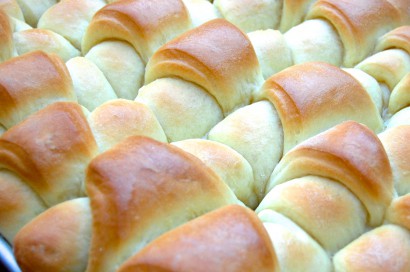
Delicious and simple buttery rolls. A great addition to any meal!
1. In a microwave safe bowl, add the whole milk and the first amount of sugar. Cut 1/2 cup of butter into small pieces and add it into the milk and sugar mixture. Microwave for about 2 to 3 minutes until butter is just about melted. If there are any pieces floating, mix with a whisk and the butter will melt down.
2. Pour mixture into a large mixing bowl and let it cool for a few minutes. Add the egg (adding it sooner will cause it to scramble) and kosher salt. Allow the mixture to sit and cool for a few more minutes. Meanwhile, in a small bowl or cup dissolve the yeast and second amount of sugar in the warm water. Let it sit for a few minutes until bubbly. Add 2 cups of flour to the milk mixture to help cool it down further. Once the mixture has cooled down and is no longer boiling hot, add the yeast, sugar and water mixture.
3. Gradually add about 8-9 cups of flour in 2-cup increments, being sure to mix well in between. This dough comes out much better when mixed with your hands, however if you’d rather use a wooden spoon, that will work too! You may not use all of the flour. You’ll know you’ve added enough flour when dough is dense and somewhat sticky. Once all the flour is incorporated, cover with plastic wrap and place a towel over the plastic wrap. Leave in a warm place and let dough rise for about 3-4 hours. You will know the dough has risen enough when it has quadrupled in size.
4. When the dough is just about done rising, soften 2 cups of butter. Use some of the softened butter to grease 2 cookie sheets. Set aside (you will use the rest of the butter later). Create a large working space either on your counter or on a large cutting board. Cover the area with plenty of flour to prevent sticking while rolling out the dough.
5. Remove the dough from the bowl and split into 4 balls. These don’t have to be perfect so just guess by eyeballing the size and the weight of each one. Leave 1 ball of dough on your floured work space and place the others aside. Using a rolling pin, roll out the ball into a circle that is no thicker than ¼ of an inch. Once the dough is completely rolled out use a pastry brush to spread butter on the entire piece of dough.
6. Using a pizza cutter cut the circle of dough into quarters. Then cut each quarter into 3 wedges, which would give you 12 slices from each ball of dough. Now you get to roll the rolls! Starting with the wide end of the triangle, roll up each slice of dough and place on buttered cookie sheet with the pointed end of the triangle tucked underneath. Depending on the size of your cookie sheet, you will make 3 rows of 8 rolls giving you 24 rolls per pan. If you have a smaller or larger cookie sheet, adjust this number so the rolls are slightly touching when placed on the pan. Continue this process with the remaining 3 balls of dough.
7. Preheat your oven to 350 F and allow your rolls to rise again by putting them in a warm place and covering each pan with a lightweight towel. Once the rolls are very full and touching, they are ready to bake! Place pans in the oven and bake for about 15-20 minutes until golden brown. Check the rolls at 10 minutes just to be sure they aren’t burning. When rolls are done baking, remove from oven and immediately brush the tops of the rolls with the remaining softened butter. Enjoy!
Notes:
1. Of course the rolls taste the best when eaten immediately but they will last for about a week in a sealed bag or container.
2. If you are gluten-free, these rolls turn out great using Pamela’s Products Gluten-Free Artisan Flour Blend, 4 Pound! They don’t rise as much, but they are pretty tasty regardless!
No Comments
Leave a Comment!
You must be logged in to post a comment.