I use my stand mixer to make this extra simple, but you can definitely do it all by hand. You will have the strongest arm muscles in all the land! Who needs a gym membership, eh?
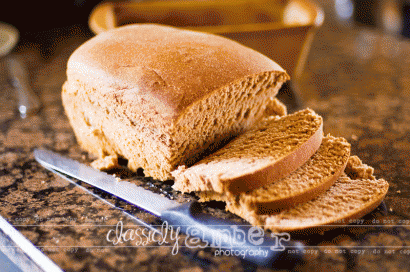
This is the homemade loaf bread that I make each week for my family. Once you start doing this, it really is nothing to keep it up every week. In fact, it makes things easier at mealtimes and all. Truly.
In your mixer’s bowl, pour in the 2.5 cups of warm water. Make it not too hot, but certainly not cold. If it’s too hot, then it will kill the yeast, which goes in next. Pour that in. Give it 5 minutes or so to activate and look alive. You will notice it start to change in texture and you may even see some bubbles!
Next pour in just 2 cups of your wheat flour. Turn your mixer on to Speed 2 (this is what my KitchenAid says to make breads at). As it’s going, add in the rest of your ingredients, starting with the remaining 4 cups of flour.
Your dough will be looking quite sticky. You want to keep the machine going until it begins to be smooth in appearance and pulls away from the sides of the bowl.
Then you can have fun and get messy. Remember: if you don’t make messes in your kitchen, then you’re just not having enough fun baking stuff! So…the more messy you get, the better you’ll cook. That motto has always worked for me anyway.
Turn your dough onto a slightly floured surface. Please don’t add in tons of flour. Honest-to-goodness, you will make the bread WAY too dry that way! A little bit of flour goes a long way. When you first start baking your own breads, you will think that you’re not doing this part right and that you need to get the dough as un-sticky as possible. That’s just not true. The dough should always be a little sticky…but not TOO sticky. You will learn how to balance this better with practice.
When you knead it for a little while, it will start to smooth out. After you work out a smooth dough, you are ready to pan it. Tuck the ends under and put it ‘seam’ side down.
Move it to your fancy loaf pan. Now, I have tried a few different types of pans, and my hands-down favorite is this stoneware pan made by Pampered Chef. This is one that my mom let me “borrow” years ago and I’ve had it ever since. The bread simply does not stick to it at all like it does with different metal loaf pans I’ve used. Plus, it’s super easy to clean.
Pat down your dough to try and get it even across the top if you’re interested in a more perfect-looking loaf of bread. This makes your sandwiches nicer.
Now it’s time to proof! That simply means that you are leaving your dough alone now so it can think about what it needs to do next. Set your timer for 30 minutes and give it some space. You will want to let it rise in a draft-free warm-ish place. I have a double oven and I let mine rise in the top oven and then allow the bottom oven to preheat during that time. Or you could simply put it in the corner of your kitchen somewhere with a flour sack towel draped over it.
Your oven that you are cooking it in should be 350 degrees F.
Pop it in! Set the timer for 45 minutes and walk away.
When the buzzer goes off, check your bread. It’s should be a beautiful golden brown color on top and should sound hollow when tapped.
I allow mine to cool in the pan somewhat before attempting removal. If you try to take it out too soon, then it will be so crazy hot that it will rip and fall apart. Been there – done that! It’s not a bad thing, per se, but it does make crafting sandwiches a little more tricky.
To remove, I simply use a sturdy butter knife and run it along all the edges all the way to the bottom of the pan and sort of slide it towards the center (if that makes sense at all). If it’s cooled enough, it will totally pop out in one piece after that point.
Cut the bread with a good serrated knife and make yourself some of the tastiest sandwiches and toast ev-er!
Again, this is our basic bread that we make here pretty much every week. Sometimes I change it up and make it with herbs or garlic, etc. Try it and see how much you love homemade bread! Mmmm YUM!
P.S. I just want to encourage you breadmaking newbies out there! This might seem like it’s too hard or impossible to do at first, but for me personally – it took me lots of tries until I got the bread the way I liked it (you know, NOT ugly and SUPER tasty!). The more that you practice, the better you will get. So don’t give up if your first breads are not what you expected. It gets better each time, I promise!










6 Comments
Leave a Comment
You must be logged in to post a comment.
blondray on 9.16.2011
I threw all the ingredients in my bread machine using the dough setting, then baked it off in the oven, Turned out perfect. I ended up with 2 loaves. Thanks for sharing,..great recipe!!!!
sheriwestbrook on 4.30.2011
This bread turned out great and was super easy just like you said! I almost forgot the salt though and had to throw it in at the last minute…won’t forget again!
kaylabird on 1.27.2011
Oh… should have read the previous post. The first time I made this bread (last week) the bread baked beautifully and tasted great, and more impressively sliced perfectly. However, half the bread ended up above the edge of the pan. I thought maybe it was a fluke. So today, my second loaf is in the oven and 2/3 of the loaf is above the edge of the pan! So, next time (which will probably be in a few days) I will use two pans.
lindasue on 1.20.2011
oh, yum, yum, yum! I saw this recipe late in the afternoon and decided to try it since it didn’t take alot of time. I did the mixing and kneading in the bread machine, and it worked great! I ended up using two loaf pans because there was so much dough…a pampered chef loaf pan and a silicone one. Just snitched a piece before supper, and this stuff is AWESOME!!!
ClassiclyAmber on 12.5.2010
Hi there! I’m not sure about the greasing part…I always use stoneware when baking bread, so nothing like that is ever required since the breads comes right out after it’s cooled. How did your bread turn out?