No Reviews
You must be logged in to post a review.

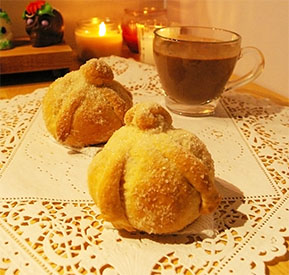
This is a traditional Mexican bread for the Day of the Dead.
Note: This requires overnight refrigeration as well as some advance prep, so plan ahead.
For the yeast dough:
In a small bowl, dissolve the yeast in the milk. Add 3 tablespoons of the bread flour amount listed in the dough section. With a fork, mix until well blended. It must be smooth and not lumpy. Cover with a piece of plastic wrap and leave in a warm place until it doubles in size, approximately 30 minutes.
For the dough:
In the bowl of a stand mixer fitted with the hook attachment, mix together the remaining flour, sugar and salt on low speed until well mixed. Add the orange zest and mix. Gradually add the eggs, the orange blossom water and the yeast dough. Mix until the dough starts to come together.
On low speed, slowly add the butter. Increase the speed to medium-high and beat for 15-20 minutes until the dough pulls away from the sides of the bowl. The dough should be smooth, homogeneous and when stretching, it should be translucent and should not break easily. If it breaks easily, you should beat it a bit longer.
Lightly oil a large bowl. Turn the dough out of the mixing bowl, shape into a ball by tucking the edges of the dough underneath and then continue to tuck the edges underneath until the dough naturally gathers into a ball with a tight surface. Transfer the dough to the oiled bowl and sprinkle with flour. Cover the bowl with plastic wrap or a kitchen towel. Place the bowl in a warm place (I like to put it near the stove) for 1 to 1 ½ hours.
After this time the dough will rise and it will feel a little loose. Punch down the dough and again shape it into a ball by tucking the edges underneath. Transfer to the same oiled bowl, sprinkle with flour and cover with plastic wrap. Refrigerate overnight.
Remove the dough from the refrigerator. Let it come to room temperature, which will take about 1 hour.
Punch down the dough. Divide it into roughly 17 pieces of dough (50 grams/1.7 ounces each) that are about the size of a tennis ball. Reserve 3 of these balls, these will be the “bones” and the “skulls”. Shape the remaining 14 pieces on a lightly floured surface into rounds and make sure the dough is compact. Place the dough rounds on two baking sheets and lightly flatten the tops with the palm of your hands. See related blog link for more photos of the assembled bread.
With 1 of the reserved balls of dough, form 14 marble-size balls and set them on the baking sheet for later use. After making the marble-size balls, divide the remaining 2 sections of reserved dough into 28 pieces. Roll these 28 pieces with your hands making strips that are long enough to lay over the width of the big dough rounds. Place 2 strips on top of each bread round, overlapping in the center in a “+” pattern. Let the bread rise in a warm place until it doubles in size, about 1/2 hour.
Meanwhile, preheat the oven to 160°C/320°F.
Gently press the reserved dough balls on top of each loaf, where the strips meet. You can use a little of cold water as glue. Bake for 25- 30 minutes or until the dough has a golden color. Remove from the oven and add the topping (recipe below) while still warm.
For the topping:
Brush the melted butter over the rolls, being sure to brush all around the knobs. Sprinkle evenly with sugar all over the top.
No Comments
Leave a Comment!
You must be logged in to post a comment.