No Reviews
You must be logged in to post a review.

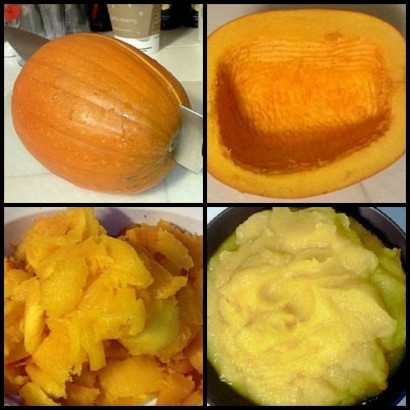
Using your own homemade pumpkin puree in a pumpkin pie or other recipes requiring pumpkin is such a treat! It’s velvety smooth and tastes much fresher!
1. First you want to pick your pumpkins; larger pie pumpkins should do. Around the fall, especially around Thanksgiving, your local grocer will carry pie pumpkins. These are typically smaller than your normal jack-o-lantern type of pumpkins. I strongly recommend using pie pumpkins over the ones you carve for Halloween, as pie pumpkins will be a bit meatier and won’t be as watery. Jack-o-lanterns are usually watery and won’t yield as much pumpkin for pureeing.
2. Wash your pumpkins thoroughly, removing all the dirt. Once you’ve washed your pumpkin, dry it off and place it on a cutting board. Carefully cut it in half from the stem to the bottom. This may prove to be difficult; using a serrated knife works best.
3. Clean out your pumpkin. Remove the “guts” using a rigid spoon. Don’t leave any stringy stuff or seeds…clean it out really well, so it looks smooth. You can save the seeds for roasting if you’d like. Just separate them from the strings and soak them in a salt water bath for a little bit before roasting.
4. Cut your pumpkin into medium sized pieces. I like to cut in half again then cut across each piece once more for more chunkier pieces.
5. Now to cook the pumpkin. In the past I’ve typically pressure cooked my pumpkin so it took less time, but I’ve also baked it. To bake the pumpkin (which seems to be the most universal technique), place your pumpkin chunks in a very lightly sprayed roasting pan. Cover the pan with the lid or foil and bake at 350 to 375 F for 60-90 minutes or until you can put a fork through it easily.
6. Remove the skin from the pumpkin chunks. The skins may just fall off the outside of your pumpkin pieces at this point. Make sure to scrape off any usable pumpkin flesh from the skin so you don’t waste any.
7. Once you’ve removed the skin, it’s time to puree it. I put it into a bowl and use an immersion blender. But you can use a food processor or a regular blender or any other contraption you might have to puree food. Blend/puree your pumpkin until you get a nice smooth, non-lumpy texture.
8. Once you have a nice puree, you may notice that it may be a little watery. This is normal. I set my puree in a strainer lined with cheesecloth and let it sit for a little while. To speed up that process you can wrap it in the cheesecloth and squeeze some of the water out. Don’t squeeze it too dry however.
9. Now you have a beautiful pumpkin puree to use in pies and other pumpkin dishes! You can either use it right away or freeze it to use at a later date. Just store in a freezer bag and squeeze out as much air as possible.
Notes:
1. Some cheesecloth is also required for this recipe.
2. This recipe yields roughly 2-3 cups of pumpkin puree, depending on the size of the pumpkin.
No Comments
Leave a Comment!
You must be logged in to post a comment.