No Reviews
You must be logged in to post a review.

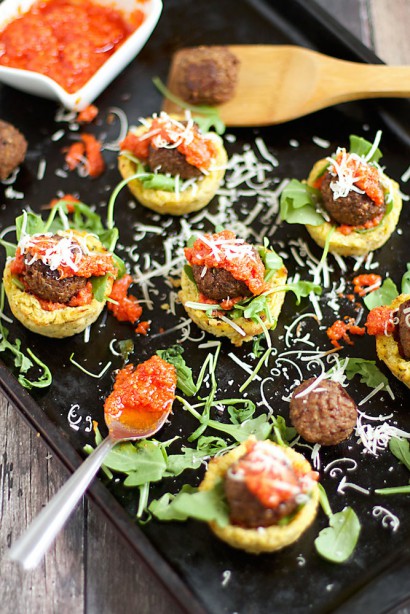
Spaghetti and meatballs meet sliders in a tasty vegan bite. Perfect for a light main meal or appetizer.
To make the spaghetti slider cups: Preheat the oven to 375 F. In a large bowl, combine the squash (see note below for squash prep info), cornmeal, olive oil, and seasonings. Stir to combine. Grease a 12-count standard size muffin tin, then scoop 1/4 cup of the squash mixture into each tin. Use your fingers to press the mixture into the middle and up the sides to form a “cup”. Bake for about 20 minutes, or until the edges have browned. Allow to cool in the pan before removing them.
To make the sauce: Using an immersion blender (or a Cuisnart), combine the mayo, tomatoes (along with the oil they’re in), lemon juice, salt, and roasted garlic (squeeze the roasted garlic flesh out of the peel). Pulse to combine. Set aside.
Once the cups have finished baking, and you remove them from the oven, increase the oven temperature to 450 F. Place the meatballs on a non-stick, non-lined baking sheet (you can use a little cooking spray if you need to). Bake for 15-17 minutes, turning them about halfway through. Allow meatballs to cool before assembling the sliders.
To assemble the sliders: Place a little arugula or basil in the bottom of a spaghetti cup. Add a dollop of sauce, then a meatball. Finish with a little more sauce and, if you wish, a sprinkle of cheese (vegan or parmesan).
Serve on a bed of arugula.
Notes:
1. This recipe is vegan, gluten-free, vegetarian, and dairy-free (if you use regular mayonnaise and Parmesan cheese it will only be gluten-free and vegetarian).
2. These taste good served hot or cold.
3. The “spaghetti” portion can be made up to 24 hours ahead. Simply allow the cups to cool after baking, then place them, in a single layer, in an airtight container. Refrigerate until you are ready to use them. You can use them straight out of the fridge or reheat them for a few minutes.
4. The sauce portion can also be made ahead. Just store it in an airtight container in the refrigerator until you are ready to use it. For the best flavor, I would suggest making the sauce no more than 3 days in advance.
5. To prepare a spaghetti squash: Cut a squash in half lengthwise. Place the halves, cut-side down, into a glass baking dish (they don’t have to fit perfectly…if you need to lean them up against the side a little bit, that’s OK). Add about 1 inch of water, then place them in the oven and bake at 400 F for about 45 minutes, or until you can easily insert a knife into the squash. (For a smaller squash it may take only 30 minutes. Just keep checking with a knife to see when it’s done). Also, be sure to check on the water level while the squash bakes. If it starts to go down, just add a little more water. Once the squash is done, remove it from the oven and allow to cool. Use a spoon (I find a grapefruit spoon works best) to gently scrape the seeds out of the middle. While some people prefer to remove the seeds prior to baking, I find that they come out much easier once the squash has baked. To make the “spaghetti” simply use a fork to scrape the squash into strands and out of the skin. You can use the squash immediately or store it in an airtight container for up to 3 days in the refrigerator. I typically use a large spaghetti squash so I have enough for multiple recipes, but to get the 3 cups needed for this recipe you will need either one small squash or about 1/3 of a large squash.
6. To make the roasted garlic: Take the head of garlic. Peel off any loose skin and then cut off the top to expose the cloves inside. Place the head of garlic on a piece of aluminum foil, then drizzle with just a little olive oil (no more than 1 teaspoon). Loosely wrap the foil up around the garlic to seal the head in. Place this garlic foil packet on a baking sheet or in a small baking dish and bake at 400 F until the garlic becomes golden-brown, about 35-45 minutes. Allow the garlic to cool for 10-15 minutes before gently squeezing the cloves out of the peels. For this slider recipe, I followed the steps above to prepare the head of garlic, but then I baked it in a small baking dish alongside the spaghetti squash cups and then transferred it to the meatball baking sheet to finish roasting it with the meatballs. You could also roast the garlic while you are roasting the spaghetti squash as they both roast at the same oven temperature for the same amount of time.
No Comments
Leave a Comment!
You must be logged in to post a comment.