The Pioneer Woman Tasty Kitchen
Profile Photo

Asiago Herb and Garlic Bread

4.66 Mitt(s) 3 Rating(s)3 votes, average: 4.66 out of 53 votes, average: 4.66 out of 53 votes, average: 4.66 out of 53 votes, average: 4.66 out of 53 votes, average: 4.66 out of 5

Prep:

Cook:

Level: Easy

System:

6
x

Print Options

Page size Letter 3x5 4x6
Text Size Small Medium Large
Content Include description
Include prep time, etc.
Show image

Description

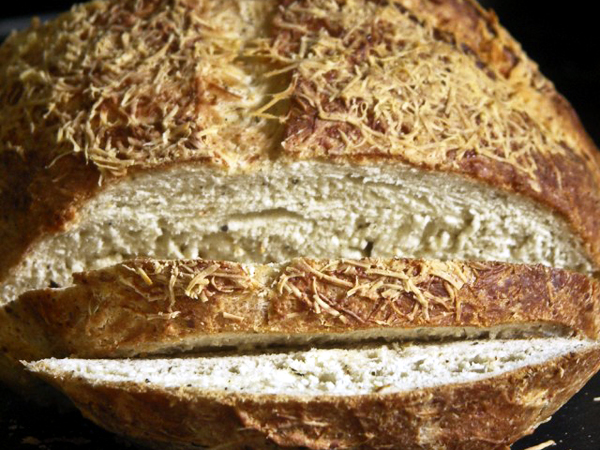
This is most gorgeous brown, cheese-crusted and cheese-studded, herbed, garlic bread I’ve ever had the pleasure of tearing apart with my teeth. It’s a yeast bread that is made—start to finish—in under an hour!

Ingredients

  • 6 cups All-purpose Flour
  • 1-½ cup Plus 2/3 Cup Grated Asiago Cheese
  • 2 Tablespoons Instant Dry Yeast
  • 2 Tablespoons Sugar
  • 1 Tablespoon Kosher Salt
  • 1 Tablespoon Dried Italian Seasonings
  • 1 teaspoon Dried Rosemary
  • 1 teaspoon Crushed Red Pepper Flakes, Adjust According To Heat Preference
  • 1 teaspoon Dried Granulated Onion (or Onion Powder)
  • 1 teaspoon Dried Granulated Garlic (or Garlic Powder)
  • 1 teaspoon Minced Fresh Garlic (optional)
  • 2 cups Hot Tap Water (about 120-130 F)
  • 4 Tablespoons Extra Virgin Olive Oil, Divided, Plus A Little Extra For The Bowl

Preparation

Whisk the flour with 1-1/2 cups grated Asiago, yeast, sugar, salt, Italian seasoning, rosemary, red pepper flakes, onion and garlic powder. (If using a food processor, simply add those dry ingredients to the food processor bowl and pulse 5 times.) Pour in the hot water and stir 100 times (That is equal to 3 minutes with a stand mixer fitted with a dough hook. If using the food processor, drizzle the water in while the machine is running until the dough forms a ball.)

Knead the dough for 8 minutes. (If using a stand mixer with a dough hook, allow to mix on low for 4 minutes. If using the food processor, allow the ball to spin 20 times.) Form the dough into a tight round. Drizzle some olive oil into a bowl. Place dough into the bowl and flip over, so both sides are lightly coated with olive oil. Cover with a damp tea towel (or paper towel) and allow to rise for 15 minutes.

Punch down dough and divide into two equal pieces. Form the dough into rounds. To make a nice tight ball, pulling the top of the dough down and over the side. Then, tuck the excess under. Voila! Tight dough balls! Place about 6 inches apart on an ungreased, rimmed baking sheet. Gently pat the dough rounds down so they are relatively flat on top. Use a sharp knife to slash an ‘x’ about 1/4″ deep over the tops of the loaves. Drizzle each loaf with about 2 tablespoons of olive oil and then top each loaf with about 1/3 cup additional grated Asiago.

Place baking sheet in a cold oven over a cake or loaf pan filled with hot tap water. Set oven to 400°F. As soon as you turn the oven on, set your timer for 40 minutes. Begin checking the bread when the timer goes off. If bread is a gorgeous deep golden brown, remove it. If it is still light colored, pop it back in the oven. You may need as much as 10 more minutes.

Remove the bread and serve hot, warm or room temperature. This is one bread that tastes great any way you slice it!

11 Comments

You must be logged in to post a comment.

Profile photo of Rebecca

Rebecca on 6.3.2010

wysmom- I’m so glad you maked it and loved it. You’re very, very welcome!

Profile photo of wysmom

wysmom on 5.27.2010

O.MY.WORD…this was fantastic! Absolutely true that it took under an hour and tasted like a fancy bakery loaf – thanks for sharing!

Profile photo of Rebecca

Rebecca on 4.28.2010

Aliceb- It also makes great croutons! I’m glad you like it! And I’m betting your neighbors are happy, too :-)

Sarasourire- Perhaps, but I have a hearty appetite :-)

Melanee- You’re very, very welcome. Thank you for letting me know you liked it!

Amberjoyfull- YES! I’m so glad it worked for you. Asiago is expensive unless purchased in massive chunks. If you want to keep the cheese angle, you can use freshly grated parmesan or Romano, too!

Profile photo of amberjoyfull

amberjoyfull on 4.14.2010

I made this last night for our small group dinner. Boy, did it get rave reviews! Thanks, Rebecca, for sharing this delicious recipe. It will be a go-to from now on.
The asiago was expensive, so I may try it without next time.

Profile photo of Melanee

Melanee on 4.12.2010

Wow, this bread was every bit as easy and delicious as everyone said it would be! I didn’t have any Asiago cheese on hand so I grated some Parmesan and it was great. I live at a pretty high altitude (4500 ft.) but didn’t have any problems baking as directed. Thanks for the great recipe!

3 Reviews

You must be logged in to post a review.

Profile photo of kiki00star

kiki00star on 8.9.2010

I didn’t have any asiago cheese the first time around, so I tried this without and it still turned out spectacular. The second and third time I used the cheese and actually liked it better the first way. My crust turned out beautiful but the inside was still doughy – it might have been the high altitude or my old oven. It’s happened all three times now. I usually can remedy it by turning the oven down during cooking, then turning it off once the crust is right and just leaving the bread inside to slowly cook through until the oven have completely cooled.

Profile photo of christi78

christi78 on 6.29.2010

I made this bread for the first time last night and it was outstanding. I had to bring it into work with me today so that I wouldn’t eat the whole loaf in one sitting. I LOVE asiago cheese and this has the perfect amount. This was my first time ever to make bread so it took me longer than an hour (because I was going back to the recipe every 10 seconds) but I’m sure it will be under an hour next time I make it. Thanks for the great recipe!!

Profile photo of Melanee

Melanee on 5.31.2010

Wow, this bread was every bit as easy and delicious as everyone said it would be! I didn’t have any Asiago cheese on hand so I grated some Parmesan and it was great. I live at a pretty high altitude (4500 ft.) but didn’t have any problems baking as directed. I would definitely start watching it at about 35 minutes to avoid over-browning. Thanks for the great recipe!
Related Recipes

Easiest No-Knead Bread in a Dutch Oven
Profile Photo by Lindsay @ My Therapist Cooks in Breads
Mark Bittman’s no-knead bread is the easiest, most foolproof path to...
5.00 Mitt(s) 1 Rating(s)1 vote, average: 5.00 out of 51 vote, average: 5.00 out of 51 vote, average: 5.00 out of 51 vote, average: 5.00 out of 51 vote, average: 5.00 out of 5

Prep: Cook:

Serves: 6 Level: Easy


No Yeast Naan
Profile Photo by Liz Voltz in Breads
Quick and easy Naan flat bread made without yeast. Comes together...
0.00 Mitt(s) 0 Rating(s)0 votes, average: 0.00 out of 50 votes, average: 0.00 out of 50 votes, average: 0.00 out of 50 votes, average: 0.00 out of 50 votes, average: 0.00 out of 5

Prep: Cook:

Serves: 6 Level: Easy


Sourdough Banana Muffins
Profile Photo by PW Food & Friends in Breads
Use up your excess sourdough discard/starter in these yummy banana muffins! From...
0.00 Mitt(s) 0 Rating(s)0 votes, average: 0.00 out of 50 votes, average: 0.00 out of 50 votes, average: 0.00 out of 50 votes, average: 0.00 out of 50 votes, average: 0.00 out of 5

Prep: Cook:

Serves: 12 Level: Easy


Coconut Blueberry Wholemeal Muffins
Profile Photo by Cheryl Whyte in Breads
Sometimes you just need something a little sweet, right!? Well, I’ve...
0.00 Mitt(s) 0 Rating(s)0 votes, average: 0.00 out of 50 votes, average: 0.00 out of 50 votes, average: 0.00 out of 50 votes, average: 0.00 out of 50 votes, average: 0.00 out of 5

Prep: Cook:

Serves: 12 Level: Easy


Sourdough Naan
Profile Photo by PW Food & Friends in Breads
Naturally leavened Indian flatbread cooked in a cast iron skillet! From Erica...
0.00 Mitt(s) 0 Rating(s)0 votes, average: 0.00 out of 50 votes, average: 0.00 out of 50 votes, average: 0.00 out of 50 votes, average: 0.00 out of 50 votes, average: 0.00 out of 5

Prep: Cook:

Serves: 12 Level: Intermediate