No Reviews
You must be logged in to post a review.

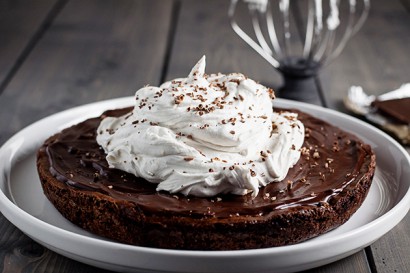
Holy chocolate. My favorite simple, gluten-free brownie pie gets all dressed up with dark chocolate glaze and mounds of orange coconut whipped cream.
Note: Prep time for the brownie alone is 30 minutes or less, plus cook time.
For the brownie:
Preheat oven to 350 F. Spread nuts on a rimmed baking sheet. Line a one piece 8 inch cake or tart pan with a single sheet of foil, leaving some overhang. Grease foil with 1 teaspoon of the butter.
In a microwave safe bowl, combine the bittersweet chocolate and remaining butter and heat for 1 minute on high. Leave alone for 5 minutes, then heat another minute. Remove from microwave and stir until smooth and combined.
Roast nuts for about 10 minutes, stirring halfway through. Cool slightly, then transfer to a plastic freezer bag. Seal bag, press out the air, then wrap the bag with a dish towel. Use a rolling pin or small, heavy pan to crush the nuts into small, but recognizable, pieces.
Combine both sugars, eggs, and vanilla in a medium mixing bowl with a whisk, until smooth. Add nuts and chocolate mixture and fold in with a rubber spatula until fully combined. Pour batter into prepared pan and bake 20 minutes, until a toothpick inserted in the center comes out slightly wet. Remove from oven.
Cool cake in the pan on a wire rack to prevent cracks. When completely cool, lift brownie from pan using the foil overhang. Use one hand to gently lift brownie and remove foil from bottom with your other hand. Slide gently onto a serving plate or back into pan.
For the glaze:
When brownie has cooled completely, coarsely chop chocolate and combine with water and salt in a microwave safe bowl. Heat 90 seconds at 50% power, stirring halfway through. Stir again until chocolate is melted and mixture is smooth. A few pieces at a time, gently stir in butter until each addition is melted. This takes 5 to 10 minutes. If the chocolate cools so much that the butter will barely melt, microwave for 30 seconds at 50% power. After adding all the butter, stir until mixture is completely smooth. If using, stir in triple sec. Cool about 20 minutes (to around 90 degrees F), so the glaze is pourable but has thickened slightly.
Pour ¼ cup of glaze over brownie, spreading evenly with the back of a spoon, almost to the edge. This layer will fill any cracks in the brownie, so it’s okay if crumbs appear in it. Refrigerate glazed brownie, uncovered, for 10 minutes.
Pour about ⅔ cup (or to desired thickness) of remaining glaze over the first layer, again spreading evenly with the back of a spoon. Allow to set at room temperature or more quickly in the refrigerator before serving. If making ahead, refrigerate the brownie, covering with plastic wrap after the glaze has set.
For the whipped cream:
This is best prepared immediately before serving. Chill a mixing bowl or the bowl of a stand mixer for 10 minutes. Turn refrigerated cans of coconut milk upside down and open from the bottom. Pour off separated, semi-translucent liquid (reserve for smoothies). Scoop the firm, white milk into the chilled bowl. Beat with a handheld electric mixer or the whisk attachment of your stand mixer until fluffy, about 5 minutes at 60 to 80% power. Add sugar, vanilla, and zest, and whip again until incorporated and sugar dissolves.
To serve, pile all the cream onto the brownie (for a dramatic look), cut, and serve. Alternately, if not serving all at once, scoop cream onto individual slices of brownie. Finish with finely shaved (on a microplane or cheese slicer) chocolate.
Notes:
1. To make ahead, refrigerate cooled (and glazed, if you like) brownie. It’s tasty served cold, allowed to come to room temperature, or even warmed briefly.
2. It should keep up to 1 week. The coconut cream also keeps well. Re-whip if needed; however, when I make it, it remains fluffy in the refrigerator for at least 4 days.
3. There’s lots of buzz around the internet about which brands of coconut milk separate when refrigerated, thus enabling their use in this recipe. “Guar gum” as an ingredient supposedly prevents separation, but both cans I used contained it, and both separated and worked well in this recipe (Whole Foods organic and Native Forest organic). If in doubt, purchase a couple different brands, if available to you, and refrigerate them both, in case one doesn’t work.
No Comments
Leave a Comment!
You must be logged in to post a comment.