The Pioneer Woman Tasty Kitchen
Profile Photo

Chicken Parmigiana

5.00 Mitt(s) 5 Rating(s)5 votes, average: 5.00 out of 55 votes, average: 5.00 out of 55 votes, average: 5.00 out of 55 votes, average: 5.00 out of 55 votes, average: 5.00 out of 5

Prep:

Cook:

Level: Easy

System:

4
x

Print Options

Page size Letter 3x5 4x6
Text Size Small Medium Large
Content Include description
Include prep time, etc.
Show image

Description

This dish was my prelude to Mother’s Day. I wanted to make something so comforting for my wife, as she works hard every day taking care of my children, managing our bills, and maintains our overall household. These things are never forgotten.

Chicken parmigiana is a great dish to remind our loved ones how much we care. A dish that warms our stomachs, and keeps those at the table talking about it for some time to come.

Ingredients

  • 4 cups Your Favorite Marinara Sauce
  • 4 whole Boneless, Skinless Chicken Breasts
  • 2 cups Flour
  • 1 Tablespoon Salt
  • 1 Tablespoon Cracked Black Pepper
  • 1 Tablespoon Garlic Powder
  • 2 whole Eggs, Beaten
  • ¼ cups Water
  • 1 cup Regular Bread Crumbs
  • 2 cups Panko Bread Crumbs
  • 1 Tablespoon Dried Basil
  • 1 Tablespoon Dried Oregano
  • 1 cup Olive Oil, For Frying
  • 1 pound Your Favorite Pasta (Spaghetti, Angel Hair, Vermicelli Works Well)
  • 8 Tablespoons Grated Parmesan Cheese
  • 10 ounces, weight Buffalo Mozzarella, Sliced
  • Fresh Basil Leaves, For Garnish (optional)

Preparation

Begin by warming your favorite marinara sauce on the stove, on low. I make my own, but if you do not have time for that, go with a higher quality sauce from the store.

Next, take your chicken breasts, and carefully use your knife and slice them down the middle, from the side. The goal is to butterfly the chicken breasts. Once you have butterflied your breasts, lay plastic wrap down on your meat board, or cutting board. Lay the breast on top of the plastic wrap, then top with a larger piece of plastic wrap. Take the flat end of your meat mallet, and lightly pound the breast, from the center out. This will help tenderize the chicken, while at the same time, making your chicken cutlet. Just be careful not to tear the chicken. Continue this process with the rest of your breasts.

Now it is time to get your dredging station ready. Get three dishes ready that are deep enough to hold flour, egg wash, and breadcrumbs. To station one, add the flour, and season with salt and pepper, and garlic powder. To station two, crack your eggs, add the water, and beat with a fork to make your egg wash. To station three, add the breadcrumbs, basil, and oregano. Mix well.

Preheat your oven to 450 degrees (F).

Get a large fry pan warmed to medium heat, and add in enough olive olive to coat the bottom.

Take a chicken breast, and add it to your flour bowl. Flip it over to coat, and shake off any excess flour. Add it to station two, to coat with the egg wash. Next, add it to station three, pushing it into the breadcrumbs. Take your hand and add more crumbs to the top, pushing it into the breast. Shake off any excess crumbs.

Add this to your fry pan, and fry on both sides for a few minutes. Remove from the pan, and place in a strainer for any excess oil to drain. Feel free to let these cool, store in a large ziplock bag, and freeze them for later use.

Repeat this process with the rest of the chicken breasts. NOTE: These are great enough to eat right now, plain. I took one large breast, sliced them into strips, and my kids ate those for dinner, along with pasta. They loved them!

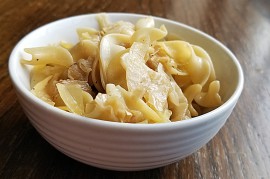
Bring a large pot of water to a rolling boil and generously season with salt. Cook your pasta, according to the directions, reserving a half cup of the pasta water. Drain, and have it ready to plate.

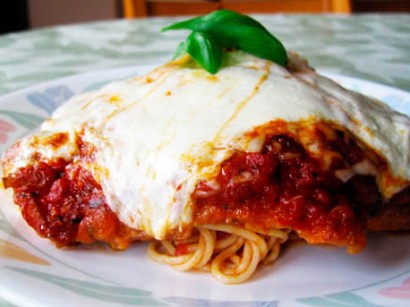
Get a large cooking dish ready and place your fried chicken breasts in the dish. Top with your red sauce. Generously sprinkle the parmesan cheese on top of the sauce, and top with the slices of mozzarella cheese. Place in the oven until the cheese becomes bubbly, about 8-10 minutes.

When you are ready to plate, add some pasta to a bowl, and add in some of your red sauce. Mix well. The pasta will serve as the bed for the chicken parmigiana. Add the chicken parmigiana to the top of the pasta, top with a fresh basil leaf, and dig in.

This dish is great any day of the week and pleases kids and adults as well.

5 Comments

You must be logged in to post a comment.

Profile photo of Dahlia-Gaye

Dahlia-Gaye on 5.6.2014

Thank you this was such a simple and quick recipe to follow

Profile photo of Cathy Bray

Cathy Bray on 11.3.2010

Your wife is lucky!!

Profile photo of laurainthecountry

laurainthecountry on 11.3.2010

Awww – you’re wife is a lucky lady!

Profile photo of Merryweather Mama

Merryweather Mama on 11.3.2010

Anyone who says such nice things about the mama gets my attention! Plus, this looks delicious, so into my recipe box it goes!! Thanks!

Profile photo of Shelly

Shelly on 11.2.2010

This will be on my menu very soon!

5 Reviews

You must be logged in to post a review.

Profile photo of Dahlia-Gaye

Dahlia-Gaye on 5.6.2014

Absolutely delicious!!!!!!!

Profile photo of Amanda

Amanda on 2.20.2013

Yum! This was perfect for our snowy Saturday. The flavors in the chicken are perfect!

Profile photo of maddynmummy

maddynmummy on 9.18.2011

Absolutely delicious!!! The only issue we had was that we had half of the flour and the breadcrumbs left over we had to throw it out so we will cut them in half next time.

Profile photo of Cathy Bray

Cathy Bray on 11.10.2010

You are a genius!! LOVED it…This recipe is now in my “keeper” file.. Thank youuuuuu!

Profile photo of Jessica

Jessica on 11.4.2010

Absolutely perfect! Can’t wait to make this again, and again…

Related Recipes

Garlic Shrimp Scampi with Angel Hair Pasta
Profile Photo by Blondelish.com in Main Courses
This shrimp scampi with angel hair pasta is a delicious dinner...
5.00 Mitt(s) 1 Rating(s)1 vote, average: 5.00 out of 51 vote, average: 5.00 out of 51 vote, average: 5.00 out of 51 vote, average: 5.00 out of 51 vote, average: 5.00 out of 5

Prep: Cook:

Serves: 4 Level: Easy


Mango Tilapia
Profile Photo by Shavanna in Main Courses
This is an easy, tasty and healthy recipe for a pan-seared...
0.00 Mitt(s) 0 Rating(s)0 votes, average: 0.00 out of 50 votes, average: 0.00 out of 50 votes, average: 0.00 out of 50 votes, average: 0.00 out of 50 votes, average: 0.00 out of 5

Prep: Cook:

Serves: 4 Level: Easy


Sage Garlic Lamb with Feta Yogurt Sauce
Profile Photo by Molly Mulligan in Main Courses
Using few ingredients, this recipe for ground lamb is so tasty!...
0.00 Mitt(s) 0 Rating(s)0 votes, average: 0.00 out of 50 votes, average: 0.00 out of 50 votes, average: 0.00 out of 50 votes, average: 0.00 out of 50 votes, average: 0.00 out of 5

Prep: Cook:

Serves: 4 Level: Easy


Cabbage Rolls
Profile Photo by Beth Pierce in Main Courses
These delicious traditional stuffed Cabbage Rolls are made with ground sausage...
0.00 Mitt(s) 0 Rating(s)0 votes, average: 0.00 out of 50 votes, average: 0.00 out of 50 votes, average: 0.00 out of 50 votes, average: 0.00 out of 50 votes, average: 0.00 out of 5

Prep: Cook:

Serves: 12 Level: Easy


Dorito Casserole
Profile Photo by Krystle in Main Courses
Flavorful ground beef, and melty cheese in a crunchy doritos crust....
5.00 Mitt(s) 2 Rating(s)2 votes, average: 5.00 out of 52 votes, average: 5.00 out of 52 votes, average: 5.00 out of 52 votes, average: 5.00 out of 52 votes, average: 5.00 out of 5

Prep: Cook:

Serves: 8 Level: Easy