

No Reviews
You must be logged in to post a review.
Cake balls have truly been this year’s baking craze, and with good reason. They’re delicious, they’re cute and they’re delicious.
Make your cake batter according to the directions. In addition to the standard required ingredients (specified on the box), also add the nutmeg, ginger, and vanilla listed above. This is what turns it into an eggnog cake.
Make sure that you spray the pan well for easy removal of the cake. Use whatever size you have, following the baking instructions provided on the box.
When the cake is done baking, remove it from the oven. Allow the cake to cool for 5-10 minutes. Then turn it out onto a cooling rack and let the cake cool completely.
When the cake has cooled, break up the cake into large pieces using your (clean) hands. Place the cake pieces into a bowl. Using your fingers, gently crumble the cake into small uniform sized crumbs.
When the cake has been completely crumbled, add about half of the can of frosting to the bowl.
Using your hands (or use a spoon if you would like, because this is quite messy—however, I found that it’s easier to do this by hand) mix the frosting together with the cake. The mixture should resemble dough. If the cake and frosting is too crumbly, add more frosting until you get the right consistency.
Using a cookie scoop, put a small ball of ‘dough’ into the palm of your hand. Roll the ball into a quarter-sized ball of deliciousness, and resist popping it into your mouth. Place the rolled ball onto a cookie sheet.
Repeat this process until all of the cake and frosting mixture has been used up (this should make about 60 cake balls.)
Place the cookie sheet into the refrigerator overnight. Cover the tray with a kitchen towel before doing so.
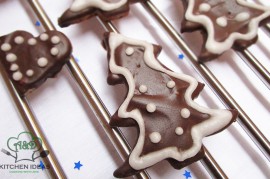
Once the cake balls have chilled overnight, they are ready for their pretty outer layer.
Over a double boiler, melt your chocolate chips. I like to only work with half a bag of chocolate chips at a time. For each half bag add 1/2 teaspoon of vegetable oil.
When the chocolate is nice and smooth, remove it from the heat.
Take a few (no more than 4 or 5) of the cake balls out of the fridge, and place them on a small plate that you’ve lined with wax paper.
Using a spoon and a fork drop 1 cake ball into the melted chocolate. With the spoon, cover the ball completely with chocolate. When the ball is covered, scoop the ball out of the chocolate using the fork.
With the spoon, gently tap the fork to get the excess chocolate to drip back into the bowl.
Place the covered ball onto the wax paper and sprinkle with decorations if desired. Repeat with the remaining 3 balls.
Place the plate in the freezer for 10 minutes or until the chocolate coating has hardened.
When the chocolate has set, transfer the bite-sized drops of yummy back onto the cookie sheet in the fridge. Repeat with the remaining dough and chocolate, melting additional chocolate when needed.
When all of the balls have been dipped and decorated, they are ready to make their debut at your next party!
If you don’t plan on eating them immediately, store them in your refrigerator in an airtight container for up to a week.
If you wish, you could make a bunch of cake balls and store them in the freezer for up to a month.
Prep: Cook:
Serves: 10 Level: Easy
Prep: Cook:
Serves: 8 Level: Easy
Prep: Cook:
Serves: 6 Level: Easy
Prep: Cook:
Serves: 10 Level: Easy
Prep: Cook:
Serves: 10 Level: Intermediate


One Comment
Leave a Comment
You must be logged in to post a comment.
Deborah Vogts on 1.3.2012
Wow, what a process. Sounds interesting!