
No Reviews
You must be logged in to post a review.
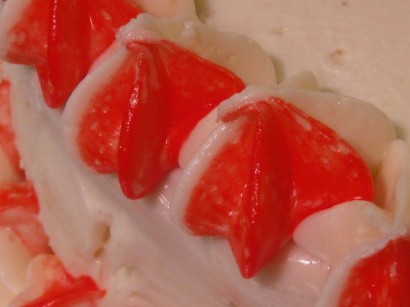
Friends don’t let friends get ripped off in the frosting aisle. Making your own two-toned cake icing is a cinch with this method!
Begin by cutting the zippers away from your plastic freezer bags. I usually just cut mine straight across diagonally, to make a triangular pouch for the frosting to sit in.
Fan open one triangular pouch and place the bag about 2/3 of the way down into a wide-mouthed tumbler or similar drinking glass. This will make it easier to fill. Fold the top 1/3 of the plastic bag opening down over the rim of the glass to keep it out of the way. This method will keep goopy frosting out of the portion of bag you’ll be twisting closed when piping.
Use a spoon or butterknife to fill the first bag 2/3 of the way full and set the first bag aside. Cut the second bag’s tip off so you can place your frosting coupler down into the bag.
Secure the piping tip on the outside of the bag with the coupler ring. Remove the full bag of icing from the cup and place the second bag, tip/coupler pointing downward into the bottom of the cup. Fold bag sides over the rim as you did the first.
Using a dry, small paintbrush and a container of food coloring paste (NOT LIQUID FOOD COLORING), begin painting a thin (1/2″-3/4″) stripe up one side of the coupler/bag. Make the total length of the stripe about 4 inches — it doesn’t need to come all the way up the bag, and you’ll have less mess and crisper-looking stripes if you quit while you’re ahead.
Cut a good-sized tip off of the point of the already-full icing bag to expose the frosting, and place it partially down into the striped bag. Begin squeezing to transfer the frosting into the striped bag, stopping when 2/3 of the way full. The reason for using one bag to transition into the other is to keep spoons/knives from possibly smearing the stripe you painted in the second bag. This makes for an easy, clean fill.
When the striped bag is filled, flip up the edges of the bag, remove from the drinking glass, and twist the bag shut. You’re ready to start piping. Use a napkin or coffee filter to do a few practice squeezes on first, so that any uneven or wet blobs of excess food coloring will not land on the cake, and also so you know exactly how it’s going to look coming out and where your stripe will be positioned.
Once you’ve got the hang of it, you’re ready to begin decorating your cake.
Prep: Cook:
Serves: 6 Level: Easy
Prep: Cook:
Serves: 12 Level: Intermediate
Prep: Cook:
Serves: 16 Level: Easy
Prep: Cook:
Serves: 24 Level: Intermediate

Prep: Cook:
Serves: 12 Level: Easy


No Comments
Leave a Comment!
You must be logged in to post a comment.