

No Reviews
You must be logged in to post a review.
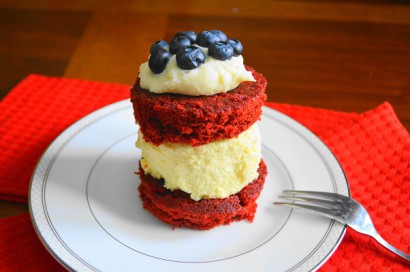
These red velvet cheesecakes are so decadent and incredible. They are perfectly patriotic with a blueberry topping for the 4th of July, but you definitely will want to enjoy them all year long. All of the components can be made ahead of time, and then assembled when you need them. I made mine 24 hours in advance, so they were nice and chilled.
1. The cheesecake layer needs to chill the longest, so I made that first. It’s my same recipe I used for my classic New York cheesecake, it’s to die for! It is loosely adapted from Emeril Lagasse’s recipe. Preheat the oven to 350 F and liberally spray a 9 1/2 inch spring form pan with cooking spray. You could also use a 10 inch pan if you have that instead but a 9 inch pan will make the cheesecake layer just too thick for the assembly. In the bowl of a stand mixer combine the cream cheese, sugar, vanilla and salt and beat that all together thoroughly with the paddle attachment until fluffy. Slowly add in the eggs and egg yolks one at a time, letting each one get beaten in before adding the next one. Then add in the Greek yogurt and lastly, the flour. The Greek yogurt is my little secret, it just gives the cake the perfect consistency and tang.
2. Pour the cheesecake batter into the prepared pan and smooth it out with a spatula. Let the cheesecake bake for an hour, take it out of the oven and let it cool for at least 10 minutes before you release it from the pan. Then let it cool completely before you gently wrap the cheesecake in plastic and get it in the refrigerator.
3. Next, prepare the two red velvet layers which will end up sandwiching the cheesecake. My red velvet recipe is adapted from Alton Brown’s recipe, I’ve done quite a bit of testing and tweaking to make it my own! Preheat the oven to 325 F (or just turn it down to 325 F after you take the cheesecake out). Line two 9 inch cake pans with parchment paper circles and spray the pans with cooking spray. In a bowl, whisk together the two flours, cocoa powder, baking soda and salt. In another bowl, whisk together the milk, red food coloring, white vinegar and vanilla. You will need to wash out your stand mixer bowl and paddle attachment from the cheesecake. In the clean bowl of the stand mixer, combine the sugar and butter and beat them together until fluffy. Then beat in the eggs. Slowly add in 1/3 of the dry ingredients, followed by 1/3 of the wet mixture. Repeat two more times, ending with the wet mixture and you will have a gorgeous batter! Divide the batter evenly between the two cake pans. Bake the red velvet cakes for 30-35 minutes, until a toothpick comes out of the center clean.
4. Take them out of the oven and let them cool for a few minutes, then turn them out carefully onto a plate to finish cooling. Wrap the layers in plastic and store them in the refrigerator. Chilling the layers will make them easier to cut later! Also, as a side note, try not to wear anything you care too much about when you make red velvet. I have learned the hard way how hard it is to get splattered food coloring off of my clothes in the past!
5. The last component is the easy cream cheese frosting for the top. You will need to once again quickly wash out your stand mixer bowl and paddle attachment. Combine the cream cheese, butter, vanilla and salt in the clean stand mixer bowl and beat it all together thoroughly with the paddle attachment until creamy and fluffy. Then slowly add in the powdered sugar with the speed on the lowest setting so that you don’t end up having a snow storm in your kitchen. Cover the bowl in plastic and let the frosting chill in the refrigerator.
6. After everything has chilled overnight, the red velvet cheesecakes are ready to assemble! Using a 4 inch round cookie or biscuit cutter, cut out 4 circles from the first red velvet layer and lay them on a platter or cake plate. Then cut another 4 circles out of the cheesecake layer and set them carefully on top of the red velvet circles. Cut another 4 circles out of the second red velvet layer and gently layer them on top of the cheesecake layers. Spoon a big dollop of the cream cheese frosting on top and smooth it out a little with an offset spatula. Then take a handful of blueberries and sprinkle them evenly into the frosting. Voila! You have a show stopping dessert!
Now, I know you’re asking “what about the scraps”. No need to waste them! Crumble them up into layers in a big trifle bowl with the rest of the frosting and more blueberries on top to have extra dessert in addition to the 4 red velvet cheesecakes. These are just incredible, let me tell you. The blueberries give that needed burst of freshness and acidity to cut through the richness of the cake. The 4th of the July has never been so delicious and decadent!
Prep: Cook:
Serves: 12 Level: Intermediate
Prep: Cook:
Serves: 12 Level: Easy
Prep: Cook:
Serves: 16 Level: Easy
Prep: Cook:
Serves: 32 Level: Easy
Prep: Cook:
Serves: 16 Level: Easy


No Comments
Leave a Comment!
You must be logged in to post a comment.