
No Reviews
You must be logged in to post a review.
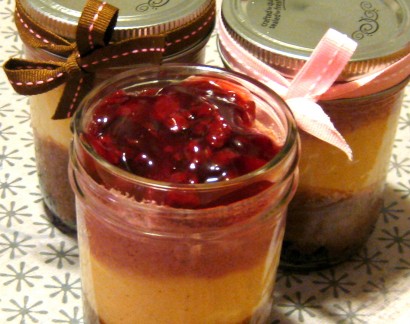
Raspberry, vanilla bean, and chocolate-flavored layers reminiscent of Neopolitan ice cream, all baked into individually-sized Mason Jars and ready for surprise deliveries! Oreo bottoms and raspberry topping fill out each jar beautifully.
Prepare the Jars:
Begin by separating 12 half-pint-sized (8-ounce) jars from their lids and rings. If you haven’t already, sanitize them and make sure insides are well-dried.
In a large bowl, crush the Oreo cookies into medium-sized chunks. Place a large spoonful of cookie crumbles in the bottom of each jar, just covering the bottom of the glass.
Have a 9×13 metal pan with 2″ sides or taller at the ready on your counter top. This is what you will bake the jars in, surrounded by water.
Prepare the Filling:
Use an electric mixer to whip all 5 bricks of the room-temperature cream cheese until smooth and creamy. Slowly beat in 1-1/2 cups of the granulated sugar until evenly mixed (save the remaining 1/4 cup sugar for later).
Using a separate bowl and wire egg whisk, beat the eggs until yolks and whites run together a little bit. (You can do this by hand; it doesn’t take very long.) Add the milk, flour and vanilla extract to the egg mixture and use the whisk to lightly incorporate everything.
Using the “stir” setting on mixer, gradually pour the egg mixture into the cream cheese mixture; once it is mostly incorporated you can raise the beater speed until the batter is smooth.
Take two large mixing bowls and pour about 1/3 of the mixture into each of them, leaving 1/3 in the original mixing bowl. Scrape the sides of the bowl with a rubber spatula as you do this to make sure no cheese lumps are left in there.
To the first bowl, add the cocoa powder and your remaining 1/4 cup additional granulated sugar.
To the second bowl, add the vanilla bean scrapings and ground cinnamon.
For the third bowl, microwave the black raspberry jam in a measuring cup for about 30 seconds. Stir until smooth and add to the third bowl of cheese filling. If the final stirred product looks a little bit too purple, you can add a couple of drops of pink food coloring. I kind of liked the purplish-pink look, so I left it as-is.
Layer the Jars:
Preheat the oven to 325F at this point because it will still take you a little while to complete this process. You will also want to begin boiling a kettle full of water at this point. Once boil is reached, remove the kettle from heat even if you’re not quite done assembling the jars. It will still be warm enough for what you need in a few minutes.
Add a few spoonfuls of chocolate batter to each jar over the cookie crumbles. Don’t add too much, though, because you’ve still got several layers to go.
It helps to have a folded, clean dishtowel on the counter top to rap the jar up and down a little bit on to get mixture to settle without breaking the jar on the hard counter.
Make sure there are no streaks of chocolate filling on the jar sides above that layer. If there are, you can run a clean napkin around the inside of the jar to take most of it away.
Repeat this process with the vanilla filling layer, being sure you are barely over the halfway mark of the jar after adding the second filling.
(The batter is probably going to rise slightly or shift while in the oven, and you will also need to conserve the upper-rim area for the pie filling so that all three actual cheesecake layers are visible even when lids/rings are in place later.)
Again, wipe any higher-than-vanilla-layer filling away from jar sides.
Repeat this process again with the raspberry filling layer. You should now be almost to the top of the regular jar part (not rim).
Some air bubbles may rise to the surface as you fill the jars. You can pop them with a toothpick if it’s easy to do, but don’t stress about it too much.
Bake the Jars:
As you complete the raspberry cheesecake layer for each jar, place the jar into the 9×13″ metal cake pan, making rows. Once all 12 jars have been filled and transferred to the pan, you can slowly begin pouring the hot water from the tea kettle into the pan (surrounding the jars). This is easiest to do from one corner of the pan.
Be patient and careful when adding the heated water; you don’t want any of the jars to overheat too quickly and crack. The entire purpose of using very hot water here is to prepare them for an easy transition into the hot oven. So…slowly, gradually, methodically is how you want to temper the glass.
Once the water is about 2/3 way up the sides of the jars(or no higher than you feel comfortable lifting), put on your oven mitts and carefully transfer the water-and-jar-filled pan into the preheated oven and. Position pan on the center rack and close the oven door, and reduce heat to 300 degrees F.
Bake jars for 30 minutes, avoiding opening the oven door unless absolutely necessary. At the end of 30 minutes, turn the oven off, but leave jar-filled pan inside oven for another 20 minutes or so. If it’s not hot in your kitchen, you can prop the oven door open after 15 minutes like this.
When you remove the pan from the oven, you’ll see that the filling has probably risen up to the surface of the jar mouth on each one. Once out of the oven, you should be able to use the back of a spoon to tap the filling back down to the level of the rim bottom.
Spoon raspberry pie filling into the top of each jar, filling most of the rim area with it while cheesecake is still hot. Add the lids and rims to the jars. As they cool, you might even hear some of them do that fun “plink!” that regular jars* do when you’re canning other items.
*Because you’ll be using these within the next several days regardless of that plinking seal, it doesn’t really matter if they all seal like that.
Once your jars have finished cooling, decorate lids with ribbons or fabric if desired and transfer to the fridge.
Prep: Cook:
Serves: 6 Level: Easy
Prep: Cook:
Serves: 12 Level: Intermediate
Prep: Cook:
Serves: 16 Level: Easy
Prep: Cook:
Serves: 24 Level: Intermediate

Prep: Cook:
Serves: 12 Level: Easy


No Comments
Leave a Comment!
You must be logged in to post a comment.