


No Reviews
You must be logged in to post a review.
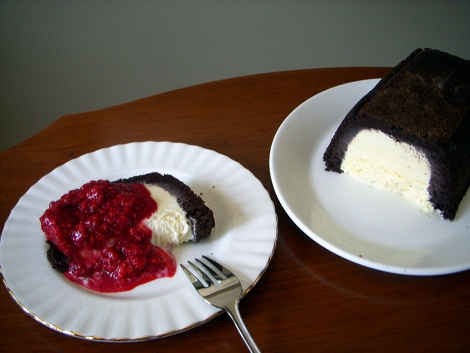
Effortlessly easy and delicious ice cream cake made into a Marquise. Serve with fresh raspberry coulis for a dramatic dessert.
Directions For Cake:
1. Preheat the oven to 350 degrees F. Prepare a 9×13′ cake pan with baking spray and a sprinkle of flour over it to coat. You want this baby to come out nice and easy.
2. Sift the flour, sugar, cocoa, baking soda and baking powder together into a bowl and mix until well combined
3. In a stand mixer, combine the milk, oil, eggs, and vanilla. With the mixer on low speed, slowly add the dry ingredients until incorporated.
4. With the mixer on low, add the hot water until combined.
5. Pour cake mix into 9×13′ cake pan. You will need about 2-3 cups as you do not want a thick cake. You can use the reserve cake mix to make a dozen cupcakes – which is what I did! or to make another small cake.
Bake the cake for approximately 15-20 minutes or until toothpick inserted in the center comes out clean. Remember, it’s not as thick as usual cake so it doesn’t need a long time to bake.
6. Allow cake to cool slightly, and turn out onto cutting board lined with parchment or cooling rack. Make sure it does not stick to the board. You’ll want it right side up.
Directions to Assemble Marquise:
While the cake bakes/cools, line a loaf pan with cling wrap.
On a sheet of paper, trace the sides of your loaf pan and label them. See “Related Link” for a step by step photo tutorial. But what we’re looking for is to ‘line’ the insides and bottom of the loaf pan with slices of cake, and leave the middle open (for the ice cream). Then, cut out the pieces of paper and place them into the pan to make sure they fit!
Once the cake is baked and cooled, turn it out onto a cooling rack or cutting board lined with parchment or wax paper.
Next, place the cut outs over top of the cooled cake and cut out each piece to match the size of the paper cutout. Once they are cut, place them one at a time into the loaf pan – so that you know which is which. Start with the bottom, then place the sides and top side pieces in. You can use your fingers to push it into place and against the sides.
Then, cover the cake/loaf pan with cling wrap and press it firmly in place. Place into the freezer for about 20 minutes to harden and firm up.
Remove the frozen cake ‘shell’ from the freezer and peel away cling wrap. Using homemade or store bought ice cream, carefully fill the inside of the loaf cake with the ice cream. The ice cream may need to be softened at room temperature for a few minutes. Then place another piece of cling wrap over the top and return to the freezer. It should set for at least 4 hours or overnight. It can stay in the freezer for quite a few days properly wrapped.
Once you are ready to serve it, take off the cling wrap, and place it upside down onto a serving dish. Carefully un-mold it. You can leave it for a few minutes to warm up before cutting. Use a large cake knife heated under water before slicing.
You can eat it plain – or in a saucepan over medium heat, make a raspberry coulis sauce to pour on top.
Prep: Cook:
Serves: 6 Level: Easy
Prep: Cook:
Serves: 12 Level: Intermediate
Prep: Cook:
Serves: 16 Level: Easy
Prep: Cook:
Serves: 24 Level: Intermediate

Prep: Cook:
Serves: 12 Level: Easy


One Comment
Leave a Comment
You must be logged in to post a comment.
bakeaholic on 7.31.2010
There are also step by step photo directions on my website!