
One Review
You must be logged in to post a review.
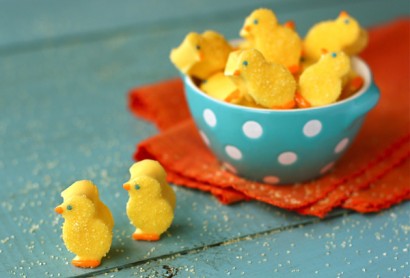
I baked up a little flock of sweet and fluffy marshmallow chicks!
For the marshmallows:
Lightly spray the inside of a 9″ x 13″ pan with cooking spray. Generously coat the pan with powdered sugar, shaking out the excess. Set aside.
Pour 1/3 cup of the water into the bowl of a stand mixer. Sprinkle the gelatin over the water and stir briefly to incorporate. Let it stand for about 10 minutes, or until the gelatin has softened.
In a saucepan, off the heat, combine the remaining 1/3 cup of water and the granulated sugar, corn syrup and salt. Place the pan over medium-high heat. Clip a candy thermometer on the inside of the pan, making sure it doesn’t touch the bottom. Cook the mixture without stirring until it reaches 240°F. Brush down the sides of the pan with a pastry brush, dipped in water, to gently wipe away any sugar crystals.
With your mixer on low speed, very carefully add the hot syrup to the softened gelatin. Once combined, add the vanilla and increase the speed to medium-high. The mixture will start out clear, but quickly turn very white. Beat for about 8 minutes, or until the marshmallow gets very thick and sticky, and starts to pull away from the sides of the bowl, in string-like pieces. This will really give your mixer a workout.
Spread the mixture into the prepared pan using a lightly oiled spatula. With wet hands, press the batter evenly into the corners of the pan. Just keep rewetting your hands to help with the stickiness. Set aside for at least 1 hour, or until the mixture is firm and cool.
Run a wet knife around the edge of the cooled pan to loosen the marshmallow. Remove the marshmallow from the pan, onto a sheet of parchment paper.
Dip your small chick-shaped cookie cutter (mine measures 1″ wide by 1-1/2″ tall) into a shallow bowl of water and then cut the slab of marshmallow into chick shapes. This is a sticky job, but just have patience. It’s worth it! It helps to dip the chick cutter into the water in between cuts. Repeat this process until the whole slab of marshmallow is cut.
For the white chocolate coating and decoration:
Using the microwave, carefully melt the white chocolate in a glass, taking special care to not let the white chocolate get too hot. It’s best to partially melt the white chocolate and then just stir it until completely melted. Then at that point you can color it with yellow candy coloring to your liking.
Drop a marshmallow chick into the colored white chocolate and dunk with a fork to completely coat. Pick the marshmallow up with the fork, allowing excess white chocolate to drip off while lightly tapping the fork to coax more of the excess off. Then slide the fork out of the glass, scraping the underside of the fork tines along the rim of the glass. This will scrape off any remaining excess white chocolate, so you don’t have a pool of it form around your chick as it cools.
Set the white chocolate coated chick on a sheet of parchment paper. Then, while the coating is still wet, place a blue nonpareil for the eye and sprinkle a bit of yellow sugar on the body, staying away from the chick’s feet. Let the chicks cool and completely set up on your kitchen counter. It may help to let them sit in the refrigerator for awhile.
For the glaze icing for the chick’s feet and beak:
Sift the powdered sugar into a small bowl and add the milk and corn syrup. Stir until well incorporated. Then color it with orange icing coloring to your liking. If the icing is too stiff, add just a little more milk. If it’s too thin, add a bit of powdered sugar.
Pour colored glaze icing into a pastry bag fitted with a small round tip. Pipe on a little orange beak and a line across the chick’s feet. This glaze is easy to manipulate and “stretch” using a toothpick, if needed. Let dry completely.
Store in a single layer in an airtight container. The white chocolate will have a softer set than if using candy melts.
Marshmallow recipe adapted from jam it, pickle it, cure it by Karen Solomon (I love, love, LOVE this book!). Glaze icing adapted from i am baker. Marshmallow Chicks concept from a farmgirl’s dabbles.
Prep: Cook:
Serves: 12 Level: Easy
Prep: Cook:
Serves: 32 Level: Easy
Prep: Cook:
Serves: 10 Level: Intermediate
Prep: Cook:
Serves: 12 Level: Easy
Prep: Cook:
Serves: 24 Level: Easy


2 Comments
Leave a Comment
You must be logged in to post a comment.
Jeanne (aka NanaBread) on 3.22.2012
Brenda, this is seriously one of my favorite food photos of all time. Those chicks are adorable, and that photo is spectacular. Love your use of color AND the texture with the sugar-sanded boards. Absolutely gorgeous!
Anna @ Scandinavian cottage on 3.20.2012
These are too cute!
It’s a must make for easter!