
No Reviews
You must be logged in to post a review.
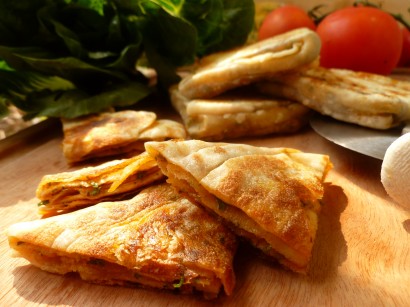
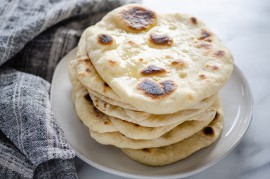
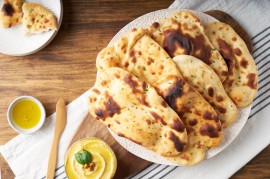
If a recipe describes something one has never tasted or even, perhaps seen, the difficulty may not lie in performing the steps, but in visualizing the end result. Moroccan flatbread is not a difficult bread to make. A visual guide helps give you an idea of what you are aiming for the first time you make it. An excellent little layered bread with a savoury filling. There are step photos in the related link.
A note about flour and water for this bread:
Flour varies from place to place. The Diplomatickitchen version of this flatbread consistently uses 7 tablespoons of water. The signs that the dough is done are the same no matter what flour is used and are described in the instructions below.
A question of timing:
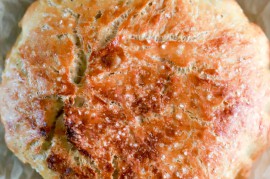
The dough for Moroccan Flatbread may be made and used after a 30 minute rest. Another method is to mix the dough the night before using it, cover it with plastic wrap and leave it at room temperature until the next day. Either timing makes a good flatbread. There are small differences in the results. The overnight version is slightly more pliable and tears less easily than the quicker one which is somewhat less elastic and resembles tortilla dough in its texture. Also, the overnight timing makes a slightly puffier flatbread. The question is rather which bread you prefer and which timing, than which is better. (Both types are pictured in the related link.)
You will also need:
1. Two small bowls, a large mixing bowl and, for the overnight method, a medium-sized bowl for resting the dough.
2. A sifter.
3. A standing mixer, preferably one with a paddle attachment, is optional and convenient for mixing the dough. But it may be done by hand instead.
4. A pastry board and rolling pin.
5. Two sheets of parchment paper, each about 24-inches long.
6. A stove-top griddle or grill with a flat side or a wide, heavy-bottomed pan.
For the dough:
1. In a small bowl, mix the yeast with 6 tablespoons of warm water and set it aside until it is creamy and smooth.
2. Sift the flour and salt into the bowl of the mixer (or any mixing bowl if mixing by hand). Using the paddle attachment, turn on the mixer and pour in the yeast and water.
3. After a few minutes of mixing, if there remain scraps and flakes of dryish dough at the bottom of the bowl that will not combine easily with the dough ball, add the reserved 1 tablespoon of water. Continue mixing. If you have added an additional tablespoon of water, the dough will now appear sticky and leave a liquid-ey flour paste on the sides of the bowl. But further mixing (not more flour) will change the dough’s texture. It is ready when the sides of the bowl are clean and the dough forms a compact, not very sticky ball. Leave it to rest, covered, for 30 minutes or place it in a dry bowl, cover it with plastic wrap and leave it at room temperature overnight.
Making the filling:
1. Finely chop the parsley and onion and combine them in a bowl.
2. Stir the softened butter, paprika and cumin together in a larger bowl.
3. Then mix in the chopped parsley and onion and the salt and set the bowl of filling aside.
Rolling out the dough:
1. Divide the dough into 4 pieces and roll them into balls. Place them on a small plate next to the pastry board.
2. Spread out the two sheets of parchment paper next to the board. (The flattened circles of dough are placed on the paper.)
3. Pour a teaspoon of oil on the pastry board and spread it all over the board with your hands.
4. Place a ball of dough on the board and roll it out into a circle of about 10-inches (26cm) in diameter. Flip the circle once, as you roll it out, so that both sides of it are pressed against the oiled surface. The circle won’t be regular.
5. Transfer the circles, as you make them, to the sheets of parchment paper (2 circles per sheet).
Spreading on the filling:
When all 4 dough balls are flattened into thin circles, divide the filling among them and spread it out over their surfaces with your fingers. (Forming these flatbreads may lead you on the backroads of your memories to preschool days of fingerpainting and modeling clay.)
Forming the flatbreads:
1. The final step is to fold the dough circles several times so that the baked bread is multi-layered. Each circle will be folded into thirds. Imagine the circle divided horizontally into three parts. Pick up the third nearest you and fold it up over the second third.
2. Then, pick up these two-thirds together and fold them over the last third. The circles have now been transformed into long strips.
3. Turn the strips of dough so that a short end is nearest you. Again, imagine the strips divided horizontally into thirds. Flip the third nearest you up over the middle third.
4. Then flip the last third (the one furthest away from you)under the first two thirds that are folded one on top of the other. You’ll now have a square of folded dough. See the related blog link if you need a better visual.
5. On the top of each square, there will be a V-shaped space, revealing a bit of the filling. Pull the top fold of dough across to cover the filling.
6. The squares should be between 2 and 3-inches in size. Make them larger (to a size of between 3 and 4-inches) by placing each one in the palm of one hand and pressing and pushing out on it gently with the rounded part of the palm of your other hand. Ideally you do this without making any tears in the pastry. But … sometimes tears happen. Small ones may be pressed back together. If a little filling presses through the cracks, the finished bread will be colored by the paprika and more buttery on the surface than ones without tears. Either way, the bread will be good. (And if there are air bubbles beneath the surface, just leave them there. They are all to the good and help form the layers inside the bread.)
Griddle-baking or skillet-baking the bread:
1. Preheat the griddle or stove top grill (flat side up) or the skillet over medium heat. Brush it very lightly with oil.
2. Place a couple of flatbreads on the griddle (or in the skillet). Cook them for 2 minutes or until they are golden on one side.
3. Flip them and cook them 2 minutes more or until they are golden on the second side. Transfer them to a cutting board.
4. Cook the remaining flatbreads in the same way.
5. Cut each flatbread into 4 triangles and serve them hot.
A suggestion: R’ghayef is a nice bread to accompany soup. The small triangles are good, as well, placed around a Greek salad. The bread is equally fine all on its own, served as an hors d’oeuvre or snack. And, the bread also travels well for taking on picnics.
An acknowledgement: Moroccan Flatbread is adapted from a recipe for R’ghayef in Mediterranean Street Food (2002) by Anissa Helou.
Prep: Cook:
Serves: 6 Level: Easy
Prep: Cook:
Serves: 6 Level: Easy
Prep: Cook:
Serves: 12 Level: Easy
Prep: Cook:
Serves: 12 Level: Easy
Prep: Cook:
Serves: 12 Level: Intermediate


No Comments
Leave a Comment!
You must be logged in to post a comment.