


No Reviews
You must be logged in to post a review.
This no-knead bread is simple enough that anyone can make it. It will make your home smell fantastic and impress your family. Trust me – if you think bread is too difficult, just try this one. It’s a guaranteed success!
This actually makes 4 LOAVES, not 4 servings, and almost all of the “cook time” is actually rise time. There is very little actual work involved here.
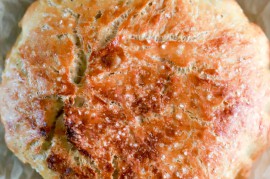
Chop your herbs quite small. I like to use a combination of rosemary, thyme, and sage. Just rosemary works beautifully as well. Experiment! This bread is really versatile. You can even leave out the herbs for a delicious plain bread (the bread in the photo is actually the plain version). When you chop the herbs, try to make them all about the size of a rosemary leaf cut into quarters. My knives aren’t very sharp, so I like to use kitchen shears (scissors) for this part.
In a large mixing bowl, mix warm water (about 100 degrees F) with kosher salt until dissolved. Sprinkle yeast over the top of the water. You’ll be using 2 packets, which is about 1.5 tablespoons of yeast. Let the yeast sit for 2-4 minutes.
Mix your herbs thoroughly into your flour. I prefer to use bread flour, but in this recipe all purpose flour will work if it’s what you have. I’ve even used All-Purpose and Bread flour combined, just to use the last of my flour. This recipe is nothing if not versatile.
Using a wooden spoon, stir the flour into the yeast/water until there are no more wet or dry spots. Cover the bowl with a damp towel and let it rise until doubled. (The damp cloth prevents the top of your dough from drying out. If it dries, the dry surface will prevent the dough from rising).
Doubling should take 2-5 hours. This will depend largely on how warm your kitchen is.
When the dough has doubled in size, turn your oven to 450 degrees. Put one rack on the lowest shelf and the other rack on the middle of the oven. On the lower rack place a broiler pan, on the middle rack place a pizza or baking stone. The stone needs to be heated for at least 20 minutes after the oven reaches temp, so don’t forget this important step of placing these in the oven when you turn it on!
Take a large cookie sheet and spread cornmeal over it. Sprinkle a dusting of flour over your dough. Using a serrated knife, cut the dough in half while it is still in the bowl. Cut one of those halves in half again. Take one quarter of the dough and turn it in your hands, stretching the surface lightly, to form a smooth top and lumpy bottom. Place this on the cornmeal and repeat with the other quarter. We’re letting the newly formed loaves of dough rise a second time.
Cover the dough with a damp towel again.
After 40 minutes, the first loaf is risen and ready for the oven. Sprinkle some flour on the top of it, then using a serrated or very sharp knife slice the top of the bread 3 times, about 1/4 inch deep. Alternately, you can cut an X into the top of the bread, also 1/4 inch deep.
Get 1 cup of very hot water. Open the oven and place your dough on the pizza stone. Then pour the cup of very hot water into the broiler pan at the bottom of the oven and quickly shut the door, trapping the steam. This will allow the surface of the dough to stay moist for long enough that it will rise before it forms a hard crust.
When you put that first loaf into the oven, remove the half of the dough that is remaining in the bowl, cut it in half, turn it in your hands to form a stretched smooth top and lumpy bottom, and place it onto the cornmeal to rise.
Bake the first loaf of bread (and each subsequent loaf) for 20-25 minutes, until it gets a nice golden brown crust.
When you remove the first loaf from the oven, place it onto a cooling rack and put the second loaf into the oven. Remember to make the cuts on the top of the loaf and also to pour in the cup of hot water into your roaster pan each time you put a loaf into the oven.
When you put the second loaf in, prep the third and fourth pieces of dough the same way, turning it in your hands to create a smooth top and lumpy bottom.
Once cooked, allow the bread to cool completely, unless you plan to eat the whole loaf at once. Otherwise it will lose its moisture.
Once the bread is cooled (2-3 hours) you can store it in a plastic bag. It freezes well, so you can save loaves for quite some time.
When you remove it from a plastic bag the crust will be softer than when you put it in. If you want a nice crispy crust simply place the loaf in a warm oven for 10 minutes or so.
It makes wonderful stuffing, if you’re making a turkey. It’s good with just about anything, really. This bread is fantastic, easy, and it just might inspire you to make more breads! Even if you have never baked bread before, you will succeed at making this bread.
Prep: Cook:
Serves: 6 Level: Easy
Prep: Cook:
Serves: 6 Level: Easy

Prep: Cook:
Serves: 12 Level: Easy
Prep: Cook:
Serves: 12 Level: Easy

Prep: Cook:
Serves: 12 Level: Intermediate


One Comment
Leave a Comment
You must be logged in to post a comment.
jkbybee on 4.20.2010
Okay, I made this recipe on Sunday – twice. The first time, my yeast didn’t proof, but I didn’t know it until the dough didn’t rise after 5 hours… So I quickly re-did it, this time proofing my yeast in just 1/3 cup water (and with 1/2 teaspoon of sugar – that ratio always works for me!). It proofed well, and I went with the recipe from there. SUPER YUMMY!!! I’ve never made bread before – just rolls with a recipe specifically for rolls – and this was a rousing success! I took some to a friend, and she ate the whole loaf right there. Seriously. It’s THAT GOOD. Thank you SO much for this recipe! I’m already making it again today.