

No Reviews
You must be logged in to post a review.
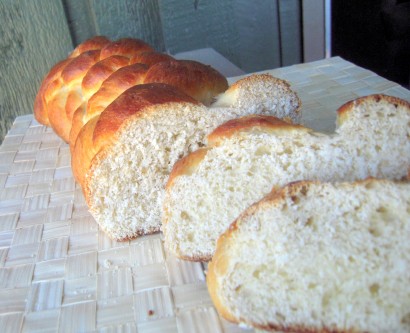
A rich, slightly sweet, terribly addicting egg bread braided into a pretty loaf. Perfect to compliment any meal, also great for French toast and sandwiches! Braiding instructions included, but visit the related blog post for step-by-step photos.
Makes 3 loaves.
NOTE: This dough can be made either in a stand mixer with a dough hook attachment or by hand. I mostly make it by hand these days, after doing it in college so many times without a mixer. Both are equally easy and take the same amount of time.
1. In a medium saucepan, combine the water, butter, sugar and salt. Heat over medium heat, stirring occasionally, until the butter is mostly melted and the mixture reaches a temperature of 110-120ºF. (It should feel like hot tap water on your finger.) If the butter isn’t completely melted when it reaches this temperature, just remove the pan from the heat and continue stirring until the butter melts.
2. In the bowl of a stand mixer or in a large mixing bowl, measure 7 cups of bread flour. Sprinkle the yeast over the flour and stir briefly to combine. If using a mixer, turn the mixer on low and slowly pour in the warm butter mixture, making sure to scrape out any bits of salt or sugar at the bottom of the pan. If making by hand, pour in a little of the butter mixture at a time, mixing with a sturdy wooden spoon between additions. In either case, mix just until the flour starts to moisten.
3. Add 4 eggs, one at a time, mixing/stirring after each addition to combine. When all 4 of the eggs are added, the dough will seem slippery and wet. Adding about 1/4 cup at a time, gradually add in enough of the remaining 1 cup of flour to form a soft, slightly sticky dough. Go slowly and mix well after each addition! I usually don’t have to add the whole cup of flour. To get the best texture possible, you want to add just enough flour. The dough should just start to pull away from the sides of the bowl, whether you’re mixing by hand or with a mixer, when it’s ready. Add the raisins here, if using. At this point, continue kneading (either with the dough hook or by hand..which I just do directly in the bowl) the dough for about 5 minutes. It should stick very slightly to your fingers when it’s ready.
4. Lightly oil the bottom and sides of another large mixing bowl. Turn dough into that bowl, turning to coat the sides of the dough with the oil. Cover the bowl with plastic wrap and a kitchen towel. Place in a warm, draft-free area to rise until doubled in volume, about 45 minutes. (Or…use this trick: preheat your oven to 400ºF for ONE minute, then turn off the oven. Place your bowl of dough in the turned OFF oven to rise.)
5. Line two baking sheets with parchment paper. When the dough has doubled in volume, turn it out onto a very lightly floured work surface (it usually has just enough oil from the bowl to prevent any sticking). Divide the dough ball into 3 equal portions. If you have a kitchen scale, feel free to use it…but I always estimate and it turns out fine. No one will complain if one loaf is slightly bigger than the others. Set aside two portions, leaving one to work with.
6. Ok. Time to braid. If you’re doing a 3-braid, just divide the dough ball into 3 pieces, roll each piece into a long rope and braid it like you would braid hair. If you’re doing a 6-braid, just follow these steps. Don’t psych yourself out, it’s simple, I swear. Divide your portion of dough into 6 equal portions. Now you want to make 6 ropes, each one about 12 inches long – give or take, this is not an exact science. You can roll them into ropes on the work surface, but I find it’s easiest to let gravity do some work. I hold each dough portion up and gently stretch it and squeeze it so that I’m holding the rope lengthwise up and down. If something tears, don’t worry! Just smush it up and start over.
7. When you have 6 ropes, lay them all next to each other so the ends are pointing at you. Starting at the far ends, mush the ends together so they won’t come apart while you’re braiding. Scoot the ropes to the sides a little so you have 2 groups of three, with a wider space in the center.
8. If it helps to think of numbers, pretend the ropes are numbered 1 thru 6 from left to right. Start with the rope all the way on the right, #6 – pick it up, and place it in the center gap, so that it’s now #4.
9. Now pick up the second rope from the left, #2, and place it all the way on the right, so that it’s now #6.
10. Pick up the first rope on the left, #1, and place it in the center gap, so that it’s now #3.
11. Pick up the second rope from the right, #5, and place it all the way on the left, so that it’s now #1.
12. Pick up the first rope on the right, #6, and place it in the center gap, so that it’s now #4.
13. Repeat…pick up the second rope from the left, #2, and place it all the way on the right, now #6…pick up the first rope on the left, #1, and place it in the center gap, now #3. Continue this process until your get to the end of the braid. Press the ends together to seal the braid. Place the completed braid on one of the baking sheets.
14. Repeat the braiding process with the other 2 portions of dough. I usually fit 2 loaves on one sheet diagonally, and the other loaf by itself on one sheet. Cover loaves with kitchen towels and let rise in a warm, draft-free space until puffy and visibly larger, about 25 minutes. (You can use the oven trick again here, just make sure to take the loaves out before you preheat the oven to bake them!)
15. Preheat oven to 375ºF with racks in the upper-middle and lower-middle positions. Beat together the remaining 1 egg and the 1 Tablespoon of water. Brush loaves with egg wash. Bake challahs (actually plural in Hebrew would be challot, if we’re going to get technical here) until they’re golden brown and sound hollow when tapped, about 15-17 minutes total, switching the pans from top to bottom racks halfway through. You can let the loaves cool on a wire cooling rack if you want, but there are very few things that are better than warm challah, fresh from the oven.
(Challah freezes very well. Just wrap a loaf tightly in plastic wrap, then freeze in a freezer-safe Ziploc bag.)
Recipe adapted from Tina Wasserman.
Prep: Cook:
Serves: 6 Level: Easy
Prep: Cook:
Serves: 6 Level: Easy

Prep: Cook:
Serves: 12 Level: Easy
Prep: Cook:
Serves: 12 Level: Easy

Prep: Cook:
Serves: 12 Level: Intermediate


No Comments
Leave a Comment!
You must be logged in to post a comment.