The Pioneer Woman Tasty Kitchen
Profile photo of georgiapellegrini

Barbecued Shrimp, New Orleans Style

Posted by in Step-by-Step Recipes

Tasty Kitchen Blog: Paul's Barbecued Shrimp. Guest post by Georgia Pellegrini, recipe submitted by TK member Jennifer of Food Orleans.

 
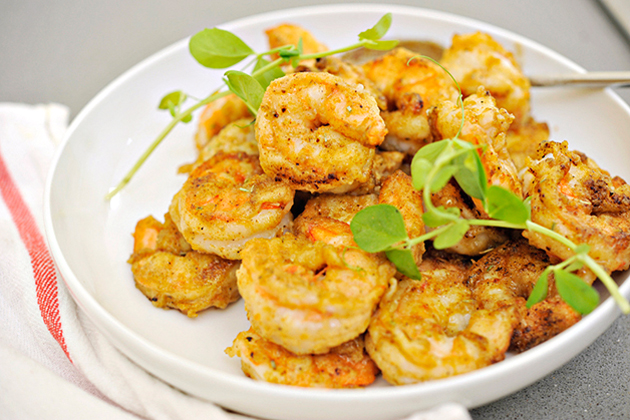
This barbecued shrimp recipe from Food Orleans was utterly wonderful. There was just enough breading and seasoning without it dominating the flavor of the shrimp, but enough to give it a great texture. Jennifer explains that New Orleans style barbecued shrimp is buttered, not barbecued. I’m down with that.


Tasty Kitchen Blog: Paul's Barbecued Shrimp. Guest post by Georgia Pellegrini, recipe submitted by TK member Jennifer of Food Orleans.

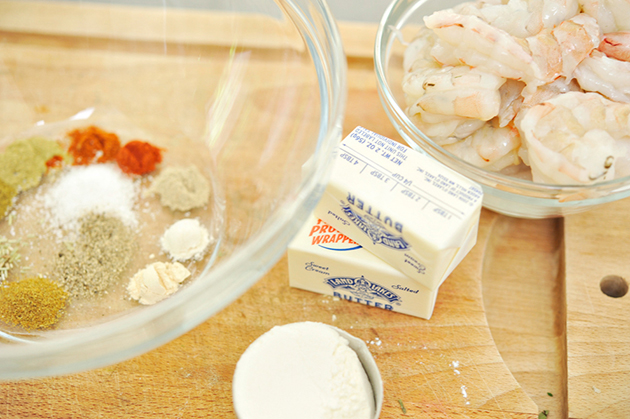
Here is what you will need: onion powder, garlic powder, white pepper, dried thyme, dried oregano, dried rosemary, ground cumin, cayenne pepper, paprika, kosher salt, cracked black pepper, all-purpose flour, shrimp (shelled and deveined), and unsalted butter.


Tasty Kitchen Blog: Paul's Barbecued Shrimp. Guest post by Georgia Pellegrini, recipe submitted by TK member Jennifer of Food Orleans.

Combine all of the spices together!


Tasty Kitchen Blog: Paul's Barbecued Shrimp. Guest post by Georgia Pellegrini, recipe submitted by TK member Jennifer of Food Orleans.

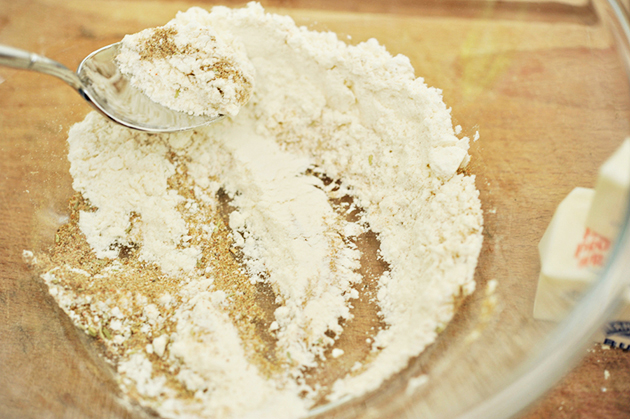
Then whisk in the flour.


Tasty Kitchen Blog: Paul's Barbecued Shrimp. Guest post by Georgia Pellegrini, recipe submitted by TK member Jennifer of Food Orleans.

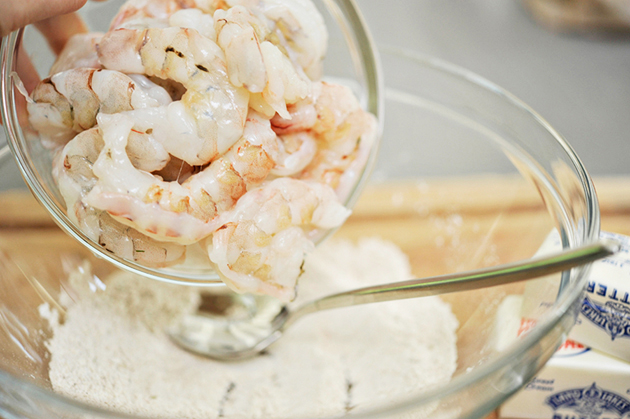
Pat your shrimp dry and then throw them in the bowl.


Tasty Kitchen Blog: Paul's Barbecued Shrimp. Guest post by Georgia Pellegrini, recipe submitted by TK member Jennifer of Food Orleans.

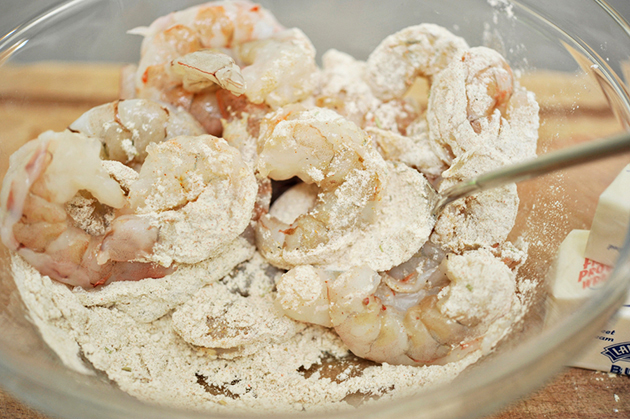
Give them a nice toss in the mixture, making sure to scoop it all from the bottom.


Tasty Kitchen Blog: Paul's Barbecued Shrimp. Guest post by Georgia Pellegrini, recipe submitted by TK member Jennifer of Food Orleans.

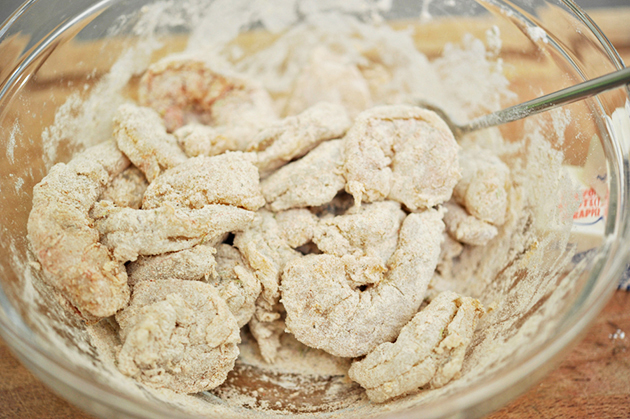
Like so. You want a nice coating so that all of the flavor gets used up.


Tasty Kitchen Blog: Paul's Barbecued Shrimp. Guest post by Georgia Pellegrini, recipe submitted by TK member Jennifer of Food Orleans.

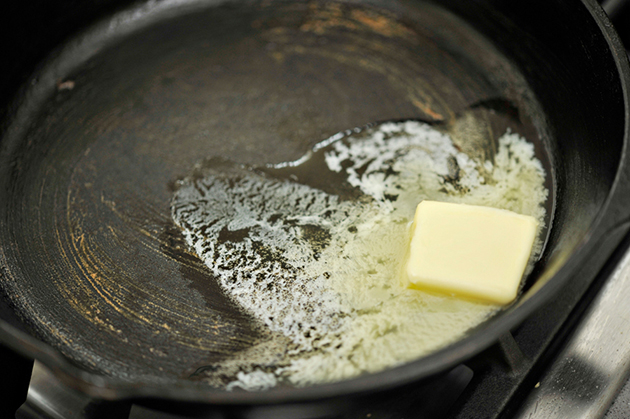
Meanwhile, in a skillet melt a good dose of butter. If you want extra juice to sop up with the bread, you’ll want extra butter. Or if you just want to gobble the shrimp up without the bread, you won’t need quite as much.


Tasty Kitchen Blog: Paul's Barbecued Shrimp. Guest post by Georgia Pellegrini, recipe submitted by TK member Jennifer of Food Orleans.

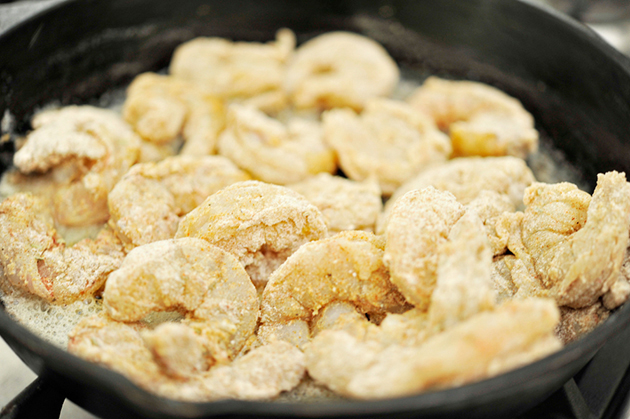
Add the shrimp to the skillet in one layer.


Tasty Kitchen Blog: Paul's Barbecued Shrimp. Guest post by Georgia Pellegrini, recipe submitted by TK member Jennifer of Food Orleans.

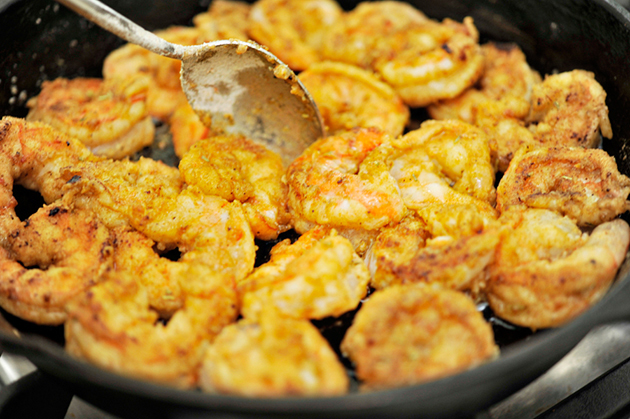
After about 3 minutes, when things are nice and golden brown on one side, turn them over one at a time and let them brown on the other side. They’ll curl and firm up and turn reddish under the breading once they’re ready.


Tasty Kitchen Blog: Paul's Barbecued Shrimp. Guest post by Georgia Pellegrini, recipe submitted by TK member Jennifer of Food Orleans.

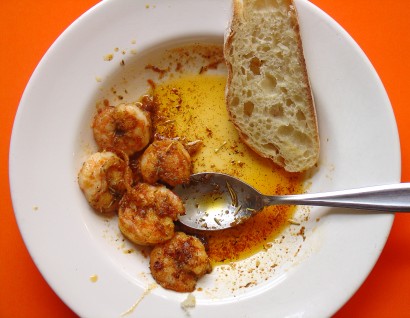
You can serve this with bread if you have extra sauce, or it would also be wonderful with some greens as part of a salad. It was such an addictive dish, thanks so much to Jennifer for sharing it with us! Check out her blog Food Orleans for more deliciousness.


Printable Recipe

Paul’s Barbecued Shrimp

See post on food orleans’s site!
4.40 Mitt(s) 5 Rating(s)5 votes, average: 4.40 out of 55 votes, average: 4.40 out of 55 votes, average: 4.40 out of 55 votes, average: 4.40 out of 55 votes, average: 4.40 out of 5

Prep Time:

Cook Time:

Difficulty: Easy

Servings: 4

4
x

Print Options

Page size Letter 3x5 4x6
Text Size Small Medium Large
Content Include description
Include prep time, etc.
Show image

Description

New Orleans-style barbecued shrimp isn’t barbecued—it’s buttered. Serve small portions as tapas, for the love of all that’s holy.

Ingredients

  • ¼ teaspoons Onion Powder
  • ¼ teaspoons Garlic Powder
  • ¼ teaspoons White Pepper
  • ¼ teaspoons Dried Thyme
  • ¼ teaspoons Dried Oregano
  • ¼ teaspoons Dried Rosemary, Crumbled
  • ¼ teaspoons Ground Cumin
  • ½ teaspoons Cayenne Pepper
  • 1 teaspoon Paprika
  • 1 teaspoon Kosher Salt
  • 1 teaspoon Cracked Black Pepper
  • ¼ cups All-purpose Flour
  • 1 pound Shrimp, Shelled And Deveined
  • 6 Tablespoons Unsalted Butter
  • 4 slices Ciabatta Or Other Bread, For Serving

Preparation Instructions

Combine onion powder and the rest of the spices in a small bowl. Mix well and taste it a little bit; the mixture should be very tasty and spicy, so add more of anything you think it needs. Add flour and mix well.

Pat shrimp dry with paper towels, then toss to coat with spice mixture.

Heat a medium cast-iron or other heavy skillet over high heat. Add butter and swirl pan to melt.

When butter is just melted, add shrimp to pan and cook without disturbing for about 2 minutes. Turn shrimp over and cook another 3–4 minutes, or until curled and opaque throughout.

Serve shrimp and butter drizzled over bread. Gracious.


_______________________________________

There’s so much to say about Georgia, we don’t know where to start. Leaving Wall Street for the French Culinary Institute, followed by a stint at the Gramercy Tavern and La Chassagnette in France, her passion for food and food traditions are evident and inspiring. Visit her site at Georgia Pellegrini, where you’ll find more recipes, photos, learn all about her wonderful books Girl Hunter and Food Heroes, and enjoy her latest adventures.


Profile photo of ThreeManyCooks

Baked Falafel Pita

Posted by in Step-by-Step Recipes

Tasty Kitchen Blog: Baked Falafel Pita. Guest post by Maggy Keet of Three Many Cooks, recipe submitted by TK member Jane (janecooks).

 
As I’m eating less meat these days, I’m always on the look-out for recipes that use beans and legumes. They’re healthy, filling, and full of protein and fiber. But when I think falafel, I think fried and weekend project, too.

But Tasty Kitchen member janecooks offers a baked version of the fried favorite that’s weeknight-easy. And with two cans of chickpeas as the bulk of the meal, it’s easy on the wallet, too. These Baked Falafel Pitas are colorful, flavorful, and oh-so delicious. They received rave reviews in my house and I’m sure they will in yours.


Tasty Kitchen Blog: Baked Falafel Pita. Guest post by Maggy Keet of Three Many Cooks, recipe submitted by TK member Jane (janecooks).

Bright, colorful, flavorful ingredients. That’s always a good start.

Preheat your oven to 400ºF.


Tasty Kitchen Blog: Baked Falafel Pita. Guest post by Maggy Keet of Three Many Cooks, recipe submitted by TK member Jane (janecooks).

Drain the chickpeas and pour them into your food processor.


Tasty Kitchen Blog: Baked Falafel Pita. Guest post by Maggy Keet of Three Many Cooks, recipe submitted by TK member Jane (janecooks).

Add the flour, parsley, garlic, cumin, coriander, chili powder, salt and pepper.


Tasty Kitchen Blog: Baked Falafel Pita. Guest post by Maggy Keet of Three Many Cooks, recipe submitted by TK member Jane (janecooks).

Blitz the ingredients until it looks like this. If you don’t have a food processor, you can use a fork or a potato masher instead.


Tasty Kitchen Blog: Baked Falafel Pita. Guest post by Maggy Keet of Three Many Cooks, recipe submitted by TK member Jane (janecooks).

Form chickpea patties about 1 ½ inches wide by 2 inches thick. Place formed patties on a lightly greased baking sheet and bake for 15-20 minutes.


Tasty Kitchen Blog: Baked Falafel Pita. Guest post by Maggy Keet of Three Many Cooks, recipe submitted by TK member Jane (janecooks).

While the chickpea patties are baking, make this tahini-lemon sauce. We added a little water to make it more … saucy.


Tasty Kitchen Blog: Baked Falafel Pita. Guest post by Maggy Keet of Three Many Cooks, recipe submitted by TK member Jane (janecooks).

Assemble by spreading a portion of the tahini-lemon sauce inside of each pita. Then add a couple of chickpea patties and a generous amount of lettuce, tomato, and crumbled feta. Enjoy!

Thanks to Jane for sharing these Baked Falafel Pitas, I’m definitely adding these to my weeknight repertoire!


Printable Recipe

Baked Falafel Pitas

5.00 Mitt(s) 7 Rating(s)7 votes, average: 5.00 out of 57 votes, average: 5.00 out of 57 votes, average: 5.00 out of 57 votes, average: 5.00 out of 57 votes, average: 5.00 out of 5

Prep Time:

Cook Time:

Difficulty: Easy

Servings: 4

4
x

Print Options

Page size Letter 3x5 4x6
Text Size Small Medium Large
Content Include description
Include prep time, etc.
Show image

Description

These healthy chickpea cakes have zesty Middle Eastern flavor and are a great, quick dinner-time treat when tucked into a pita! My meat-loving fiance doesn’t even miss the meat in this flavorful, filling meal!

Ingredients

  • 2 cans (15 Oz. Size) Chickpeas
  • 3 Tablespoons Flour
  • 3 Tablespoons Parsley (optional)
  • 4 cloves Garlic
  • 2 teaspoons Ground Cumin
  • 2 teaspoons Ground Coriander
  • 1 teaspoon Chili Powder
  • ½ teaspoons Salt
  • 1 dash Black Pepper
  • 4 Tablespoons Tahini
  • 3 Tablespoons Lemon Juice
  • 3 whole Tomatoes, Diced
  • 1 block (8 Oz. Size) Feta Cheese, Crumbled
  • 1 head Lettuce
  • 12 whole Small Pitas

Preparation Instructions

Throw the chickpeas, flour, parsley, and spices into a food processor and pulse until well blended—or mash up chickpeas with a fork or potato masher and mix in spices. Then form small patties out of the chickpea mixture, about 1 1/2 to 2 inches wide and 1 inch thick.

Preheat the oven to 400ºF and place chickpea patties on a lightly greased pan and pop into the oven for 15–20 minutes.

Meanwhile, mix together the tahini and lemon juice and set aside with your other toppings (tomatoes, feta, and lettuce). When the patties are done, put them in a pita with plenty of toppings, and enjoy!


_______________________________________

Three Many Cooks is the always-entertaining food blog of Pam Anderson and her two daughters, Maggy and Sharon. Pam is a well-known and much-respected food writer and author, Maggy is a “hippy adventurer meets 1950s housewife,” and Sharon refers to herself as a recovering food snob learning to survive on a graduate student’s budget. Theirs is a strong relationship both inside and outside the kitchen, and it shows in the food they create and the stories they tell.


Profile photo of Amber {Sprinkled With Flour}

Savory Corn Creme Brûlée

Posted by in Step-by-Step Recipes

Tasty Kitchen Blog: Savory Corn Creme Brûlée. Guest post by Amber Potter of Sprinkled with Flour, recipe submitted by TK member Donna of Apron Strings.

 
I like unusual twists to classic recipes. It’s so much fun trying something new and different, but with a familiar recipe. Some may say, “If it’s not broke, don’t fix it.” But I’m all for being adventuresome. When I found this recipe from Donna for Savory Corn Creme Brûlée, I knew this was a twist I just had to try. (Donna, a self-proclaimed creme brûlée addict, was inspired by a savory creme brûlée recipe by Claire Robinson in 5 Ingredient Fix.) I really had no idea what to expect but the idea of a savory creme brûlée really intrigued me, and I have to say, it was fantastic!

This dish has fresh corn pureed in a cream mixture, which results in such a delicate and delicious flavor you’ll wonder why you never thought of doing it before. When you sprinkle fresh Parmesan on top and broil it to a pretty golden coat, it adds the perfect finishing touch.

Thank you Donna for sharing this wonderful dish. I can definitely say this will be made again at our house!


Tasty Kitchen Blog: Savory Corn Creme Brûlée. Guest post by Amber Potter of Sprinkled with Flour, recipe submitted by TK member Donna of Apron Strings.

You will need: fresh corn on the cob, cream, eggs, egg yolks, salt, cayenne pepper sauce, grated Parmesan cheese.


Tasty Kitchen Blog: Savory Corn Creme Brûlée. Guest post by Amber Potter of Sprinkled with Flour, recipe submitted by TK member Donna of Apron Strings.

Cut the kernels off the cob and place in a bowl. Set aside.


Tasty Kitchen Blog: Savory Corn Creme Brûlée. Guest post by Amber Potter of Sprinkled with Flour, recipe submitted by TK member Donna of Apron Strings.

Add the cream to a saucepan and heat to a boil.


Tasty Kitchen Blog: Savory Corn Creme Brûlée. Guest post by Amber Potter of Sprinkled with Flour, recipe submitted by TK member Donna of Apron Strings.

Add kernels, turn off heat, and let corn steep for 10 minutes.


Tasty Kitchen Blog: Savory Corn Creme Brûlée. Guest post by Amber Potter of Sprinkled with Flour, recipe submitted by TK member Donna of Apron Strings.

Place creamed corn mixture in a blender and blend until corn is pureed.


Tasty Kitchen Blog: Savory Corn Creme Brûlée. Guest post by Amber Potter of Sprinkled with Flour, recipe submitted by TK member Donna of Apron Strings.

Strain mixture and discard the pulp remaining in the strainer.


Tasty Kitchen Blog: Savory Corn Creme Brûlée. Guest post by Amber Potter of Sprinkled with Flour, recipe submitted by TK member Donna of Apron Strings.

Whisk eggs and yolks, then add a little of the cream mixture to temper the eggs.


Tasty Kitchen Blog: Savory Corn Creme Brûlée. Guest post by Amber Potter of Sprinkled with Flour, recipe submitted by TK member Donna of Apron Strings.

Stir the egg mixture into the remaining cream mixture.


Tasty Kitchen Blog: Savory Corn Creme Brûlée. Guest post by Amber Potter of Sprinkled with Flour, recipe submitted by TK member Donna of Apron Strings.

Stir in the pepper sauce …


Tasty Kitchen Blog: Savory Corn Creme Brûlée. Guest post by Amber Potter of Sprinkled with Flour, recipe submitted by TK member Donna of Apron Strings.

And the salt.


Tasty Kitchen Blog: Savory Corn Creme Brûlée. Guest post by Amber Potter of Sprinkled with Flour, recipe submitted by TK member Donna of Apron Strings.

Pour the mixture into six buttered one-cup ramekins.


Tasty Kitchen Blog: Savory Corn Creme Brûlée. Guest post by Amber Potter of Sprinkled with Flour, recipe submitted by TK member Donna of Apron Strings.

Bake for 30 minutes, or until set in the centers. Remove from oven and let cool to room temperature.


Tasty Kitchen Blog: Savory Corn Creme Brûlée. Guest post by Amber Potter of Sprinkled with Flour, recipe submitted by TK member Donna of Apron Strings.

Sprinkle Parmesan cheese on the tops in a thin layer.


Tasty Kitchen Blog: Savory Corn Creme Brûlée. Guest post by Amber Potter of Sprinkled with Flour, recipe submitted by TK member Donna of Apron Strings.

Using a kitchen torch or broiler, toast the cheese on tops until golden brown. Serve and enjoy!


Tasty Kitchen Blog: Savory Corn Creme Brûlée. Guest post by Amber Potter of Sprinkled with Flour, recipe submitted by TK member Donna of Apron Strings.

Recipe notes: If your cheese layer is too thick, it will be harder to break through when eating, so a thin layer is recommended. Unless you’re a cheese fiend, of course, and you don’t mind the extra hassle. Also, I kept my leftovers in the fridge (covered in plastic wrap), and it reheated very well the next day.

A big thanks to Donna for this recipe! Be sure to visit her blog, Apron Strings, for a great collection of yummy-looking recipes!


Printable Recipe

Savory Corn Creme Brulee

See post on Donna @ apron strings’s site!
0.00 Mitt(s) 0 Rating(s)0 votes, average: 0.00 out of 50 votes, average: 0.00 out of 50 votes, average: 0.00 out of 50 votes, average: 0.00 out of 50 votes, average: 0.00 out of 5

Prep Time:

Cook Time:

Difficulty: Intermediate

Servings: 6

6
x

Print Options

Page size Letter 3x5 4x6
Text Size Small Medium Large
Content Include description
Include prep time, etc.
Show image

Description

Fresh sweet corn and rich salty Parmesan—a match made in heaven—meet in a savory twist to the classic creme brulee.

Ingredients

  • 3 ears Corn
  • 2 cups Cream
  • 3 whole Large Eggs
  • 2 whole Large Egg Yolks
  • ¼ teaspoons Salt
  • 1 dash Cayenne Pepper Sauce
  • 1 cup Grated Parmesan Cheese

Preparation Instructions

Preheat oven to 325 degrees.

Cut kernels off cobs. Heat cream to a boil, add kernels and then turn off heat and let corn steep for 10 minutes. Blend in a blender until corn is pureed. Strain mixture through a fine mesh strainer. Discard pulp remaining in strainer.

Whisk eggs and yolks and then add a little of the cream mixture at a time, tempering the eggs. Stir in pepper sauce.

Pour mixture into 6 buttered one-cup ramekins.

Bake for 30 minutes, until set in centers. Remove from oven and let cool to room temperature.

Sprinkle cheese on the tops in a thin layer. Using a kitchen torch or broiler, toast the cheese on tops until golden brown.


_______________________________________

Amber is a stay at home mom who lives in the heart of the Missouri Ozarks. It’s a long way from where she grew up, in Wales (yes, way over in the U.K.). The recipes in her blog Sprinkled with Flour include her original creations as well as her family recipes. Go check them out!