The Pioneer Woman Tasty Kitchen
Profile photo of A Cozy Kitchen

Best Carrot Cake of All Time

Posted by in Baking, Step-by-Step Recipes

Tasty Kitchen Blog: Best Carrot Cake of All Time. Guest post by Adrianna Adarme of A Cozy Kitchen, recipe submitted by TK members Katy and Christine (kpurwin) of Young and Hungry.
 
 
There’s nothing quite like a moist piece of carrot cake speckled with a variety of coconut, nuts, dried fruit and carrots. Carrot cake truly does make my heart pitter-patter. And what I love most of all is that the bits of shredded carrots make the entire thing healthy, right? Right?

Regardless of whether that last statement is actually true or not, there’s plenty of reasons—healthiness aside—to make this carrot cake. Like its appropriate title, this was in fact the best carrot cake I’ve had to date. Big-ups to TK member Kpurwin (who adapted it from Southern Living) for providing us with such an honest and delightful recipe.


Tasty Kitchen Blog: Best Carrot Cake of All Time. Guest post by Adrianna Adarme of A Cozy Kitchen, recipe submitted by TK members Katy and Christine (kpurwin) of Young and Hungry.

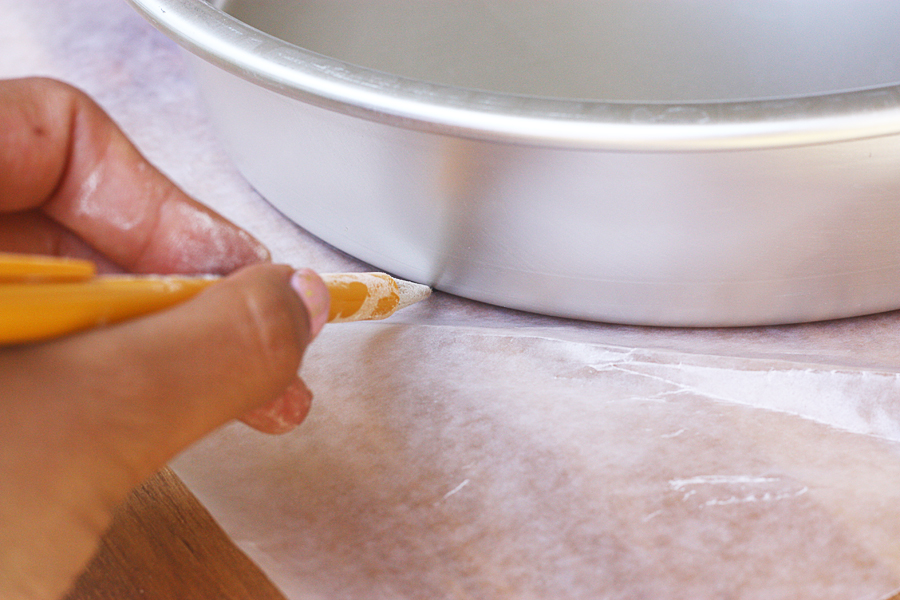
To kick off this carrot cake endeavor, you’re going to start by lining (and greasing) your cake pans with wax paper. This makes for easy carrot cake extraction later on.


Tasty Kitchen Blog: Best Carrot Cake of All Time. Guest post by Adrianna Adarme of A Cozy Kitchen, recipe submitted by TK members Katy and Christine (kpurwin) of Young and Hungry.

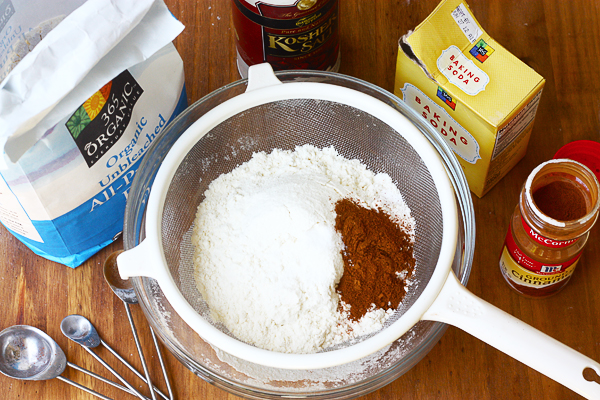
Time to get all of the dry ingredients together: all-purpose flour, baking soda, salt and cinnamon. Do a little sift action and set aside.


Tasty Kitchen Blog: Best Carrot Cake of All Time. Guest post by Adrianna Adarme of A Cozy Kitchen, recipe submitted by TK members Katy and Christine (kpurwin) of Young and Hungry.

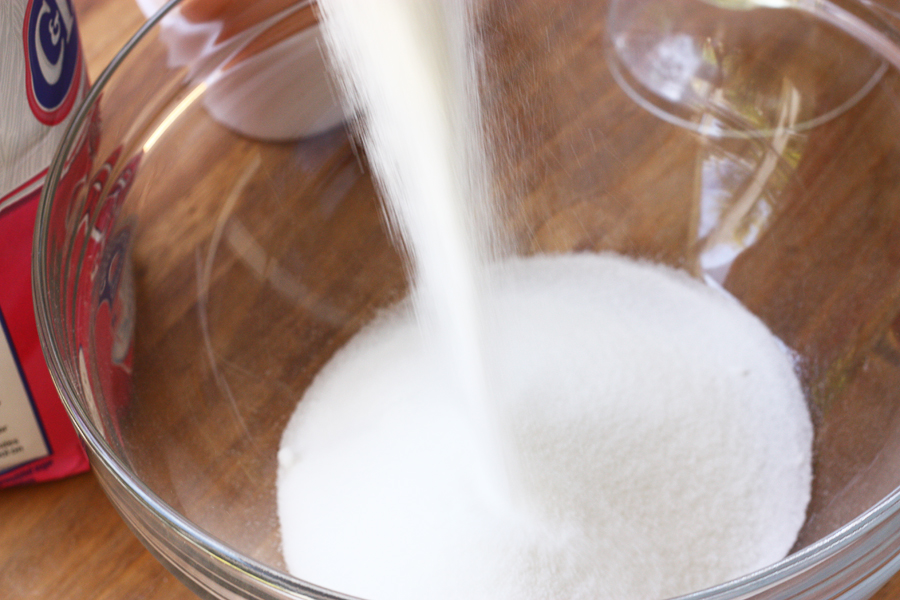
Next up, the wet ingredients. Start with the sugar.


Tasty Kitchen Blog: Best Carrot Cake of All Time. Guest post by Adrianna Adarme of A Cozy Kitchen, recipe submitted by TK members Katy and Christine (kpurwin) of Young and Hungry.
 
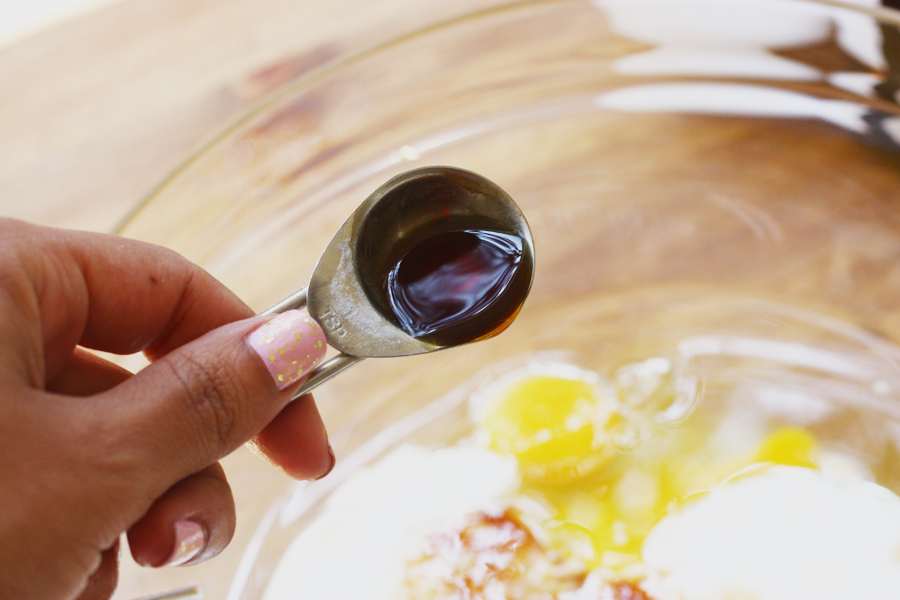
Add the eggs and vanilla.


Tasty Kitchen Blog: Best Carrot Cake of All Time. Guest post by Adrianna Adarme of A Cozy Kitchen, recipe submitted by TK members Katy and Christine (kpurwin) of Young and Hungry.

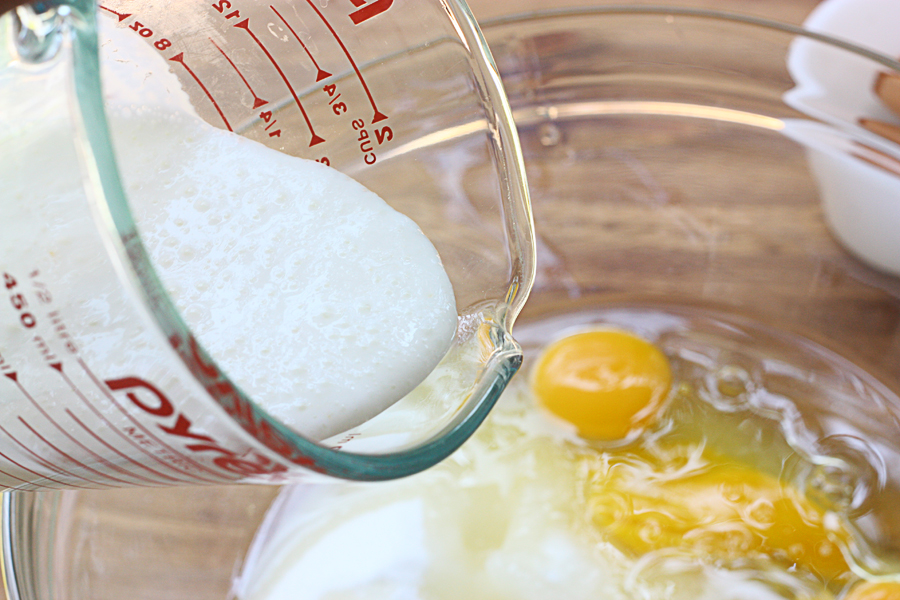
Lastly, add the buttermilk. And then, using a hand mixer, beat everything together until completely blended.


Tasty Kitchen Blog: Best Carrot Cake of All Time. Guest post by Adrianna Adarme of A Cozy Kitchen, recipe submitted by TK members Katy and Christine (kpurwin) of Young and Hungry.

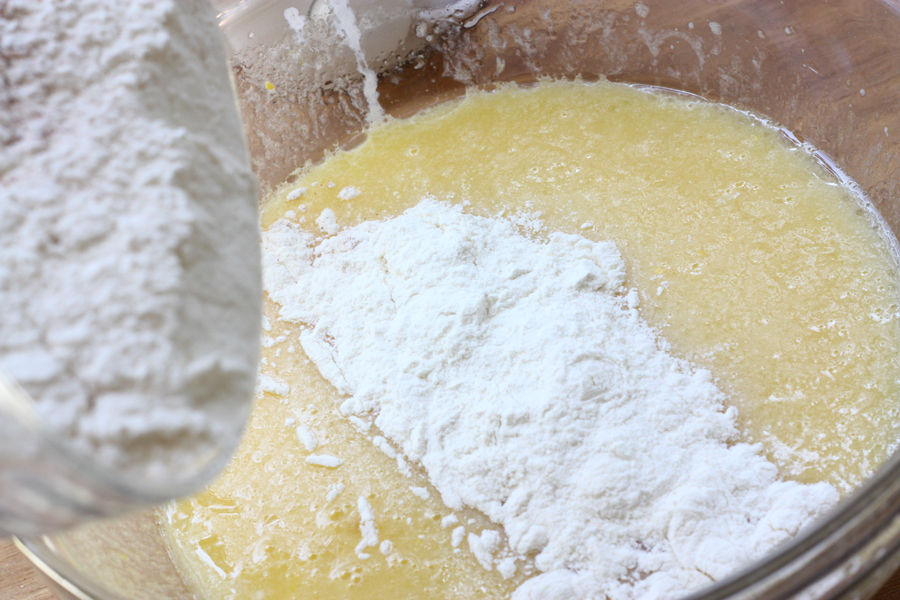
Add the flour mixture in a few batches and beat, on low, until juuuust combined.


Tasty Kitchen Blog: Best Carrot Cake of All Time. Guest post by Adrianna Adarme of A Cozy Kitchen, recipe submitted by TK members Katy and Christine (kpurwin) of Young and Hungry.

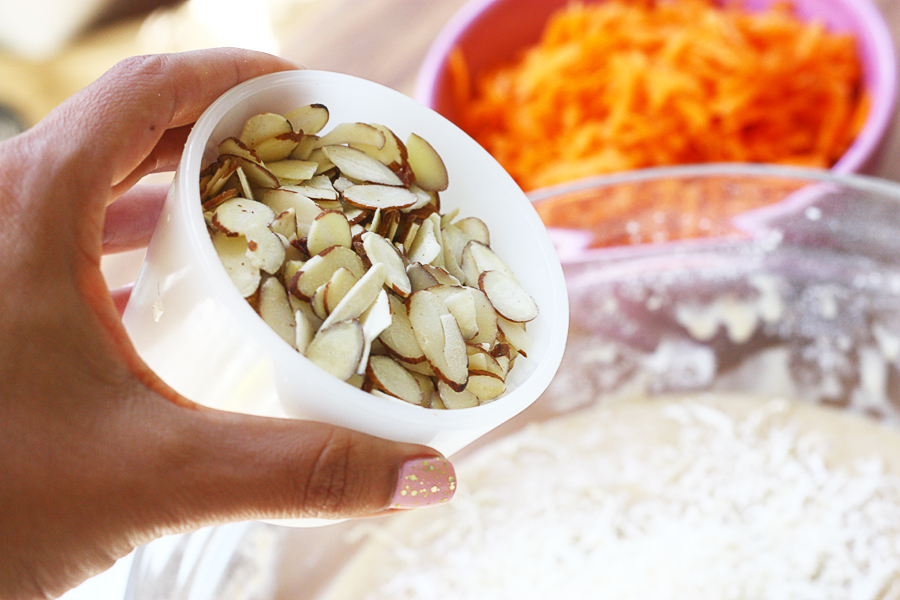
Let’s be honest. The best part about carrot cake is all the stuff it’s studded with. Let’s start with the coconut and pecans. And if you’re all out, substituting almonds is totally a good idea.


Tasty Kitchen Blog: Best Carrot Cake of All Time. Guest post by Adrianna Adarme of A Cozy Kitchen, recipe submitted by TK members Katy and Christine (kpurwin) of Young and Hungry.

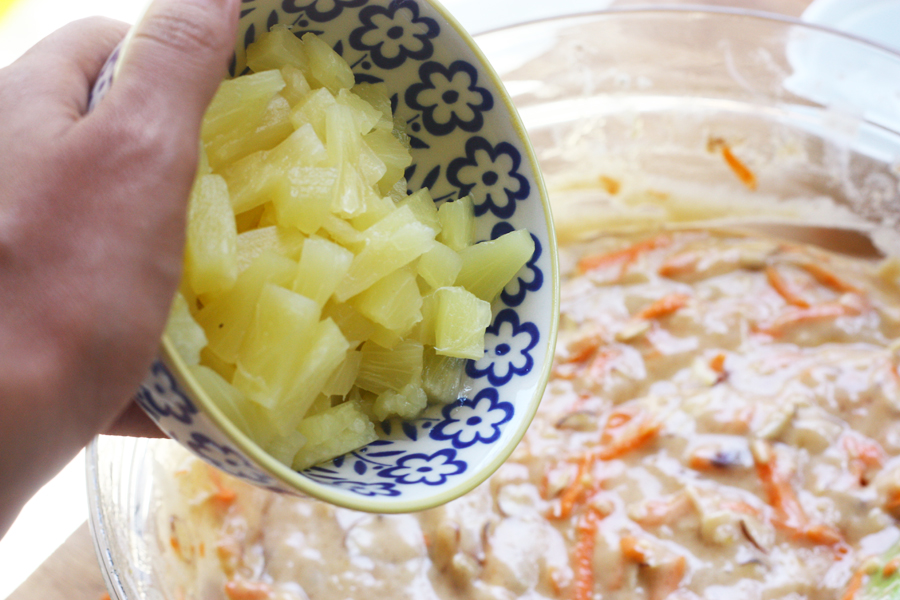
Add the grated carrots and cubed pineapple. Everyone will thank you later for this.


Tasty Kitchen Blog: Best Carrot Cake of All Time. Guest post by Adrianna Adarme of A Cozy Kitchen, recipe submitted by TK members Katy and Christine (kpurwin) of Young and Hungry.

Transfer the batter to your two lined and greased cake pans. That’s some gorgeous looking batter, isn’t it?
 
Stick it in a preheated 350ºF oven for 25 to 30 minutes, or until an inserted wooden pick comes out clean. 

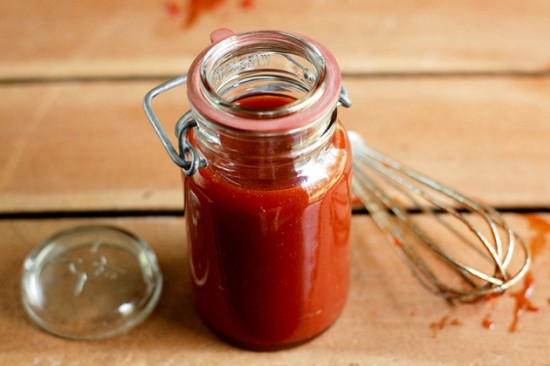
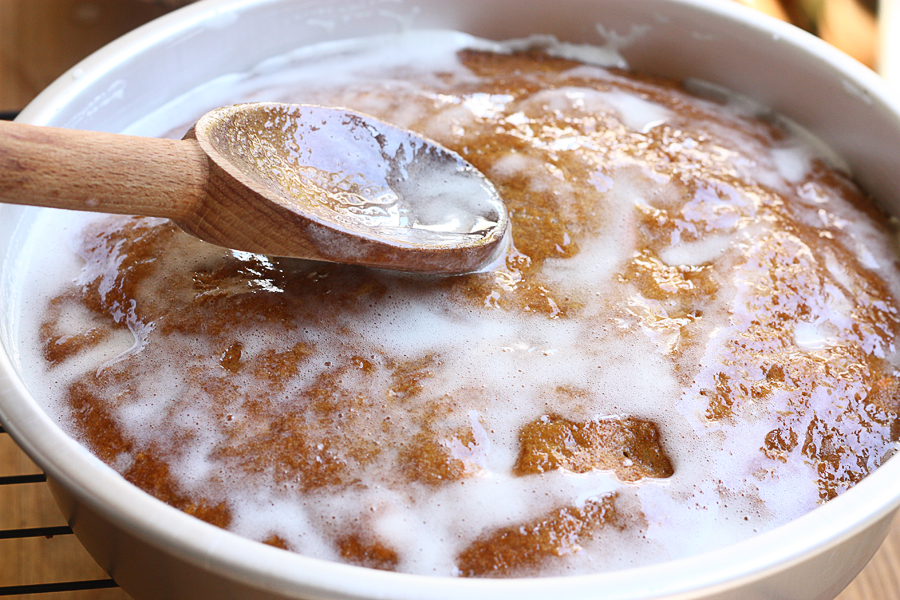
While it’s baking, turn your attention to the buttermilk glaze. It’s a breeze. Add everything to a saucepan (minus the vanilla) and cook until it reaches a boil and just mix. And then add the vanilla at the end.


Tasty Kitchen Blog: Best Carrot Cake of All Time. Guest post by Adrianna Adarme of A Cozy Kitchen, recipe submitted by TK members Katy and Christine (kpurwin) of Young and Hungry.

Right when your cakes come out of the oven, pour the buttermilk glaze over them. This will give them a good dose of extra awesomeness.


Tasty Kitchen Blog: Best Carrot Cake of All Time. Guest post by Adrianna Adarme of A Cozy Kitchen, recipe submitted by TK members Katy and Christine (kpurwin) of Young and Hungry.

You’re gonna wanna spread it all around evenly, making sure the entire cake is coated and smothered in it.
 
Let the cake cool completely and come to room temperature. While it’s doing its cooling-down action, you can get started on the cream cheese frosting.


Tasty Kitchen Blog: Best Carrot Cake of All Time. Guest post by Adrianna Adarme of A Cozy Kitchen, recipe submitted by TK members Katy and Christine (kpurwin) of Young and Hungry.

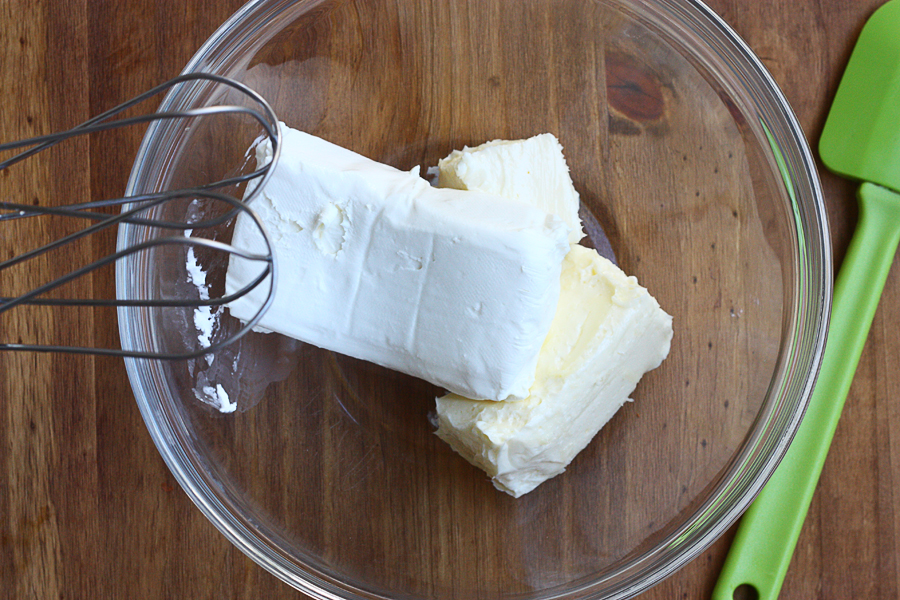
Pretty standard stuff. Just add everything to a bowl and beat until completely smooth. 


Tasty Kitchen Blog: Best Carrot Cake of All Time. Guest post by Adrianna Adarme of A Cozy Kitchen, recipe submitted by TK members Katy and Christine (kpurwin) of Young and Hungry.

After your cake is done cooling, you’re going to transfer the first layer of the cake to a big plate or cake stand. You can line the cake stand by placing squares of parchment underneath the cake. Then when you’re done icing your cake, all you have to do is remove the parchment squares, and tadaaa! Clean cake stand.


Tasty Kitchen Blog: Best Carrot Cake of All Time. Guest post by Adrianna Adarme of A Cozy Kitchen, recipe submitted by TK members Katy and Christine (kpurwin) of Young and Hungry.

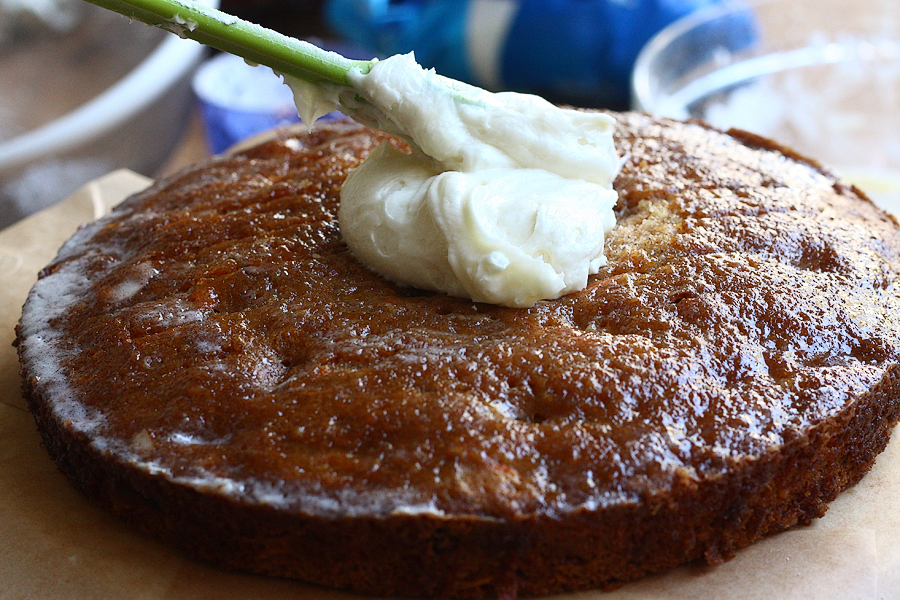
Place a big scoop of icing on top of the cake. This would be a perfect time for an off-set spatula, but since I have a kitchen that eats things, my big spatula had to do.


Tasty Kitchen Blog: Best Carrot Cake of All Time. Guest post by Adrianna Adarme of A Cozy Kitchen, recipe submitted by TK members Katy and Christine (kpurwin) of Young and Hungry.

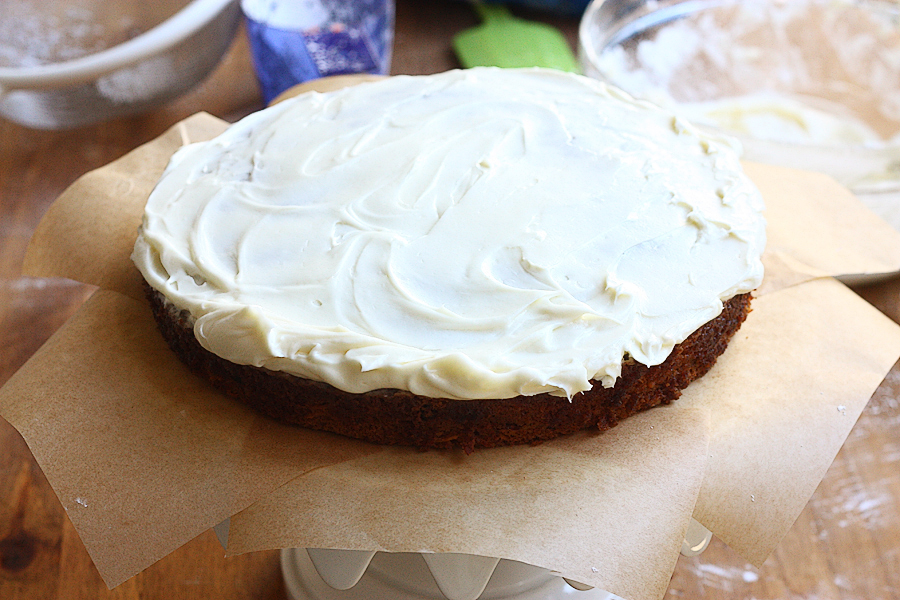
Just be sure to lay it on thick! You want a good layer of icing in between the two layers.


Tasty Kitchen Blog: Best Carrot Cake of All Time. Guest post by Adrianna Adarme of A Cozy Kitchen, recipe submitted by TK members Katy and Christine (kpurwin) of Young and Hungry.

Gently place the second cake atop the first one.


Tasty Kitchen Blog: Best Carrot Cake of All Time. Guest post by Adrianna Adarme of A Cozy Kitchen, recipe submitted by TK members Katy and Christine (kpurwin) of Young and Hungry.

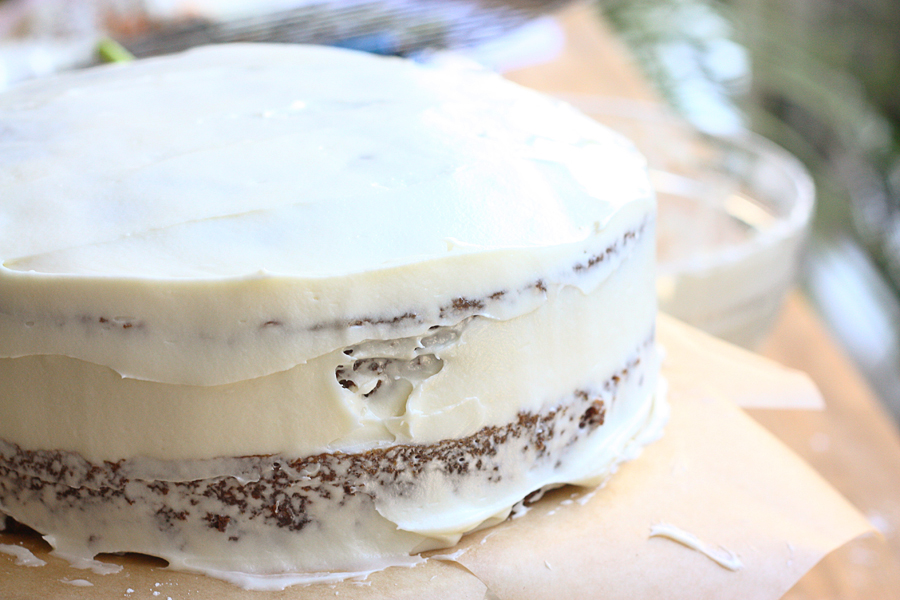
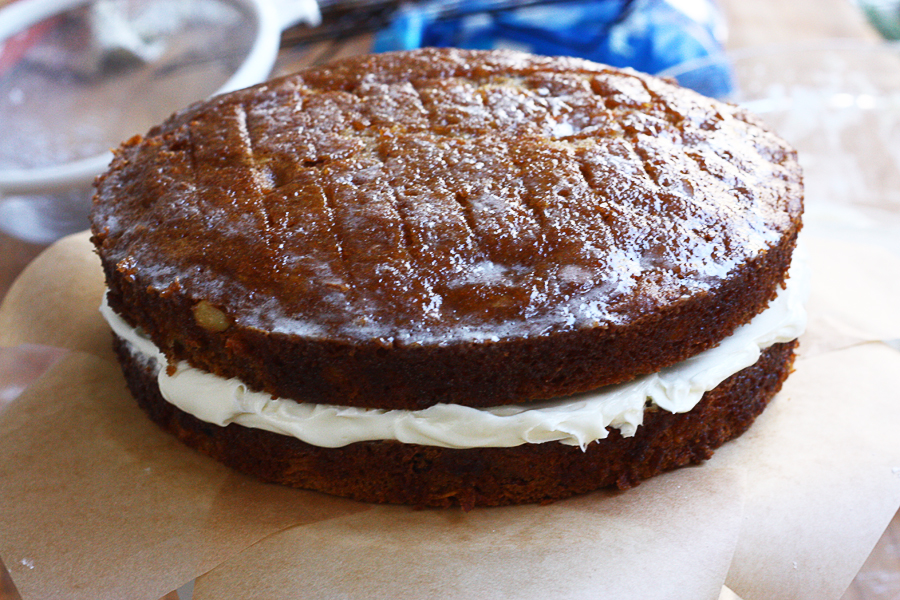
Evenly distribute icing on the top and on the sides. If you want to get fancy, you can stick this in the fridge so the icing can set and then add on one more even layer of icing.


Tasty Kitchen Blog: Best Carrot Cake of All Time. Guest post by Adrianna Adarme of A Cozy Kitchen, recipe submitted by TK members Katy and Christine (kpurwin) of Young and Hungry.

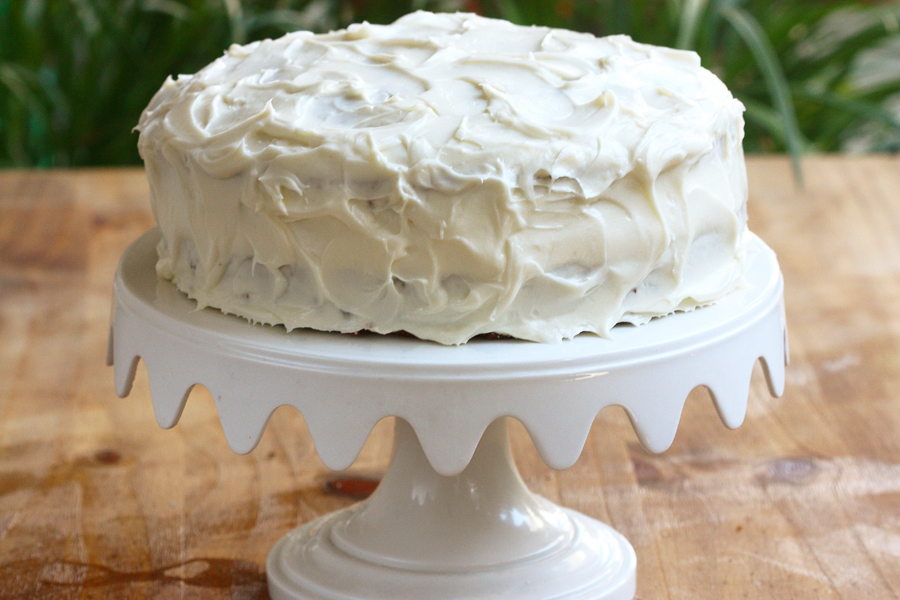
OR you could be lazy and, taking a knife, swirl on a second layer of frosting.

Take the parchment from the sides and you’re set to present, eat, and devour your carrot cake.


Tasty Kitchen Blog: Best Carrot Cake of All Time. Guest post by Adrianna Adarme of A Cozy Kitchen, recipe submitted by TK members Katy and Christine (kpurwin) of Young and Hungry.

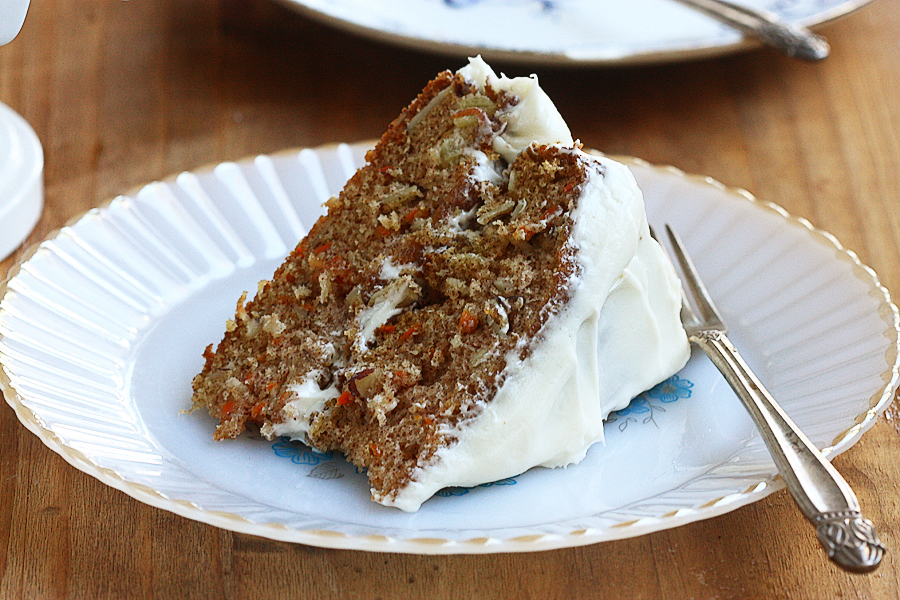
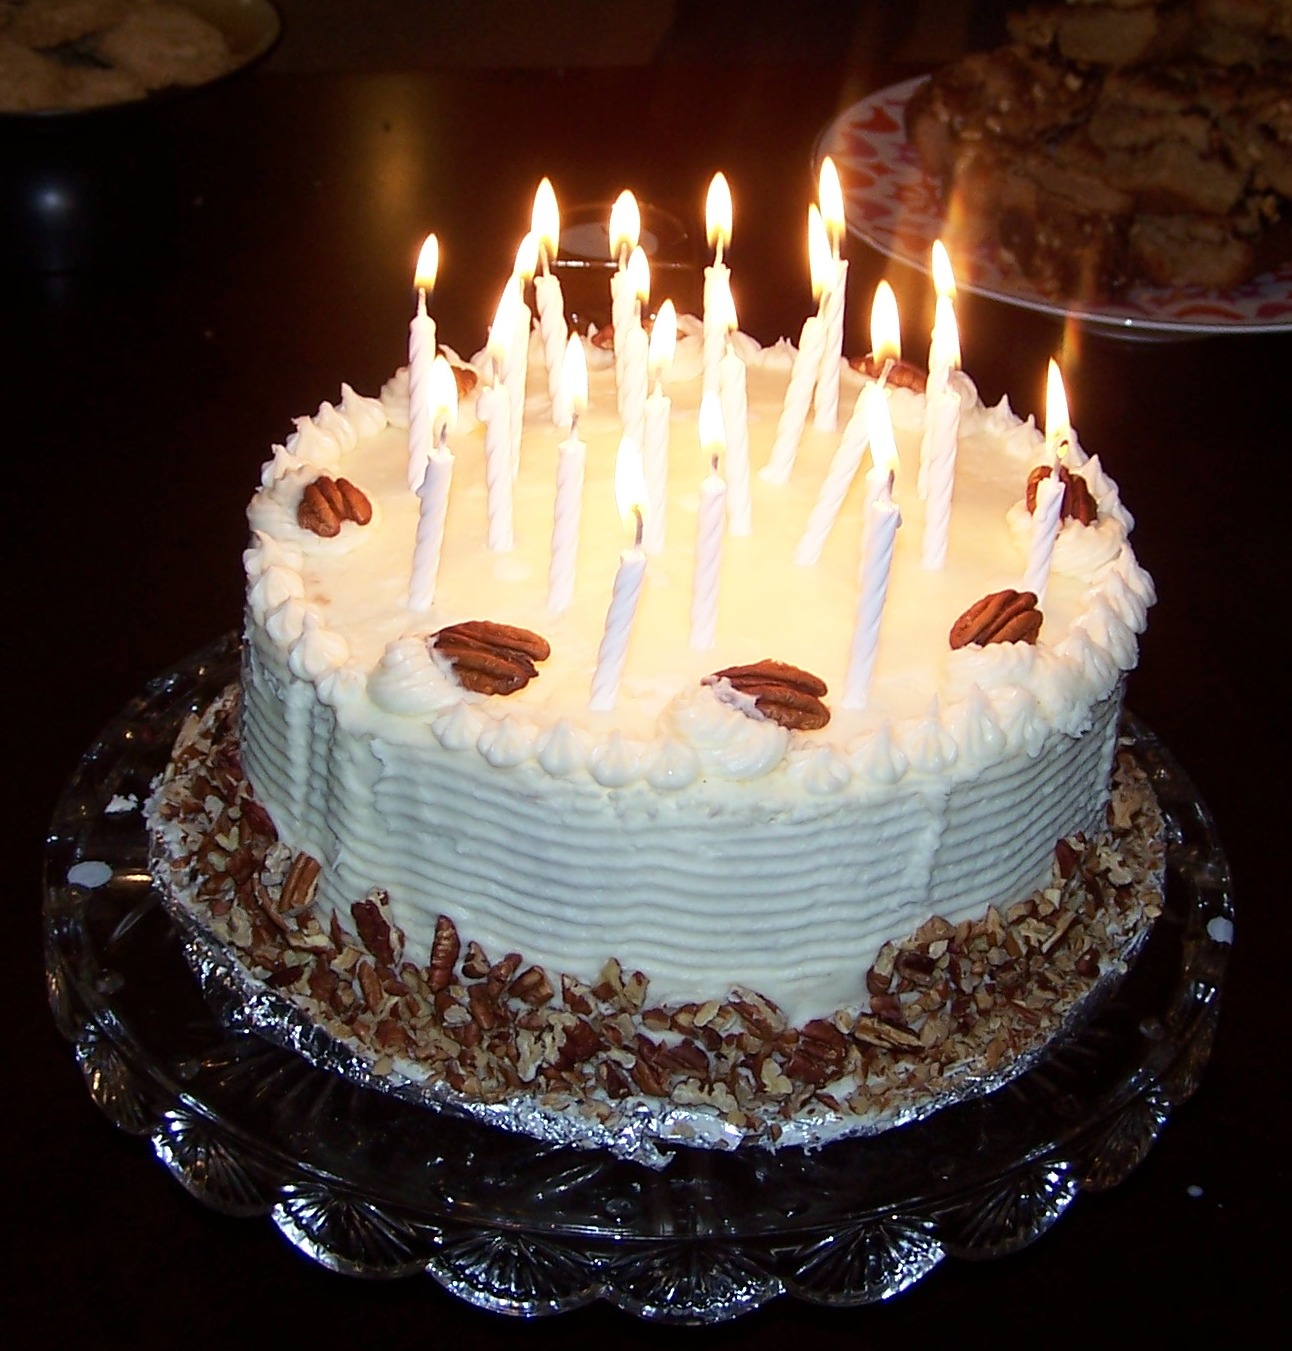
As promised, this recipe really is for the best carrot cake ever. There’s loads of texture, plenty of moistness and the combination of the buttermilk glaze and cream cheese frosting absolutely result in the best carrot cake of all time. This carrot cake deserves a place in everyone’s recipe box/arsenal.

Thank you Katy and Christine for creating two towers of heaven! Visit their site Young and Hungry for more of their recipes.


Printable Recipe

Best Carrot Cake of All Time

See post on kpurwin’s site!
4.80 Mitt(s) 25 Rating(s)25 votes, average: 4.80 out of 525 votes, average: 4.80 out of 525 votes, average: 4.80 out of 525 votes, average: 4.80 out of 525 votes, average: 4.80 out of 5

Prep Time:

Cook Time:

Difficulty: Intermediate

Servings: 8

8
x

Print Options

Page size Letter 3x5 4x6
Text Size Small Medium Large
Content Include description
Include prep time, etc.
Show image

Description

A buttermilk glaze quickly poured over hot cake layers and allowed to cool results in the moistest cake you’ve ever had! It’s finished, appropriately, with a cream cheese icing.

Ingredients

  • FOR THE CARROT CAKE:
  • 2 cups All-purpose Flour
  • 2 teaspoons Baking Soda
  • ½ teaspoons Salt
  • 2 teaspoons Ground Cinnamon
  • 3 whole Large Eggs
  • 2 cups Sugar
  • ¾ cups Vegetable Oil
  • ¾ cups Buttermilk
  • 2 teaspoons Vanilla Extract
  • 2 cups Grated Carrot
  • 1 can (8 Oz. Can) Crushed Pineapple, Drained
  • 3-½ ounces, weight Flaked Coconut
  • 1 cup Chopped Pecans
  • _____
  • BUTTERMILK GLAZE:
  • ½ cups Sugar
  • ¾ teaspoons Baking Soda
  • ¼ cups Buttermilk
  • ¼ cups Butter Or Margarine
  • ½ Tablespoons Light Corn Syrup
  • ½ teaspoons Vanilla Extract
  • _____
  • Cream Cheese Frosting
  • ¾ cups Butter Or Margarine, Softened
  • 11 ounces, weight Cream Cheese, Softened
  • 3 cups Sifted Powdered Sugar
  • 1-½ teaspoon Vanilla Extract

Preparation Instructions

CAKE:

Heat oven to 350 degrees. Line two 8-inch (or 9-inch) round cakepans with waxed paper. Lightly grease and flour the waxed paper. Set pans aside.

Stir together the flour, baking soda, salt, and cinnamon.

Beat eggs, sugar, oil, buttermilk, and vanilla at medium speed with an electric mixer until smooth. Add the flour mixture, beating at low speed until blended. Fold in grated carrot, pineapple, coconut, and pecans. Pour batter into prepared cake pans.

Bake at 350 degrees for 25 to 30 minutes or until a wooden pick inserted in the center come out clean. Drizzle Buttermilk Glaze evenly over layers; cool in pans on wire racks for 15 minutes. Remove from pans, and cool completely on wire racks. Spread Cream Cheese Frosting between layers and on the top and sides of cake.

BUTTERMILK GLAZE:

Bring sugar, baking soda, buttermilk, butter or margarine, and light corn syrup to a boil in a large Dutch oven over medium-high heat. Boil, stirring often, for 4 minutes. Remove from heat and stir in vanilla.

CREAM CHEESE FROSTING:

Beat butter and cream cheese at medium speed with an electric mixer until creamy. Add powdered sugar and vanilla; beat until smooth.


_______________________________________

Adrianna and Caroline are the lovely ladies behind the scrumptious blog A Cozy Kitchen. It’s filled with all kinds of mouthwatering recipes and gorgeous photography. Whether you’re in the mood for something vegetarian or meaty, fancy or pure comfort, light or decadent, there’s sure to be something there for everyone.


Profile photo of twopeasandtheirpod

Basil Butter Garlic Bread

Posted by in Step-by-Step Recipes

Tasty Kitchen Blog: Basil Butter Garlic Bread. Guest post by Maria Lichty of Two Peas and Their Pod, recipe submitted by TK member Jenna (kitchenlovenest) of Jenna's Everything Blog.

 
Our herb garden is going crazy this year. I am not complaining because I love fresh herbs, but I am having a hard time keeping up. Our basil plants are especially out of control. I’ve made several batches of pesto, but every time I walk outside it looks like I haven’t touched the plants. They are growing like weeds. 

I am always looking for new ways to use up our basil, so when I saw Jenna’s recipe (TK member kitchenlovenest) for Basil Butter Garlic Bread, I knew I had to try it. I love regular garlic bread and this version looked even better. The garlic bread gets jazzed up with basil butter and Parmesan cheese. 


Tasty Kitchen Blog: Basil Butter Garlic Bread. Guest post by Maria Lichty of Two Peas and Their Pod, recipe submitted by TK member Jenna (kitchenlovenest) of Jenna's Everything Blog.

To make the bread you will need: ciabatta or French bread, butter, olive oil, basil, parsley, garlic, green onion, salt, pepper, and Parmesan cheese. 


Tasty Kitchen Blog: Basil Butter Garlic Bread. Guest post by Maria Lichty of Two Peas and Their Pod, recipe submitted by TK member Jenna (kitchenlovenest) of Jenna's Everything Blog.

First, combine all of the ingredients, except for the bread and cheese, in a food processor. 


Tasty Kitchen Blog: Basil Butter Garlic Bread. Guest post by Maria Lichty of Two Peas and Their Pod, recipe submitted by TK member Jenna (kitchenlovenest) of Jenna's Everything Blog.

Process until smooth. 


Tasty Kitchen Blog: Basil Butter Garlic Bread. Guest post by Maria Lichty of Two Peas and Their Pod, recipe submitted by TK member Jenna (kitchenlovenest) of Jenna's Everything Blog.

Season basil butter with salt and pepper, to taste. 


Tasty Kitchen Blog: Basil Butter Garlic Bread. Guest post by Maria Lichty of Two Peas and Their Pod, recipe submitted by TK member Jenna (kitchenlovenest) of Jenna's Everything Blog.

Cut the bread in half using a bread knife. 


Tasty Kitchen Blog: Basil Butter Garlic Bread. Guest post by Maria Lichty of Two Peas and Their Pod, recipe submitted by TK member Jenna (kitchenlovenest) of Jenna's Everything Blog.

Spread the basil butter generously over each half of bread. 


Tasty Kitchen Blog: Basil Butter Garlic Bread. Guest post by Maria Lichty of Two Peas and Their Pod, recipe submitted by TK member Jenna (kitchenlovenest) of Jenna's Everything Blog.

Put the bread halves together and wrap in aluminum foil. Bake for 10 minutes at 400 degrees F. 


Tasty Kitchen Blog: Basil Butter Garlic Bread. Guest post by Maria Lichty of Two Peas and Their Pod, recipe submitted by TK member Jenna (kitchenlovenest) of Jenna's Everything Blog.

Remove the bread from the oven and carefully separate the bread halves. Sprinkle each half with Parmesan cheese. 


Tasty Kitchen Blog: Basil Butter Garlic Bread. Guest post by Maria Lichty of Two Peas and Their Pod, recipe submitted by TK member Jenna (kitchenlovenest) of Jenna's Everything Blog.

Return the bread halves to the oven and turn up the heat to 500 degrees F or put them under the broiler. Cook until the cheese is melted and bubbly. 


Tasty Kitchen Blog: Basil Butter Garlic Bread. Guest post by Maria Lichty of Two Peas and Their Pod, recipe submitted by TK member Jenna (kitchenlovenest) of Jenna's Everything Blog.

Cut the bread into slices and serve warm. 


Tasty Kitchen Blog: Basil Butter Garlic Bread. Guest post by Maria Lichty of Two Peas and Their Pod, recipe submitted by TK member Jenna (kitchenlovenest) of Jenna's Everything Blog.

We made the bread for a pizza party and everyone loved it. It was the perfect appetizer. The basil butter is full of flavor and the perfect addition to garlic bread. The melted cheese on top also makes this bread extra special. If you are looking for a way to spice up traditional garlic bread, try this Basil Butter Garlic Bread. It is easy to make and out of this world delicious. Thanks Jenna for helping us use up our garden basil. We love this bread! Visit her blog, Jenna’s Everything Blog, for other tasty recipes. 


Printable Recipe

Basil Butter Garlic Bread

See post on kitchenlovenest’s site!
4.83 Mitt(s) 6 Rating(s)6 votes, average: 4.83 out of 56 votes, average: 4.83 out of 56 votes, average: 4.83 out of 56 votes, average: 4.83 out of 56 votes, average: 4.83 out of 5

Prep Time:

Cook Time:

Difficulty: Easy

Servings: 6

6
x

Print Options

Page size Letter 3x5 4x6
Text Size Small Medium Large
Content Include description
Include prep time, etc.
Show image

Description

Garden overflowing with basil? Look no further for a recipe that will use a generous handful!

Ingredients

  • 2 ounces, weight Butter
  • 2 Tablespoons Olive Oil
  • 1 bunch Basil Leaves (generous Handful)
  • 1 bunch Parsley (use 1/3 Of The Amount Of Basil)
  • 2 cloves Garlic
  • 1 whole Green Onion
  • 2 pinches Salt To Taste
  • 1 pinch Pepper To Taste
  • 1 loaf Ciabatta Or French Bread
  • 1-½ cup Grated Parmesan Cheese (up To 2 Cups)

Preparation Instructions

1. Combine all the ingredients except the bread and cheese in a food processor, and process until smooth. Season with salt and pepper.
2. Cut open the loaf of bread and spread both halves with the basil butter. Put the halves together and wrap in aluminum foil. Bake for in a 400ºF oven for 10 minutes.
3. Remove the bread, separate the halves and load them up with Parmesan cheese. Return them to the oven and either crank up the heat to 500ºF or put them under the broiler.
4. Cook until the cheese is melted, bubbly, and starting to get brown. Serve!


_______________________________________

Maria and her husband Josh (who she affectionately refers to as her “dough boy”) blog at Two Peas and Their Pod. They’ve been featured on Saveur, Eatocracy, Gourmet Live, Glamour, and the Los Angeles Times, to name just a few. We’re so glad to have them here!


Profile photo of georgiapellegrini

Quinoa Salad

Posted by in Step-by-Step Recipes

Tasty Kitchen Blog: Quinoa Salad with Chickpeas, Kalamata Olives & Mint. Guest post by Georgia Pellegrini, recipe submitted by TK member Dara Michalski of Cookin' Canuck.

Quinoa has always been one of my favorite grains. I love the subtle crunch that it has when cooked and that it is so high in protein. It’s been slowly rising to stardom recently. It’s a grain-like crop grown for its edible seeds. It’s considered a “pseudocereal,” whatever that means—not a true cereal, not a grain, since it’s not a grass. It’s related to species like beets, spinach and tumbleweeds. It is 6,000 years old and is native to the Andean region of South America. The main reason its star is on the rise here is because of its incredible nutritional value, but I like it because it takes on so many other flavors as a salad. So when I saw this Quinoa Salad with Chickpeas, Kalamata Olives & Mint recipe by the fabulous Dara of Cookin Canuck, I knew I wanted to give it a try.


Tasty Kitchen Blog: Quinoa Salad with Chickpeas, Kalamata Olives & Mint. Guest post by Georgia Pellegrini, recipe submitted by TK member Dara Michalski of Cookin' Canuck.

Here is what you will need: quinoa, white wine vinegar, salt, pepper, olive oil, tomato, Kalamata olives, garbanzo beans, honey, lemon and fresh mint.

I just love fresh mint in the summer.


Tasty Kitchen Blog: Quinoa Salad with Chickpeas, Kalamata Olives & Mint. Guest post by Georgia Pellegrini, recipe submitted by TK member Dara Michalski of Cookin' Canuck.

Get the quinoa cooking in water while you prep the rest of the ingredients.

Once it is fluffy, let it cool. You can even be very smart about it like Dara was and lay it out on a sheet to help it cool quickly and evenly.


Tasty Kitchen Blog: Quinoa Salad with Chickpeas, Kalamata Olives & Mint. Guest post by Georgia Pellegrini, recipe submitted by TK member Dara Michalski of Cookin' Canuck.

Next chop the Kalamata olives roughly.


Tasty Kitchen Blog: Quinoa Salad with Chickpeas, Kalamata Olives & Mint. Guest post by Georgia Pellegrini, recipe submitted by TK member Dara Michalski of Cookin' Canuck.

Then make a small dice with the fresh tomato. You could also use cherry tomatoes or grape tomatoes here, whatever is easiest!


Tasty Kitchen Blog: Quinoa Salad with Chickpeas, Kalamata Olives & Mint. Guest post by Georgia Pellegrini, recipe submitted by TK member Dara Michalski of Cookin' Canuck.

Combine the tomatoes, olives and garbanzos in a bowl and set aside.


Tasty Kitchen Blog: Quinoa Salad with Chickpeas, Kalamata Olives & Mint. Guest post by Georgia Pellegrini, recipe submitted by TK member Dara Michalski of Cookin' Canuck.

To make the dressing, squeeze some lemon juice into a small bowl.


Tasty Kitchen Blog: Quinoa Salad with Chickpeas, Kalamata Olives & Mint. Guest post by Georgia Pellegrini, recipe submitted by TK member Dara Michalski of Cookin' Canuck.

Next add the white wine vinegar. You could also add another vinegar that you have on hand: cider vinegar, red wine vinegar, champagne vinegar or whatever else suits your fancy.


Tasty Kitchen Blog: Quinoa Salad with Chickpeas, Kalamata Olives & Mint. Guest post by Georgia Pellegrini, recipe submitted by TK member Dara Michalski of Cookin' Canuck.

Next comes the honey. We just harvested the honey from our bees so this was hot off the presses, or rather hot off the hives. It’s very light and floral tasting, perfect for a salad.


Tasty Kitchen Blog: Quinoa Salad with Chickpeas, Kalamata Olives & Mint. Guest post by Georgia Pellegrini, recipe submitted by TK member Dara Michalski of Cookin' Canuck.

Add a little sprinkle of salt!


Tasty Kitchen Blog: Quinoa Salad with Chickpeas, Kalamata Olives & Mint. Guest post by Georgia Pellegrini, recipe submitted by TK member Dara Michalski of Cookin' Canuck.

Some peppa …


Tasty Kitchen Blog: Quinoa Salad with Chickpeas, Kalamata Olives & Mint. Guest post by Georgia Pellegrini, recipe submitted by TK member Dara Michalski of Cookin' Canuck.

And a drizzle of olive oil. Whisk it all together.


Tasty Kitchen Blog: Quinoa Salad with Chickpeas, Kalamata Olives & Mint. Guest post by Georgia Pellegrini, recipe submitted by TK member Dara Michalski of Cookin' Canuck.

Then comes the fresh mint, which you chop into a chiffonade or even tear up by hand.


Tasty Kitchen Blog: Quinoa Salad with Chickpeas, Kalamata Olives & Mint. Guest post by Georgia Pellegrini, recipe submitted by TK member Dara Michalski of Cookin' Canuck.

Add the quinoa and the fresh mint and stir it all together until it’s nicely mixed.


Tasty Kitchen Blog: Quinoa Salad with Chickpeas, Kalamata Olives & Mint. Guest post by Georgia Pellegrini, recipe submitted by TK member Dara Michalski of Cookin' Canuck.

Then drizzle in your dressing. The quinoa will soak up some of the dressing and be even more delicious.


Tasty Kitchen Blog: Quinoa Salad with Chickpeas, Kalamata Olives & Mint. Guest post by Georgia Pellegrini, recipe submitted by TK member Dara Michalski of Cookin' Canuck.

This makes a wonderful cold salad for a summer party, or also slightly warm.

Thanks to Dara for this tasty recipe. Check out her website Cookin Canuck for more!


Printable Recipe

Quinoa Salad with Chickpeas, Kalamata Olives & Mint

See post on cookincanuck’s site!
4.00 Mitt(s) 2 Rating(s)2 votes, average: 4.00 out of 52 votes, average: 4.00 out of 52 votes, average: 4.00 out of 52 votes, average: 4.00 out of 52 votes, average: 4.00 out of 5

Prep Time:

Cook Time:

Difficulty: Easy

Servings: 6

6
x

Print Options

Page size Letter 3x5 4x6
Text Size Small Medium Large
Content Include description
Include prep time, etc.
Show image

Description

If you loaded the amount of quinoa our family eats in one year into a small boat, that vessel would sink to the bottom of the sea faster than you could say “healthy mini grain” five times fast. This salad is another example of our healthy obsession.

Ingredients

  • 1 cup Quinoa
  • 2 cups Water
  • 1 can (14 Oz.) Chickpeas, Drained And Rinsed
  • 1-½ cup Quartered Cherry Tomatoes
  • ½ cups Pitted And Sliced Kalamata Olives
  • 2 Tablespoons White Wine Vinegar
  • 1 Tablespoon Fresh Lemon Juice
  • ¾ teaspoons Honey
  • ½ teaspoons Kosher Salt
  • ¼ teaspoons Freshly Ground Black Pepper
  • ¼ cups Extra Virgin Olive Oil
  • 4 leaves Fresh Mint, Thinly Sliced

Preparation Instructions

In a fine-mesh strainer, rinse quinoa well and drain.

In a medium pot, combine quinoa and water. Bring to a boil, then cover the pot and turn heat to low. Cook until all the water is absorbed, about 20 minutes. Remove from the heat, fluff the quinoa and transfer to a cookie sheet, spreading the quinoa in a thin layer, to cool.

In a large bowl, mix together cooled quinoa, chickpeas, tomatoes and kalamata olives. Stir well.

For the dressing, whisk together white wine vinegar, lemon juice, honey, salt, and pepper in a medium bowl. While whisking constantly, slow pour in the olive oil until combined.

Pour the dressing over the quinoa salad, toss to coat and stir in fresh mint. Serve.


_______________________________________

There’s so much to say about Georgia, we don’t know where to start. Leaving Wall Street for the French Culinary Institute, followed by a stint at the Gramercy Tavern and La Chassagnette in France, her passion for food and food traditions are evident and inspiring. Visit her site at Georgia Pellegrini, where you’ll find more recipes, photos, learn all about her wonderful book Food Heroes, and enjoy her latest adventures.


Profile photo of missamy

Homemade Goldfish Crackers

Posted by in Baking, Step-by-Step Recipes

Tasty Kitchen Blog: Homemade Goldfish Crackers. Guest post by Amy Johnson of She Wears Many Hats, recipe submitted by TK member Erin of Dinners, Dishes and Desserts.

 
There are amazing recipes all over the internets—impressive cakes and cookies, pies galore, delicious pasta dishes, fantastic dinner ideas, and so much more. But what has had me a little stumped were homemade crackers. Homemade crackers? Who in the world has time to make homemade crackers? They looked like they’d be difficult and totally something I wouldn’t be able to pull off. But when these Homemade Goldfish Crackers from Erin popped up here on Tasty Kitchen, I decided to try my hand at them.

Let me tell ya, they were pretty darn easy. And cheesy, too. The recipe was adapted from ReadyMade magazine and it’s totally a fun little cooking project to do with kids. My children are older now, but when they were younger this would have been a great rainy day project to have them join in on. There are only five ingredients with very little prep. The cutting takes a little more time but that’s where the fun for the kids comes in. Use itty bitty cookie cutters, icing tips or make your own cookie cutter shapes out of an aluminum can (see below). The crackers puff up to a chewy, cheesy bite.

Wanna see how?


Tasty Kitchen Blog: Homemade Goldfish Crackers. Guest post by Amy Johnson of She Wears Many Hats, recipe submitted by TK member Erin of Dinners, Dishes and Desserts.

Before getting started, decide on what shapes you’ll be cutting out. Using an aluminum can and tape, I cut a thin strip and formed my fishy, then taped the edges together with clear packing tape.


Tasty Kitchen Blog: Homemade Goldfish Crackers. Guest post by Amy Johnson of She Wears Many Hats, recipe submitted by TK member Erin of Dinners, Dishes and Desserts.

I had so much fun I couldn’t stop, and made a Pac-Man and a football. The ideas for shapes you could create are endless! Large icing tips and small cookie cutters work well, too.


Tasty Kitchen Blog: Homemade Goldfish Crackers. Guest post by Amy Johnson of She Wears Many Hats, recipe submitted by TK member Erin of Dinners, Dishes and Desserts.

You’ll need just a few simple ingredients: shredded cheese, butter, flour, salt and cold water. That’s it!


Tasty Kitchen Blog: Homemade Goldfish Crackers. Guest post by Amy Johnson of She Wears Many Hats, recipe submitted by TK member Erin of Dinners, Dishes and Desserts.

Begin combining everything, except the water, in a food processor until the dough looks like sand.


Tasty Kitchen Blog: Homemade Goldfish Crackers. Guest post by Amy Johnson of She Wears Many Hats, recipe submitted by TK member Erin of Dinners, Dishes and Desserts.

Next, pulse in the water, 1 tablespoon at a time, until combined.


Tasty Kitchen Blog: Homemade Goldfish Crackers. Guest post by Amy Johnson of She Wears Many Hats, recipe submitted by TK member Erin of Dinners, Dishes and Desserts.

Remove the dough from the processor and form into a small, tidy package. Wrap in plastic and chill for 20 minutes.


Tasty Kitchen Blog: Homemade Goldfish Crackers. Guest post by Amy Johnson of She Wears Many Hats, recipe submitted by TK member Erin of Dinners, Dishes and Desserts.

Once chilled, roll out the dough. I found the thinner the dough, the crispier the cracker.


Tasty Kitchen Blog: Homemade Goldfish Crackers. Guest post by Amy Johnson of She Wears Many Hats, recipe submitted by TK member Erin of Dinners, Dishes and Desserts.

Now, the cutting fun begins!


Tasty Kitchen Blog: Homemade Goldfish Crackers. Guest post by Amy Johnson of She Wears Many Hats, recipe submitted by TK member Erin of Dinners, Dishes and Desserts.

Place crackers on a lined cookie sheet and bake at 350°F for about 15 minutes. I began with little fishies.


Tasty Kitchen Blog: Homemade Goldfish Crackers. Guest post by Amy Johnson of She Wears Many Hats, recipe submitted by TK member Erin of Dinners, Dishes and Desserts.

Then moved on to the footballs and then the Pac-Man (or Mrs. Pac-Man).


Tasty Kitchen Blog: Homemade Goldfish Crackers. Guest post by Amy Johnson of She Wears Many Hats, recipe submitted by TK member Erin of Dinners, Dishes and Desserts.

Aren’t they cute? They puff up a tad, resulting in a chewy, cheesy cracker.


Tasty Kitchen Blog: Homemade Goldfish Crackers. Guest post by Amy Johnson of She Wears Many Hats, recipe submitted by TK member Erin of Dinners, Dishes and Desserts.

Look! Pac-Man is after a fish.


Tasty Kitchen Blog: Homemade Goldfish Crackers. Guest post by Amy Johnson of She Wears Many Hats, recipe submitted by TK member Erin of Dinners, Dishes and Desserts.

Have fun with this one y’all! I enjoyed making these and I think you will too. Get creative and let the kids join in!

Thanks Erin for submitting this darling recipe. I felt like a kid again! Be sure to check out Erin’s blog, Dinners, Dishes, and Desserts, for more of her recipes.


Printable Recipe

Homemade Goldfish Crackers

See post on Erin’s site!
5.00 Mitt(s) 14 Rating(s)14 votes, average: 5.00 out of 514 votes, average: 5.00 out of 514 votes, average: 5.00 out of 514 votes, average: 5.00 out of 514 votes, average: 5.00 out of 5

Prep Time:

Cook Time:

Difficulty: Easy

Servings: 7

7
x

Print Options

Page size Letter 3x5 4x6
Text Size Small Medium Large
Content Include description
Include prep time, etc.
Show image

Description

Your favorite fish cracker made at home – and it is SUPER easy.

Ingredients

  • 8 ounces, weight Sharp Cheddar Cheese, Shredded
  • 4 Tablespoons Butter, Cut Into Cubes
  • 1 cup Flour
  • ¾ teaspoons Salt
  • 2 Tablespoons Cold Water

Preparation Instructions

Pulse everything (except water) together in the food processor until the dough resembles coarse sand.

Pulse in water, 1 tablespoon at a time.

Remove dough from the processor, wrap in plastic, and chill for 20 minutes.

Roll out the dough and cut into desired shapes. You can use a toothpick to make the eyes and smile if desired. Place on a parchment paper lined cookie sheet.

Bake at 350 degrees F for about 15 minutes, or until crispy.

Makes approximately 7 dozen crackers.


_______________________________________

Amy Johnson is a blogger who writes about food, travel, the home (both inside and out), and various observations and random musings about anything and everything. Visit her blog She Wears Many Hats for a dose of deliciousness, practicality, hilarity, or just plain fun. She lives in South Carolina with her husband and two children.


Profile photo of Erica Lea

Smoky BBQ Sauce

Posted by in Step-by-Step Recipes

Pungent spices. Tangy vinegar. Sweet maple syrup. A hint of smoke. These rich flavors meld together to make the perfect BBQ sauce. Not only is this BBQ sauce wonderfully tasty, it's also super easy to make. Just whisk a few ingredients together, and you're done! Plus, it's much less expensive than the gourmet sauces you find at the grocery store. And you know exactly…